Quantcast
Channel: Windows 8 – Password Recovery
Viewing all 396 articles
Browse latest View live

How to Bypass Windows 8.1 Password on Lenovo Yoga Laptop

$
0
0

Forgot the admin password to your Lenovo Yoga laptop? Ever wondered how to recover or reset a forgotten password in Windows 8.1? PCUnlocker is a reliable, self-booting recovery CD that can reset the password of Windows 8, 7, Vista and XP. Just boot up your Lenovo Yoga laptop with PCUnlocker Live CD and you can bypass Windows 8.1 password easily!

Note: This method works on all Lenovo Yoga series laptops that come with Windows 8.1 pre-installed, including Lenovo Yoga 2 Pro. Of course, you can also use PCUnlocker to bypass Windows 8.1 passwords on HP, Dell, Sony, Toshiba, Acer and other laptops or tablets.

How to Bypass Windows 8.1 Password on Lenovo Yoga Laptop?

Before getting started, you need to make a PCUnlocker Live CD on an alternate computer. Download the zipped ISO image of PCUnlocker and extract it. Next burn the resulting pcunlocker.iso file to a blank CD (or USB stick) using the ISO2Disc program.
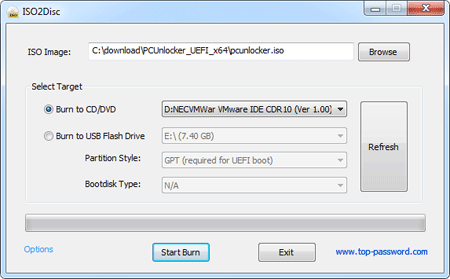
Put the CD in the CD drive of your Lenovo Yoga laptop. To get the laptop to boot from CD, we need to go into the BIOS and switch the Boot Mode from Unified Extensible Firmware Interface (UEFI) to Compatibility Support Mode (CSM). When the computer is off, press the Novo button and then select BIOS Setup.

In the BIOS Setup Utility, go to Security tab, and disable the Secure Boot option. Next, on the Boot tab, change the Boot Mode from UEFI to Legacy Support. Save the changes and exit BIOS. Shut down the laptop and then press the Novo button again and then choose Boot Menu. Choose to boot from PCUnlocker Live CD.

The laptop will load the WinPE OS from CD and open up the PCUnlocker utility. At this point the program can directly access the Security Accounts Manager (SAM) database and extract all your Windows user accounts.

Select your user account and click on “Reset Password” button. The program will reset your forgotten password by modifying the stored password hashes in the SAM registry file. Restart the computer and take out the CD. You can then log back into your Lenovo Yoga Windows 8.1 laptop with a blank password!

Conclusion

The advantage of this method is that it is very quick if you already have the PCUnlocker Live CD in your tool box. Thus it is useful for admins who have to perform this procedure often.

Reset Forgotten Windows 8 Password on ASUS Transformer Book T300/T100

$
0
0

How to unlock ASUS Transformer Book T300 after forgotten Windows 8 password? If you’ve tried the free password cracking Live CDs like Ophcrack or BartPE, you’ll soon realize that they won’t boot up on ASUS Transformer Book T300/T100. That is because ASUS Transformer Book T300/T100 is shipped with UEFI firmware instead of traditional BIOS.

In this situation, PCUnlocker can be of help and it fully supports UEFI booting. This guide will help you make a PCUnlocker Live USB with UEFI bootloader, and then use it to reset forgotten Windows 8 password on ASUS Transformer Book T300/T100.

Part 1: Preparing a bootable PCUnlocker USB drive

1. Download the zipped ISO image of PCUnlocker and save it on your local hard drive. Unzip it and you’ll see an ISO image named pcunlocker.iso.

2. Plug a 1GB or larger USB flash drive into your computer.

3. Download Rufus, a tool for creating bootable USB drives. Double-click the Rufus file to launch the utility.

4. Choose the drive letter for the flash drive you jut plugged in under the “Device” drop-down menu. Choose “GPT partition scheme for UEFI computer” and “FAT32″.

5. Make sure the box that says “Create a bootable disk using” is checked, and choose “ISO Image” and click the drive icon on the right to open an Explorer window and find your pcunlocker.iso image.

rufus

6. Click start. The computer will format your USB flash drive and prepare it as a bootable drive with UEFI bootloader. When the process is complete, eject it from your PC and move on to the next step.

Part 2: Booting PCUnlocker on the Asus Transformer Book T300/T100

1. Plug the PCUnlocker USB drive into the USB port of your Asus Transformer Book T300/T100.

2. While turning on the Asus Transformer Book, press and hold the F2 key so that you can enter into BIOS Setup. Another method is to hold down the volume down button while switching on. You then get 2 options to continue to boot into Windows or BIOS Setup. Then if you haven’t attached the keypad use the volume buttons to select “Enter Setup”.

3. In the BIOS Setup, navigate to the “Save and Exit” menu, you should see an option under Boot Override that has the name of your USB flash drive. Select your USB drive under the boot override option and hit Enter. Your computer should now boot from PCUnlocker USB drive.

Part 3: Reset Forgotten Windows 8 Password

Once you’ve booted into PCUnlocker, you’ll see a list of Windows 8 local accounts that are extracted from your Windows SAM database. Select a user account and click on “Reset Password” button, the program will remove your forgotten password in seconds.

If you’re using a Microsoft account as your machine’s login, there should be a local account that is linked to your Microsoft account, select that local account and reset the password. The program will assign a new password: Password123 so you can later log into your Windows 8 system locally.

So this is how can you easily reset forgotten Windows 8 password on ASUS Transformer Book T300/T100!

Reset Forgotten Windows Password for Xen Virtual Machine

$
0
0

Forgot Windows password to a Xen virtual machine? How can I reset a Windows 2008 (Xen HMV) VPS administrator login? To reset a lost VM password, you will need a tool called PCUnlocker. This software exists of a bootable CD image which can be burned to a CD or USB drive. Basically, you boot a Xen VM from the CD image and it allows you to reset forgotten Windows password offline.

How to Reset Forgotten Windows Password for Xen Virtual Machine?

  1. Download the self-extracting Zip archive of PCUnlocker and save it to your host OS. Extract the CD image (pcunlocker.iso) from the downloaded file. If you’ve enabled EFI/UEFI in your Xen VM, you need to use PCUnlocker Enterprise which supports UEFI booting.
  2. Start virt-manager (also known as Virtual Machine Manager). Select your Windows VM that need a password reset, click on EDIT menu at the top and then select Virtual Machine Details.
  3. In the Details window, click on IDE CDROM 1 tab. Click Connect to mount the PCUnlocker ISO image (pcunlocker.iso) to the virtual CD drive.
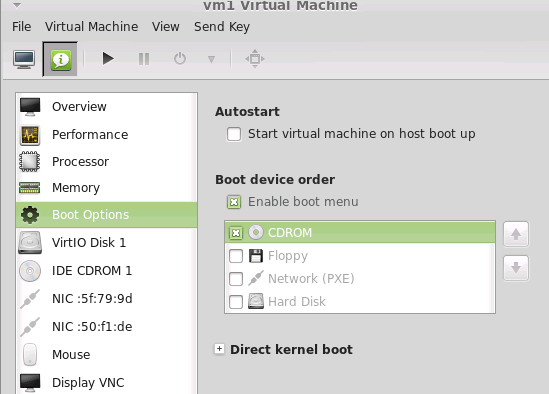
  4. Click on the Boot Options tab. Tick Enable boot menu. Check the CDROM item and put the CDROM item on top of the boot device list. Click Apply to save your changes.

    xen-boot-order

  5. Power on your Windows virtual machine and Xen will now boot from the PCUnlocker CD image, loading the WinPE OS and taking you directly into the tool. This program automatically finds your Windows SAM file and show you a list of local accounts.

  6. Select one of your user accounts and click on Reset Password button. It will reset your Windows VM password quickly, as well as unlock the account in the event it is locked out, disabled or expired.
  7. Disconnect your CD drive and restart the VM. Now you can enjoy log on to your Windows virtual machine without entering any password.

Using the same method you can reset lost Windows password for any virtual machine running in KVM, Xen, Qemu. This works with all versions of Windows, including Windows 8.1 and Windows Server 2012.

Login to Windows 8 Microsoft Account Automatically without Password

$
0
0

I just received a new computer with Windows 8.1. When I boot it up, I set up a Microsoft account login. I am the only user on this computer. However, my Microsoft account has a secure (long, hard to type/remember) password. I don’t want to type in my password each time that I restart the computer. Is there some way to override this feature?

Luckily, even with the Microsoft account, you can configure Windows 8 to login automatically. If you’re the only user on the system you may want to speed up the logon process by enabling automatic logon feature. This tutorial will show you how to bypass Windows 8 login screen and thus sign into Microsoft account automatically without entering a password.

Tips: If you’ve forgotten your Microsoft account password and unable to reset the password online, you can bypass Windows 8 Microsoft account password with PCUnlocker, so you can still log back into your system and regain access to all your files.

How to Login to Windows 8 Microsoft Account Automatically?

Before you begin, you must be logged into an administrator level account for you Windows 8 PC for these steps to work.

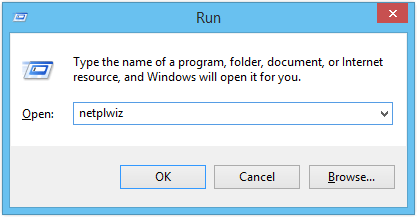
  1. Press the Windows + R keyboard combination to bring up a Run box, when it appears type netplwiz and hit Enter.

    netplwiz

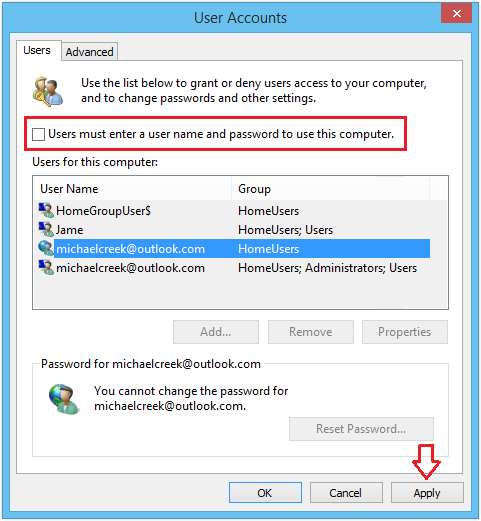
  2. This will open the User Accounts dialog box, which will display a list of all the users on your computer, including both local accounts and Microsoft accounts.
  3. Next click on the username in the bottom window, which should be your email address if you are using the Microsoft account to log into your Windows 8 PC.  Uncheck the Users must enter a username and password to use this computer checkbox.

    windows-8-user-accounts

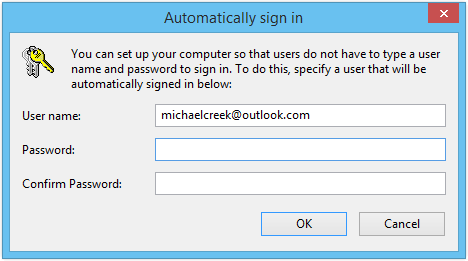
  4. Click Apply and you’ll get a pop up dialog that asks you to enter your login credentials. Just type in your Microsoft account password twice and click OK.

    automatically-login

  5. Now go ahead and restart your computer and Windows 8 should automatically boot up to the Start Screen, without prompting you to enter a Microsoft account password.

However, we don’t recommend to enable automatic login if your PC is accessible by multiple users or while you’re traveling. To re-enable the log-in screen, simply return to the User Accounts dialog box using the steps above and click on the check-box for the “Users must enter a user name and password to use this computer” option.

2 Options to Disable “Press Ctrl+Alt+Del to Log on” in Windows

$
0
0

How to bypass the Ctrl+Alt+Del logon prompt? One way of adding an additional layer of security to your computer is by enabling secure logon. By enabling secure logon, users are required to press Ctrl+Alt+Del before they can enter their credentials and log on. However, if you’re tried of pressing Ctrl+Alt+Del every time you turn on the computer, there are two easy options to disable the secure logon.

Option 1: Disable Secure Logon in the User Accounts Applet

  1. Press Windows key + R to bring up the Run box. Type netplwiz or Control Userpasswords2 and press Enter.
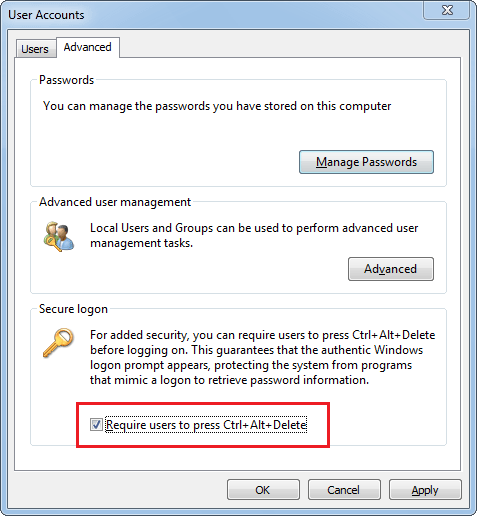
  2. When the User Accounts applet opens, click on Advanced tab.

    secure-logon

  3. Uncheck the Require users to press Ctrl+Alt+Delete checkbox. Click OK. The next time you start the computer it will boot directly to the login credential dialog box, without prompting your to press Ctrl+Alt+Del.

Option 2: Disable Secure Logon through Group Policy

  1. Press Windows key + R to bring up the Run box. Type secpol.msc and press Enter to open the Local Security Policy Editor.
  2. Navigate to Security Settings -> Local Policies -> Security Options.
  3. In the right pane, double click on Interactive logon: Do not require CTRL+ALT+DEL.
  4. Select and set the radio button of Enabled.
  5. Save the policy change by clicking OK.

Bypass Windows 8 Login Screen on Wake up from Sleep

$
0
0

In my previous post I’ve covered how to disable the password login screen in Windows 8, so the computer will automatically logon to Windows 8. Though when you put your computer to sleep, the login screen might pop up after wakeup. In this article I’ll show you 2 methods to bypass Windows 8/8.1 login screen on wake up from sleep or standby.

Method 1: Disable Require Password on Wakeup in Control Panel

  1. Press Windows key + X and select Control Panel.
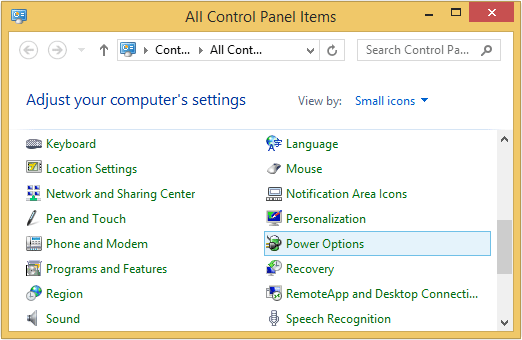
  2. Set your View by option to Small icons. Then select Power Options from the list of computer settings.

    control-panel

  3. From the Power Options window, click the link labeled Require a password on wakeup on the left-hand side.

    power-options

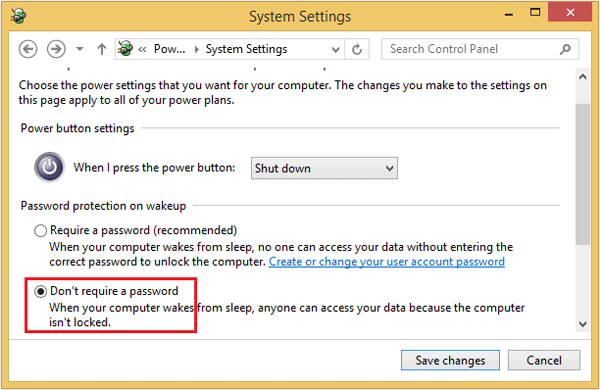
  4. Click the “Change settings that are currently unavailable” link. Now, you can select Don’t require a password under Password protection on wake up. Click on Save changes.

    require-password-on-wakeup

Method 2: Disable Require Password on Wakeup in Charms Bar

  1. From the Start Screen, open the Charms Bar (Windows key + C).
  2. Go to Settings -> Change PC settings.
  3. Go to Accounts -> Sign-in Options.

    change-password-policy

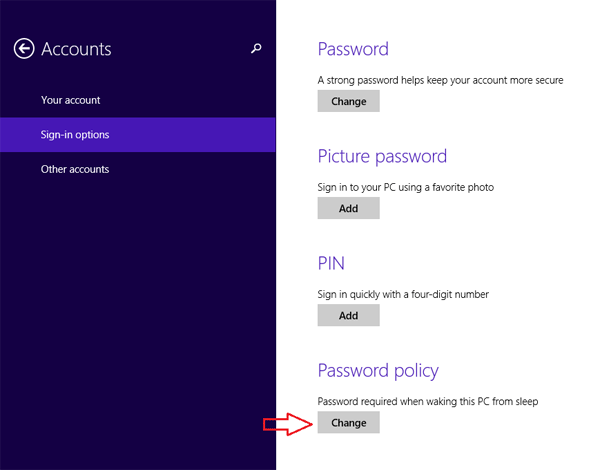
  4. Under the Password Policy section, click on the Change button to get “Password is not required when waking this PC from sleep”.
  5. Reboot your system and it won’t ask you for a password next time you wake it up from sleep.

How to Downgrade from Windows 8 Pro to Windows 7 for Free

$
0
0

After the release of Windows 8, most of the new laptops and desktops are shipping with Windows 8 pre-installed. If you’ve become accustomed to Windows 7 and don’t like Windows 8′s new Metro UI, you can downgrade to Windows 7. Windows 8 Pro comes with a feature called Downgrade Rights, which means you can downgrade from Windows 8 to Windows 7 without paying a penny or having to format the hard drive.

If you want to try this, just make sure your new computer has downgrade rights because not all Windows 8 computers are on the list. These rights are available to PCs which come with Windows 8 Pro pre-installed and not for users who have upgraded to Windows 8 using the promo offer. So it is basically only Windows 8 Pro OEM users. You can only downgrade to Windows 7 Professional or Windows Vista Business, not Windows XP. To learn more about downgrade rights, please check out this complete guide from Microsoft.

Tips: You might need to provide your Windows 8 license key for validating your purchase during exercising your Windows 8 Pro downgrade rights. If you’ve lost the key, you can use KeyFinder Plus to recover it from your current Windows 8 installation.

How to Downgrade from Windows 8 Pro to Windows 7 Pro?

The actual downgrade process is tricky and not a straight forward one. You first need to create a recovery drive for your existing Windows 8 in case you want to bring it back to Windows 8 in future. Once done, you need to disable UEFI and enable Legacy/CSM boot support. You will need a Windows 7 Professional DVD. Insert the Windows 7 installation DVD and boot to it. During the Windows 7 setup, you might need to enter the license key to go past the installation. Here you can enter any used Windows 7 key since activation does not happen here.

Now wait for the install process to complete. Once the process is complete, your PC might show activation failed message or it will not be activated. This is because you have used a key which is already in use. For getting a new key, you need to call up Microsoft support and explain to them about your downgrade rights. Have your Windows 8 Pro key ready which you’ll need to prove your PC has downgrade rights.

Once this is validated, you will receive a new activation key for Windows 7. You will need to do this for all PCs which you have downgraded. You can install back Windows 8 anytime using the recovery drive.

How to Unlock Dell Vostro Laptop After Forgot Windows 8 or 7 Password

$
0
0

Forgot the login password for your Dell Vostro 3560 laptop? How can I bypass or reset a lost administrator password? If you do not want to run the cracking tool on your computer for days/weeks/years in attempting to decrypt the login password, you can quickly delete the forgotten Windows user password with PCUnlocker. In this article we’ll walk you through the steps of resetting lost Windows 8 or Windows 7 password on your Dell Vostro laptops.

How to Unlock Dell Vostro Laptop After Forgot Windows 8 or 7 Password?

PCUnlocker comes as an ISO image that needs to be burned on to a CD, or you can put the ISO on to USB stick using a utility. Then simply boot to the CD or USB to run the utility for unlocking your Windows user password. Here are step-by-step instructions:

  1. Use a spare computer to download the PCUnlocker program. Unzip the downloaded file and you’ll get a pcunlocker.iso image. Burn the ISO image to a blank CD (or USB flash drive) using the freeware ISO2Disc.
  2. After you have the disc, you have to boot your locked Dell Vostro laptop from CD. Turn on the computer. When the DELL logo appears, press F2 immediately to access the BIOS Setup.
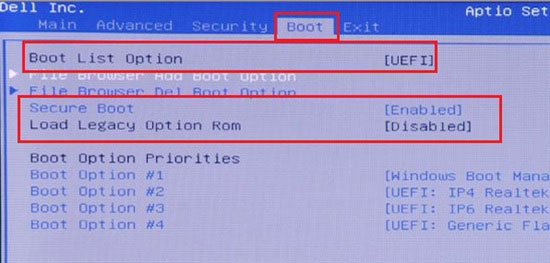
  3. Navigate to the Boot tab, use the arrow keys to move CD/DVD/CD-RW Drive (or USB Storage Device) to the top of bootable device list. If this screen has a setting labeled “Boot List Option”, it indicates your computer is preloaded with the latest UEFI firmware instead of traditional BIOS. You need to change the Boot List Option from UEFI to Legacy, disable Secure Boot and enable Load Legacy Option Rom.

    dell-vostro-bios

  4. Save your changes and exit BIOS Setup. The computer will automatically reboot from your burned CD (or USB flash drive). If everything goes as expected, you’ll come to the PCUnlocker program which shows you a list of user accounts for your Windows installation.
  5. Choose one of Windows accounts and click on Reset Password button. It will unlock / enable the selected account and reset the password as well. If the selected account is a standard account, it will also been promoted to an administrator account.

  6. The last step is to simply click on Restart button to reboot the machine. Make sure to remove the CD or USB so it doesn’t boot again. If you’ve changed the Boot List Option from UEFI to Legacy, you have to switch it back again. Now when you boot the machine the password for that user should be gone!

How to Bypass Windows 8 Password on HP Envy dv6

$
0
0

Locked out of HP Envy dv6 notebook because you’ve misplaced or forgotten your Windows 8 password? Despite being Microsoft’s most secure operating system, it’s possible to bypass or reset Windows 8 local/Microsoft account password with PCUnlocker. This article explains how you can easily bypass Windows 8 password on HP Envy dv6 notebook.

How to Bypass Windows 8 Password on HP Envy dv6?

PCUnlocker comes as an ISO image that needs to be burned on to a CD, or you can put the ISO on to USB stick using a utility. Then simply boot to the CD or USB to run the utility for bypassing Windows 8 password. Here are step-by-step instructions:

  1. Use a spare computer to download the PCUnlocker program. Unzip the downloaded file and you’ll get a pcunlocker.iso image. Burn the ISO image to a blank CD using the freeware ISO2Disc. If you don’t have an optical drive, you can burn the ISO image to a USB flash drive.
  2. Next, you have to boot your locked HP Envy dv6 notebook from the CD/USB drive. Because this Windows 8 laptop comes with UEFI BIOS, you need to firstly enable the Legacy support in the BIOS. Turn on the computer and immediately press the Esc key repeatedly until the Startup Menu opens.

    hp-startup-menu

  3. Use the arrow keys to select BIOS Setup and press Enter. Navigate to the System Configuration menu, use the down arrow key to select Boot Options, then press Enter.
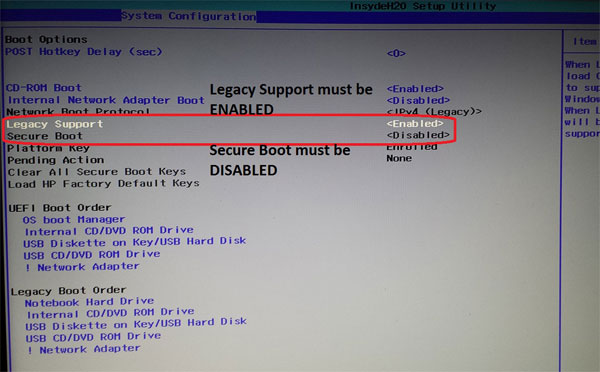
  4. Set “Secure Boot” to “Disabled” and set “Legacy Support” to “Enabled”. Press F10 to save your changes and exit BIOS.

    hp-envy-secure-boot

  5. When the computer has restarted, quickly press the Esc key to access the Startup Menu again. This time select Boot Device Options and press Enter.
  6. When the Boot Option Menu screen appears, use the up or down arrow key to select your boot media (Internal CD/DVD ROM or USB Hard Drive). Then press Enter to boot into that device.
  7. The computer will load the Windows PE operating system from your boot media and take you directly to the PCUnlocker program. Choose the user account where you want to bypass the password, and click on Reset Password button. If you use a Microsoft account as your login method, make sure you choose the local account with the “Description” column shown as your Live account ID.

  8. The program will remove your local account password immediately. As Windows 8 can’t accept blank password for Microsoft account, the program will assign a temporary password Password123 to your Microsoft account.
  9. The last step is to reboot your computer and take out the CD or USB drive. When you come to the Windows 8 login screen, you can log on as your desired account and regain access to all files on your HP Envy dv6 notebook. That’s it!

How to Bypass Windows 8.1 Pro Password on Microsoft Surface Pro 3

$
0
0

If you forgot your password for logging into Microsoft Surface Pro 3, here is how you can bypass Windows 8.1 Pro password so you can sign into your local or Microsoft account again.

Just like Surface Pro or Pro 2, Surface Pro 3 also uses 64-bit UEFI (Unified Extensible Firmware Interface) firmware and it can boot into native UEFI mode only. This makes old-fashioned password cracking bootdisks obsolete, including Offline NT Password & Registry Editor. In this tutorial we’ll explain how to bypass Surface Pro 3 password with PCUnlocker, which supports both UEFI booting and password bypass for local/Microsoft account.

How to Bypass Windows 8.1 Pro Password on Microsoft Surface Pro 3?

To get PCUnlocker to work, you need to use a spare PC to download the Enterprise edition of PCUnlocker which comes as a self-extracting ZIP file. Unzip the downloaded file and you’ll get a CD image called pcunlocker.iso.

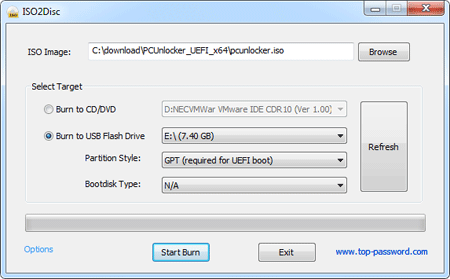
Burn the ISO image to your USB flash drive using the freeware ISO2Disc. Remember to choose the GPT partition style, because MBR-based bootdisk is unable to boot with UEFI mode.

Once you’ve create a PCUnlocker Live USB drive, insert it into the USB port of your Surface Pro 3 tablet. Make sure your tablet is powered off at this point. Press and hold the volume-down button (on the left side of your tablet), then press and release the Power button (on the top). When the Surface logo appears, release the volume-down button. Surface will boot from your USB drive.

After loading the Windows 8 PE from the USB drive, you’ll be taken to the PCUnlocker program. It shows you a list of local accounts that is extracted from your Windows 8.1 SAM registry hive. If you use an email account for signing into your tablet, you can see your email address in the “Description” column of the associated local account.

Select a local account and click on Reset Password button. It will bypass / reset your forgotten login password in no time. If you’ve chosen the local account associated with your email address, the program will assign a new password for your Microsoft account login (Note: this new password can be used to log on your tablet locally).

Now you’ve successfully bypassed Windows 8.1 Pro password on your Surface Pro 3. Restart the computer and disconnect the USB drive, you can then log on your Surface without a password!

Forgot Windows 8 Login Password on HP ProBook Notebook

$
0
0

There are a number of different ways to recover a lost Windows password by using something like Ophcrack which lets you to crack the hashes with rainbow table. However, this is also the most difficult method and can be very time consuming depending on the length of your password.

Instead of recovering the original password, you can reset a forgotten Windows login password instantly. In this tutorial I’ll show you how to reset lost Windows 8 password on a brand new HP ProBook 430 G2 Notebook with PCUnlocker.

How to Reset Windows 8 Login Password on HP ProBook Notebook?

PCUnlocker is a bootable program that needs to run from a bootable CD or USB drive. After you’ve downloaded the PCUnlocker program, unzip the downloaded file and you’ll get an ISO image: pcunlocker.iso. Burn this ISO file to a blank CD or USB thumb drive with ISO2Disc.

Once you’ve created a PCUnlocker Live CD/USB drive, you can now bring it to unlock your HP ProBook notebook. Put the CD in the optical drive or plug the USB drive into the USB port of your HP ProBook laptop. When powering on the laptop, repeatedly press the Esc key to enter the Startup Menu, and follow the prompt to press F10 to enter the BIOS Setup.

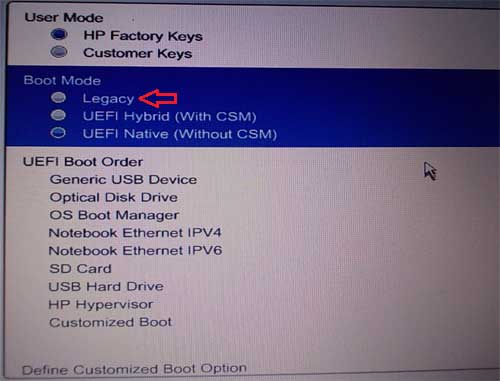
After you’re in the BIOS Setup, navigate to System Configuration > Boot Options. Disable the Secure Boot option and change the Boot Mode from “UEFI Native (Without CSM)” to Legacy.

hp-probook-uefi

Save your changes and exit the BIOS. When your computer is restarting, repeatedly press the Esc key to access the Startup Menu again. Press F9 to enter Boot Device Options, from which you can choose to boot from a CD or USB drive.

Once booted into PCUnlocker Live CD/USB drive, the computer will temporarily load the WinPE OS and take you to the PCUnlocker program. From there you can see a list of local accounts for your Windows 8 installation. In my example, I use a Microsoft account as my computer’s login, and you can see my email address in the Description column of the “Boris” account.

Choose a local account and click on Reset Password button, it will unlock / reset your forgotten Windows 8 login password immediately. Here I choose the “Boris” account and the program assigns a new password (Password123) to my Microsoft account, that is because Windows 8 doesn’t accept a blank password for a Microsoft account.

The last step is restarting your HP ProBook notebook and removing the CD/USB drive. Enter into the BIOS Setup again and change the Boot Mode back to UEFI. After that, you can boot into Windows 8 with a blank password for a local account, or log in as Microsoft account with the new password. That’s it!

How to Troubleshoot Windows Login Problems

$
0
0

Every time you start Windows you’ll be prompted to enter the username and password for logging into your account. Though this is such a routine part of the day that is is easy to not even think about the logon process, things can go wrong for various reasons. In this article we’ll discuss how to troubleshoot the most common Windows login problems you might run into.

Issue 1: I tried to log on, but I keep getting a message telling me that the user name or password is incorrect, or Windows account is locked out

Here are several possible solutions to fix this problem.

  • Caps Lock might be on

    Passwords in Windows are case-sensitive, which means that every time you type your password, you have to capitalize each letter in exactly the same way that you did when you first created it. If you have accidentally pressed Caps Lock, then you’re inadvertently typing your password in all capital letters. Make sure Caps Lock is off, and then type your password again.

  • NumLock key might be enabled

    After enabling the NumLock feature, you’ll find a strange problem and you can’t type normal anymore. For example, when you type in “mjkluio”, your computer would type “0123456″. To turn off NumLock, please check out this article: 3 Methods to Disable NumLock on a Laptop Keyboard.

  • You might be typing the wrong password, or forgot your password

    If you can’t remember your password, you need to reset your password, either with a password reset disk, an administrator account, or a third-party Windows password recovery tool such as PCUnlocker.

  • You might be trying to log on to the wrong user account

    If you have more than one user account on the computer, make sure you’re logging on to the account that matches the password you’re using.

  • Windows account is locked out

    If you’ve enabled the account lockout policy, the Windows account will become locked out after a number of invalid login attempts. The account lockout duration can range is from 1 through 99,999 minutes. A value of 0 specifies that the account will be locked out until an administrator explicitly unlocks it. If you need to access your locked account urgently, PCUnlocker can be of help!

Issue 2: My computer is part of a domain and I want to log on to a local user account, not my domain account

To log on to a local user account on your computer, you need to know the name of your computer and the user name for the account that you want to log on to. To log on to a local user account, follow these steps:

  1. On the Windows login screen, click Switch User.
  2. Click Other User.
  3. In the user name field, type the name of your computer, a backslash (\), and the user name for the account that you want to log on to. For example: computer name\user name
  4. Type your password, and then press Enter.

Issue 3: The user profile service failed the logon. User profile cannot be loaded

Corrupt user profiles are a frustratingly common problem with Windows. When you type your password and press Enter, you will typically see the error message “The User Profile Service failed the logon” and “The user profile cannot be loaded”, and you’ll be returned to the logon screen. Here is a quick registry trick to fix your corrupt user profile.

Issue 4: User account not showing up on login screen

User account is not showing up on Windows Welcome screen? If your account is disabled, it will disappear from your Windows login screen. If you’ve enabled your account but it still doesn’t show up at the login screen, please check out if this registry trick is applied on your system: Hide User Account from Welcome Screen in Windows 8/7/Vista/XP.

Issue 5: Keyboard and mouse stopped working at login screen

Sometimes when the computer boots to the Windows login screen, you might find that the keyboard or mouse stopped working and you can’t type anything. If you’ve ran into this issue, this article should be helpful for you: Keyboard Stop Working at Windows Login Screen.

Use VHD to Dual Boot Windows 8.1 on Windows 7 PC

$
0
0

Got a Windows 7 PC and want to install Windows 8.1 as a second operating system for dual-booting? All you have to do is create a new partition for Windows 8.1, then install it. But what to do if you don’t have a spare partition to do this? In this post we’ll learn how to install Windows 8.1 into a virtual hard disk (VHD) and dual boot Windows 8.1 on a Windows 7 PC, without partitioning.

How to Use VHD to Dual Boot Windows 8.1 on Windows 7 PC?

  1. Boot your computer from Windows 8.1 installation DVD or USB drive. If you have a Windows 8.1 ISO image, you can make a installation disc from the ISO image using the freeware ISO2Disc.
  2. After a few minutes, you’ll see the Windows Setup screen. Pick a language (U.S. English is the default), and click Next.
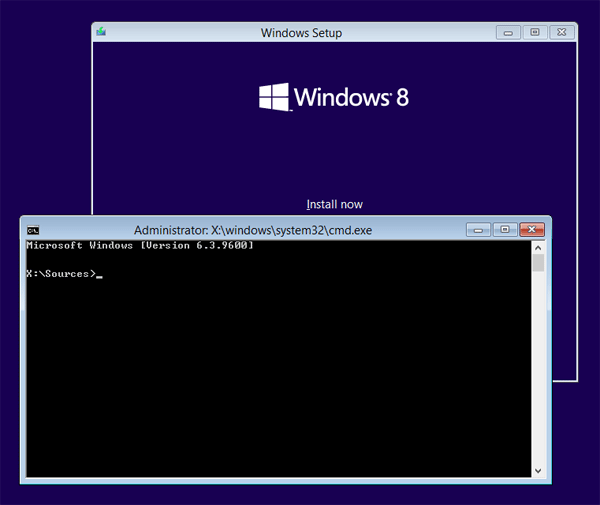
  3. The next screen allows you to install or repair Windows 8. Press Shift + F10 to open up a Command Prompt.

    windows-8-setup

  4. Now you need to use the diskpart utility to create a virtual drive that Windows 8.1 will be installed on. Type diskpart and press Enter to open the command-line disk partitioning utility.
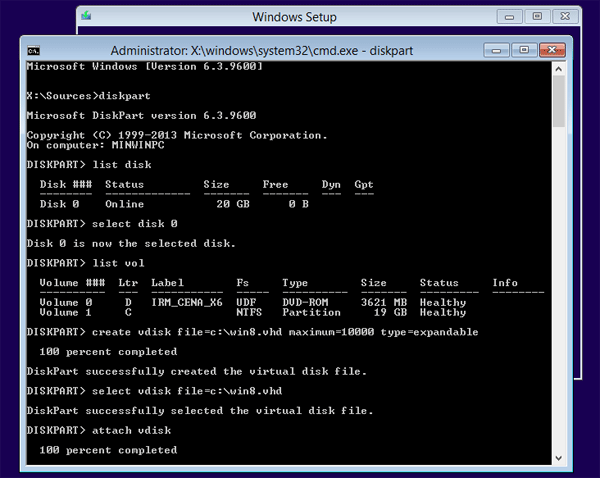
  5. At the diskpart prompt, type the following commands, pressing Enter after each one:
    • list disk
      This shows your currently attached hard disks. In this example I only have one, Disk 0.
    • select disk 0
    • list vol
      Show all the volumes that exist on that disk. You need to know the drive letter that you want to store your VHD file on.
    • create vdisk file=c:\win8.vhd maximum=10000 type=expandable
      This creates a dynamic VHD that can grow to 10GB in the root of C:\ drive. If your partition is smaller than 10GB then be sure to use a smaller value for maximum that is less than your actual partition size.
    • select vdisk file=c:\win8.vhd
      After selecting this vdisk, the following commands will apply to it
    • attach vdisk
      The VHD will be mounted and the disk will be available to the windows installer
    • exit

    create-vhd

  6. You can now click Install Now button. Accept the Licenses agreements. On the next screen select Custom: Install Windows only (advanced).
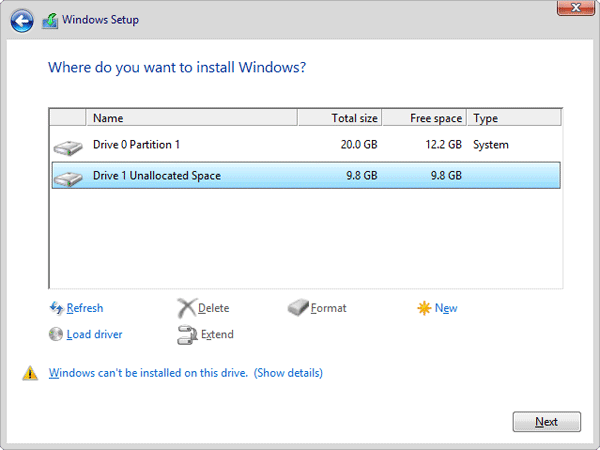
  7. At this point, Windows Setup will prompt you to choose where you want to install Windows 8.1 and you can now select your virtual drive, which will be designated as Unallocated Space and be the size that you specified. As you can see in the screenshot below, I have selected my 10GB VHD. Keep in mind that when you select the VHD, you’ll see a Warning message that says that Windows cannot be installed to this disk. Just ignore it and click Next to continue.

    install-windows-8-on-vhd

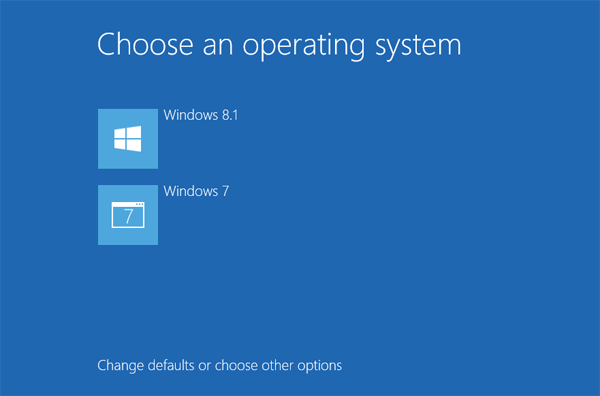
  8. When the installation is complete, Windows Setup will reboot your system one final time and you will then see the new Windows 8.1 style dual boot screen shown as below. As you can see, Windows 8.1 will automatically launch in 30 seconds if you don’t choose Windows 7.

    dual-boot-windows-8

That’s it!

How to Bypass Windows 8 Password on ASUS VivoTab Smart Tablet

$
0
0

Forgot Windows 8 password and can’t get into your ASUS VivoTab Smart tablet? You don’t have to trash the computer, or even perform a dreaded factory restore. Here’s how you can bypass Windows 8 password on ASUS VivoTab Smart tablet, without losing any file or data.

How to Bypass Windows 8 Password on ASUS VivoTab Smart Tablet?

Before getting started, you need to find a password recovery utility that supports UEFI booting, because ASUS VivoTab Smart uses 32-bit UEFI firmware instead of legacy BIOS. Here we’ll use the Enterprise edition of PCUnlocker, which works with 32-bit/64-bit UEFI-based computers.

Use a secondary PC to download the full version of PCUnlocker Enterprise (trial version). Unzip the downloaded file and you’ll get a CD image called pcunlocker.iso, which needs to be burned onto a USB flash drive (or CD) with the ISO2Disc program. Remember to choose the GPT (required for UEFI boot) option.

After you’ve created a PCUnlocker USB drive, use a Micro USB adapter to connect it to your ASUS VivoTab Smart tablet. If your tablet is running, you must turn off the tablet.

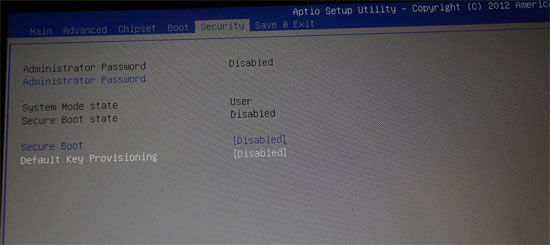
While pressing the Power button, hold the volume down button until you get to the Boot Device Menu screen. From there select Enter Setup. In the BIOS Setup, select the Security tab, disable Secure Boot and Default Key Provisioning.

asus-vivotab-smart-bios

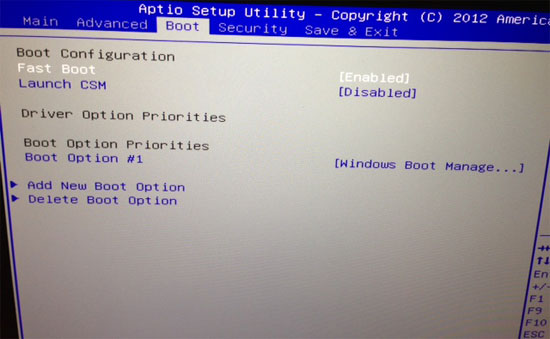
Navigate to the Boot tab. Under the Boot Option Priorities section, set your USB flash drive as the first boot option. Save your changes and exit BIOS.

The tablet will restart and boot from your created USB drive. After a while, you’ll get to the PCUnlocker program which automatically locates all Windows accounts on your tablet. Choose an account and click on Reset Password. It will bypass / remove your forgotten password in no time.

Now you’ve successfully bypassed Windows 8 password on your ASUS VivoTab Smart tablet. Disconnect the USB drive and you can then boot into Windows 8 without entering a password!

How to Log on to HP Omni 10 Tablet After Forgot Windows 8.1 Password

$
0
0

Forgot Windows 8.1 password and can’t log on to your HP Omni 10 tablet? More often than not, common approaches to this problem is creating boot disks with password bypass tools or an independent Linux OS. Because HP Omni 10 tablet is preloaded with 32-bit UEFI firmware, here we’ll use a UEFI compatible software – PCUnlocker Enterprise. Here’s how to reset forgotten Windows 8.1 password on HP Omni 10 tablet.

How to Log on to HP Omni 10 Tablet After Forgot Windows 8.1 Password?

  1. After you’ve purchased PCUnlocker Enterprise (trial version), you’ll receive an order confirmation email with a link to download the software. Unzip the downloaded file and you’ll get two files: pcunlocker.iso and ReadMe.txt.
  2. Then download and launch ISO2Disc, which is a really simple piece of software that helps you burn an ISO image to a disk (CD or USB drive). Locate the PCUnlocker ISO image and select GPT (required for UEFI boot), click the Start Burn button to create a bootable USB drive. If you’d like, you could also create a bootable CD instead.

  3. HP Omni 10 tablet doesn’t come with a full sized USB port. To connect a USB drive to your tablet, a OTG cable is required. Now you need to boot your tablet from the boot disk you’ve created. Hold the Volume down button and then press the Power button to turn on your tablet until the Boot Menu appears. Select your USB drive and press Enter.
  4. Now your tablet will boot from USB drive. When the PCUnlocker program launches, it will display a list of user accounts that are stored in your Windows 8.1 SAM registry file. Choose an account and click on Reset Password button. The program will reset your forgotten password instantly.

  5. Restart your tablet and disconnect the USB drive. You can then log on to your HP Omni 10 tablet without typing a password!

Lost Windows 8 or 7 Password on ASUS Zenbook

$
0
0

Just bought a new Asus Zenbook which came preloaded with Windows 8 but you’ve lost the password? A forgotten password is no need for panic. As long as you have a password removal utility, you can get back into Windows 8 or Windows 7 Ultrabook in minutes. PCUnlocker is one of the best recovery tools that can help you get rid of forgotten Windows 8 or 7 password with ease. The following is a walkthrough of using a CD to reset Windows 8/7 admin password on ASUS Zenbook Prime UX31A.

First of all, you need to make a PCUnlocker Live CD using a secondary computer, not your locked PC. Download the ISO image of PCUnlocker and burn it onto a blank CD with your CD burning program. If you don’t have one, try the freeware ISO2Disc or ImgBurn.

Once you’ve created a PCUnlocker Live CD, put it in the CD drive of your locked ASUS Zenbook laptop. Power on the machine and repeatedly press F2 key to enter the BIOS Setup. Go to the Security tab and disable the Secure Boot Control option. Navigate to the Boot tab, disable Fast Boot and enable Launch CSM. Press F10 to save and exit.

asus-zenbook-uefi

Press and hold ESC key to launch Boot Menu when the computer restarts. Select the CD drive from the list and press Enter to boot from it. After a while, the PCUnlocker program will launch and it shows you a list of local accounts for your Windows 8/7 installation.

Select the administrator account and click on Reset Password button. This will unlock / remove your ASUS Zenbook login password immediately. Take out the CD and reboot, you can then get back into your Windows 8/7 system without entering a password!

Conclusion

After enabling the CSM (Compatibility Support Module) on your ASUS Zenbook, the UEFI firmware will run as an emulated legacy BIOS. If you need to create a UEFI compatible CD, you need to use the Enterprise edition of PCUnlocker which can boot in UEFI mode, without requiring you to enable CSM support.

How to Crack Windows 8.1 Password with A Bootdisk

$
0
0

How to unlock your computer after you’ve forgotten Windows 8.1 password? PCUnlocker is a powerful bootdisk that allows you to crack Windows 8.1 password on a computer where you forgot your password. The step-by-step guide below should work for Windows 8, Windows 8.1 and earlier versions of Windows.

How to Crack Windows 8.1 Password with A Bootdisk?

After you download PCUnlocker, you have to burn it on a CD by right-clicking the ISO file. If you don’t have an optical drive and you want to boot from a USB flash drive, you can use the free tool ISO2Disc.

Next, you have to ensure that the CD or USB flash drive comes before the hard drive in the boot order of your BIOS settings. Most PCs allow you to access the PC setup by pressing F2, F12 or Del right after you turn the PC on. If your computer comes with UEFI firmware, you might also need to set your PC to boot with Legacy BIOS mode instead of UEFI mode.

After you boot PCUnlocker, you should see the following screen. If you have more than one Windows installation on the computer, be sure to choose the correct SAM registry file for your target Windows installation.

Choose the user account where you want to reset the password, click on Reset Password button. This program will remove the existing login password and unlock your account in case it was locked out or disabled.

The password cracking process is now completed. Reboot your computer and take out the CD or USB flash drive. You can then login to Windows 8.1 without the need of a password!

Bypass Logon Time Restriction on Windows Local or Domain Account

$
0
0

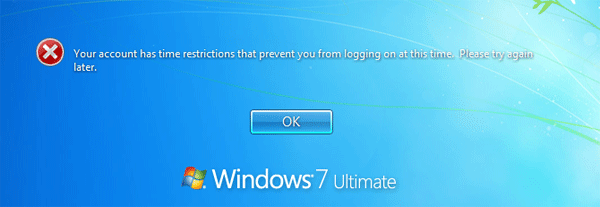
In my previous post I detailed the method to restrict logon hours for any Windows account, so you can control when a certain user account is allowed to log on to the computer. If the user tries to log in during restricted hours, the system will fail the logon with the error message “Logon failure: account logon time restriction violation.” or “Your account has time restrictions that prevent you from logging on at this time. Please try again later“.

logon-time-restrictions

However, improper logon time restrictions might also cause you locked out of all Windows user accounts. Luckily there is a rescue bootdisk called PCUnlocker which can help you bypass the account logon time restriction easily! This program is mainly used by users to reset lost Windows password, but it can also remove logon time limits for local/domain administrator account on any Windows PC.

Here is step-by-step tutorial to help you bypass the account logon time restriction that is set through the net user /time command, built-in parental control in Windows, or Active Directory Users and Computers snap-in.

How to Bypass Logon Time Restriction on Windows Local/Domain Account?

After you download PCUnlocker, you have to burn it on a CD by right-clicking the ISO file. If you don’t have an optical drive and you want to boot from a USB flash drive, you can use the free tool ISO2Disc.

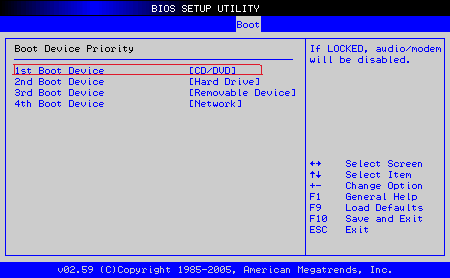
Now you need to boot your locked PC with the CD you just burned. Insert the CD into CD drive and turn on the machine. If your computer still goes straight to Windows login screen, you may need to enter the BIOS Setup utility and change the boot order to CD/DVD drive first, HDD second.

After you’ve booted into the CD, you’ll be presented with the PCUnlocker screen which displays a list of Windows local accounts by default. If you need to bypass the logon time restrictions on Active Directory user accounts, click on Reset Active Directory Password option and the program will list your domain user accounts on your domain controller.

Choose a local account or domain user account, then click on Reset Password button. This program will reset your password and remove the logon time limits that was set on your select account. Because domain user account doesn’t accept blank password, the program will assign a new password (Password123) to your AD account.

Remove the CD and reboot the machine. You can then log on your computer with your local account or domain user account without time restrictions. Well, that is how you bypass the account logon time restrictions on Windows user account. Hope it helps you in some way.

Reset Windows 8.1 Password on Lenovo G410/G500/G510/G710 Laptop

$
0
0

If you forgot Windows 8.1 password on your Lenovo laptop, it’s no big deal to reset the password with the tool PCUnlocker. This step-by-step guide shows you how to reset lost Windows 8.1 password on Lenovo G series laptops, such as Lenovo G410/G500/G510/G710. PCUnlocker can run from either a boot CD or a USB stick, but I’ll use a CD in this guide.

How to Reset Windows 8.1 Password on Lenovo G410/G500/G510/G710 Laptop?

First, use an alternate PC to download the PCUnlocker software. Unzip the downloaded file and you’ll get a disc image named pcunlocker.iso. Burn the ISO file to a blank CD (or USB stick) with the freeware ISO2Disc.

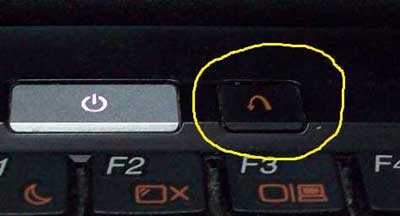
Insert the burned CD to your locked Lenovo laptop. Before getting the laptop to boot from CD, you need to make some changes with the BIOS configurations. When your laptop is powered off, press the Novo button to turn it on.

Novo-button

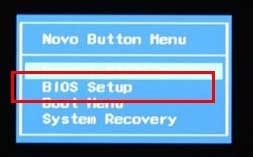
When the Novo Button Menu screen appears, select BIOS Setup.

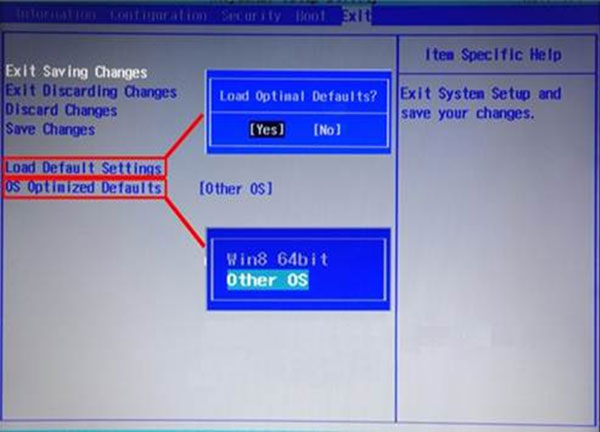
In the BIOS, go to the Exit tab. Set OS Optimized Defaults as Other OS, then Load Default Setting and save. Turn off the machine and then use the Novo button to enter BIOS Setup again.

lenovo-default-settings

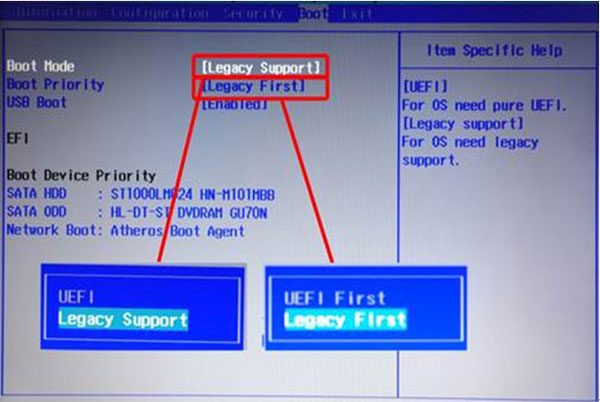
Go to the Boot tab, change Boot Mode from UEFI to Legacy Support, and set Boot Priority as Legacy First. Save your changes and exit.

lenovo-boot-mode

Turn off your computer and then press the Novo button again. When the Novo Button Menu is displayed, select Boot Menu. Next choose your CD/DVD drive and press Enter to boot from it.

Your computer will load the contents of the CD drive. When it is finished you will be presented with the PCUnlocker program, which lists your Windows 8.1 user accounts.

Choose the user name for which you want to reset the password, and click on Reset Password button to clear the password.

Congrats! You just reset your Windows 8.1 password. Reboot and take out the CD, and then change the Boot Mode back to UEFI. After that you can log on with a blank password for a local account, or log on with the new password Password123 if you use a Microsoft account as your login method.

How to Take Screenshots with Freeware Greenshot

$
0
0

There are many programs available for taking screenshots. If you’re looking for a free option, Greenshot is is an excellent and open source screenshot tool for Microsoft Windows. It is free for both personal and commercial use. It’s much easier for a beginner to use than some paid screenshot tools. Here’s how to install Greenshot and use it to take screenshots in Windows 7.

How to Take Screenshots with Freeware Greenshot?

You can grab a free copy of Greenshot from its official website. Compatible with all Windows versions, the downloaded file is sized at nearly 1.3Mb. Double-click the setup file you have downloaded to install it on your computer.

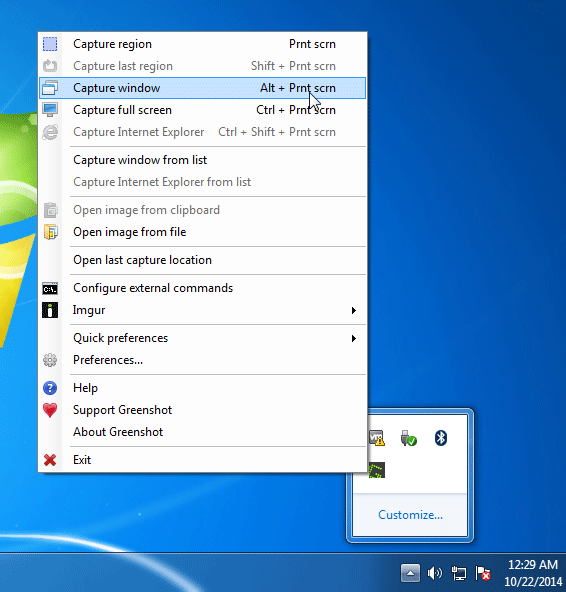
After installation, right-click on the Greenshot icon in the system tray to access the Greenshot menu. Using this menu, you can take different types of screenshots, open an image in the Greenshot editor, set Preferences, and perform several other useful tasks.

capture-window

As an example, we’re going to take a screenshot of the Skype application. Simple select the Capture window from the Greenshot menu, and you can then pick the Skype window to capture with a single click.

skype

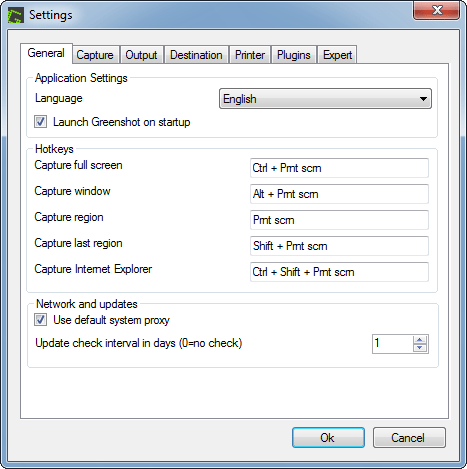
Thankfully, Greenshot also provides a list of keyboard shortcuts that making the jobs easier. If you need to take a screenshot for an active window, simply press the Alt + PrntScr hotkey. While pressing Ctrl + PrntScr you can capture the full screen.

greenshot

Once a screenshot has been captured, a popup menu will display asking what you want to do with the screenshot. We can choose to save it to a folder, or open it in Greenshot’s image editor to add some enhancements to it.

Conclusion

Greenshot may not be the best screenshot-taking program. But it handles most basic screen capture needs easily. If you don’t need to capture video and don’t mind editing captures in another program, it does everything you are likely to need. In fact, Greenshot has become my screen capture program of choice.

Viewing all 396 articles
Browse latest View live