Quantcast
Channel: Windows 8 – Password Recovery
Viewing all 396 articles
Browse latest View live

FAQs for Password Reset Disk in Windows

$
0
0

A password reset disk allows you to change lost Windows user password from Windows login screen, without needing to know your old password. In one of my previous posts we’ve covered how to create and use a password reset disk in Windows 7. Here we’ll try to answer the frequently asked questions about password reset disk in Windows 8/7/Vista/XP.

The use of password reset disk has actually protected many users against forgetting their logon passwords. And Microsoft recommends you to always create a password reset disk immediately after setting up a new user account. If you have a lot of users and do not wish to create a reset disk for each one, then you should at least create one for the administrator account on that computer. You can then use that administrator account to change any other user’s password.

FAQ: I’ve created a password reset disk for account A, can I use it to reset the password for account B?

No. Password reset disk is unique to an account (good from security point of view). That’s to say, even if you create a password reset disk for account A of Windows machine A, you cannot use it to reset the password for account B of Windows machine A, and you’ll got the following error message:
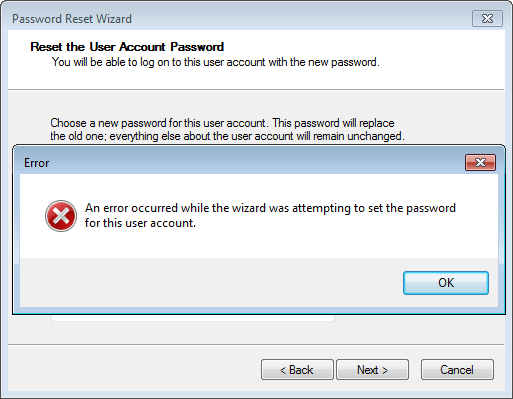
password-reset-error

FAQ: Can I create a password reset disk after forgetting my Windows password?

It’s too late to create a password reset disk. You have to create a password reset disk before you forgot the password. If you’ve already forgotten your Windows password and don’t have a password reset disk, you need to take use of the third-party live CDs such as PCUnlocker.

FAQ: Do I have to re-create a password reset disk after changing the password?

Your previously-created password reset disk will continue to work. No need to re-create the disk every time you change your user password.

FAQ: Can I create multiple password reset disks for one account?

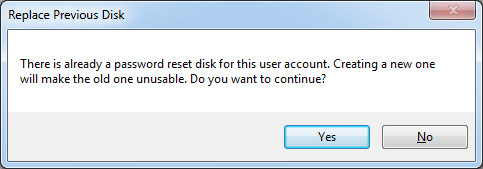
Only one password reset disk can be created for per account. When you try to create another password reset disk, you’ll get the warn message “There is already a password reset disk for this user account. Creating a new one will make the old one unusable. Do you want to continue?

replace-reset-disk

If you click Yes, the previous password reset disk automatically expires, and Windows no longer recognizes it when the user tries to use it to reset the password. This is integrated in the operating system for security purposes.

FAQ: Why Windows say “this disk is not a password reset disk”?

A password reset disk is actually a USB drive that contains a single file named userkey.psw in its root directory. userkey.psw is an encrypted backup version of your password. If you try to reset password using a USB drive that doesn’t contain the userkey.psw file, Windows will warn you that it’s not a password reset disk.
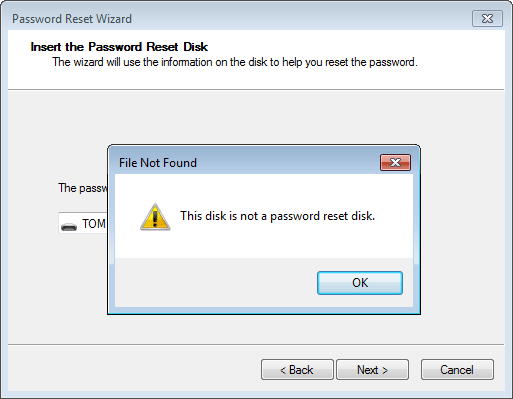
not-password-reset-disk

FAQ: Where should I store the password reset disk?

A password reset disk in the wrong hands could be used to reset the account password for whichever computer and user account for which it was created. Therefore it’s imperative to keep your password reset disk in a secure location, preferably away from the computer it was created with.

How to Enable or Disable Windows 10 Upgrade Notification

$
0
0

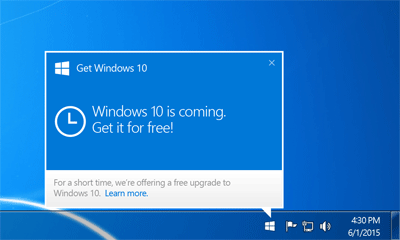
The final version of Windows 10 will release to public on July 29, 2015, and all Windows 7 and Windows 8 users can upgrade to Windows 10 for free in the first year of launch. To make the upgrade process easier, Microsoft has released a new update KB3035583 that will install a Windows 10 upgrade notification tool called “Get Windows 10″.

windows-10-upgrade-notification

If you click on the small Windows icon at the right end of the system tray, it will launch the “Get Windows 10″ app and you will be able to reserve your free copy of Windows 10. However, for some reason this icon isn’t appearing on all systems, or you might want to remove the annoying upgrade notification. In this tutorial we’ll explain how to enable or disable the Windows 10 upgrade notification.

Part 1: Enable the Windows 10 Upgrade Notification

If the “Get Windows 10″ upgrade app icon is missing in taskbar, how can you get it to appear in Windows 7 or 8? The “Get Windows 10″ app is delivered through an optional update and you need to have patch KB3035583 installed.

The first thing to try is make sure Windows Update is set to automatically install all updates on your PC and that your system is fully up to date. That alone might be enough to get the Windows 10 upgrade notification icon to appear.

Part 2: Remove the Windows 10 Upgrade Notification

But there are also many people who want to stick to Windows 7 or Windows 8.1, the “Get Windows 10″ app and its icon present in taskbar notification area might become annoying. To remove the upgrade notification completely, you have to uninstall the update KB3035583:

  1. Open the Command Prompt with Administrator privileges. In Windows 7, right-click on the Command Prompt icon and select Run as administrator. In Windows 8, simply press the Windows + X key to bring up the Power User menu and then select “Command Prompt(Admin)”.
  2. Type the following command in the Command Prompt and hit Enter.
    WUSA /UNINSTALL /KB:3035583
  3. Follow the on-screen prompts, and when complete type exit to close Command Prompt. Restart your computer and the Windows 10 upgrade notification will go away permanently.

If you want to avoid Windows installing this update again, you will need to block the patch by opening Control Panel –> Windows Updates and checking for updates, then right-click the update KB3035583 and choose to hide it.

Rate My Computer with Built-in Performance Testing Tool in Windows 8 or 7

$
0
0

Running benchmarks on a computer enables users to evaluate performance, to identify potential bottlenecks, and to choose effective system upgrades. Like Windows Vista, Windows 8 and 7 also come with a performance assessment tool, which rates your system and then gives you tips on improving it.

The following tutorial will walk you through the procedure to rate your computer with the built-in Performance Information Tools in Windows 8 or 7.

How to Rate Computer Performance in Windows 8 or 7?

  1. First of all, open up the Control Panel. In Windows 8, you can simply press the Windows key + X to bring up the Power User menu and then select “Control Panel”.
  2. Under System and Security, click Review your computer’s status.

    control-panel

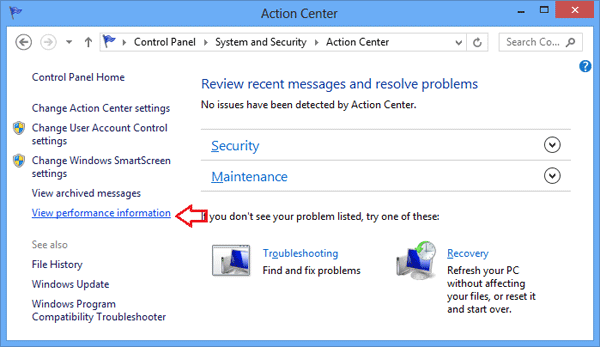
  3. In the left pane, click on View Performance Information.

    action-center

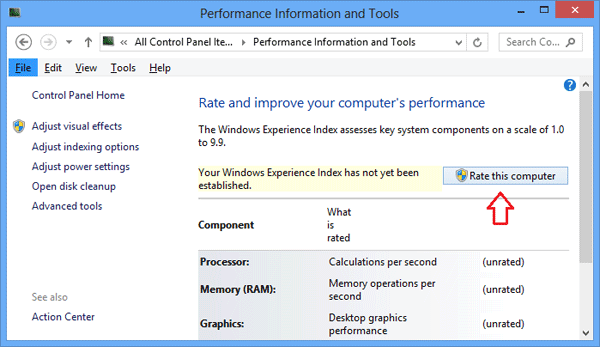
  4. When the Performance Information and Tools window appears, click on Rate This Computer to run the benchmark.

    performance-tool

    If you have ever run an assessment for this computer before, click the Re-run the Assessment link to recalculate your performance rating.

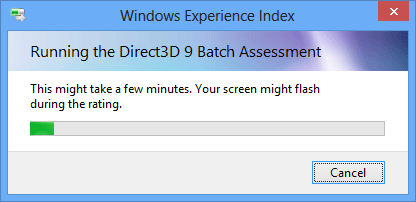
  5. The assessment may take a few minutes to complete depending on your system’s hardware and software configuration.

    rating-this-computer

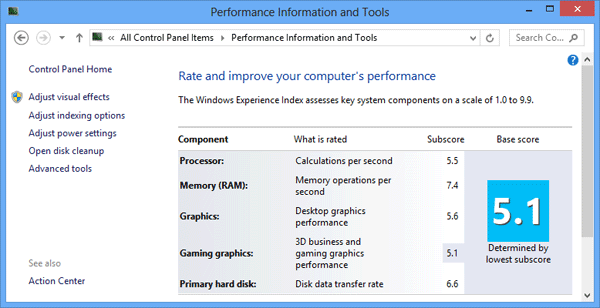
  6. After the test is complete, Windows will give scores for your computer’s processor, memory, graphics, gaming graphics, and hard disk.

    performace-score

    Though it’s not known as an especially accurate measure of PC performance, particularly when comparing scores with other systems, it can be a useful tool to identify a hardware deficiency.

How to Show Hidden Files in Windows 10, 8, 7 and Vista

$
0
0

One accidental deletion of a single system file can render your computer unusable. By default, Windows hides certain system files from view in Windows Explorer. This protects important files from being accidentally deleted, modified or altered.

But there are times when it’s necessary to view the hidden files and folders when coming to troubleshoot Windows problems. Here’s how to show hidden files in Windows 10, 8, 7 and Vista.

How to Show Hidden Files in Windows 10, 8, 7 and Vista?

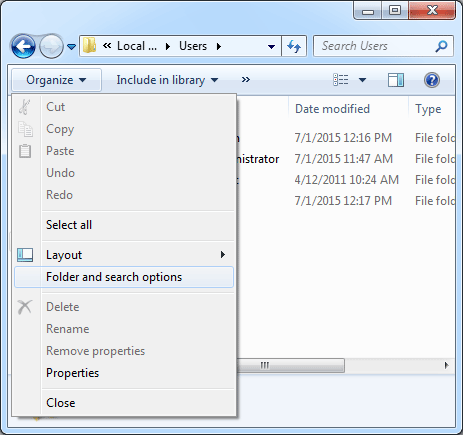
  1. Open up a Windows Explorer window, choose Organize -> Folder and search options.

    win7-folder-options

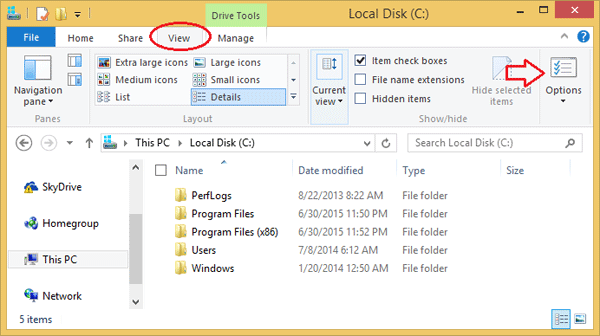
    In Windows 10 or 8, click on the View tab at the top of Windows Explorer, and then click Options.

    win8-folder-options

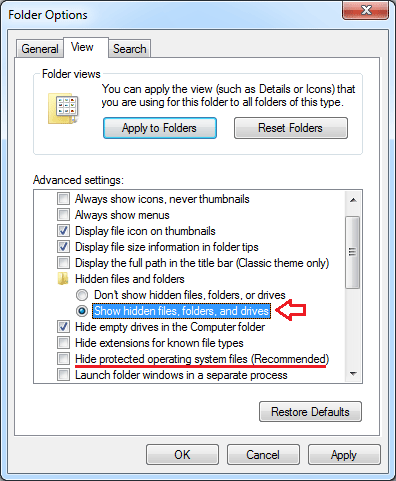
  2. From the opened Folder Options box, go to View tab.
  3. Under the Advanced settings section, click to select “Show hidden files, folders, and drives” radio button. If you are trying to get into the Windows directories, you might want to also remove the checkbox from “Hide protected operating system files (Recommended)” as well.

    show-hiden-files

  4. When you are done, just click Apply and OK, and your changes will take effect immediately.

2 Methods to Fix “The Group Policy Client service failed the logon. Access denied.”

$
0
0

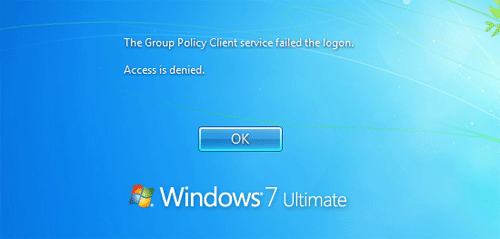
When you try to log on to your Windows account, you might encounter the error “The group Policy Client service failed the logon. Access is denied.

group-policy-failed-logon

When you click OK, the system will return you back to the login screen. Searching this on the net gave a lot of answers but none of them seemed to solve it. In the end we discovered that it is a permissions problem and not a corrupt profile problem. Here’s two methods to fix this issue.

Before getting started, you need to log on to your computer with a working administrator account. Then follow the solutions below to fix the problem for your affected account.

Method 1: Regain Registry Permissions

  1. Press the Windows key + R to bring up the Run box. Type regedit and hit Enter.
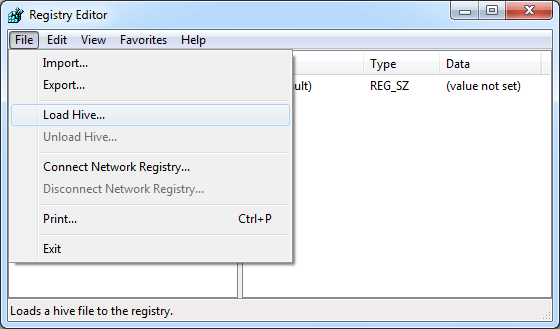
  2. When the Registry Editor opens, select HKEY_USERS in the left pane. Now, pull down the File menu and choose the Load Hive option.

    load-hive

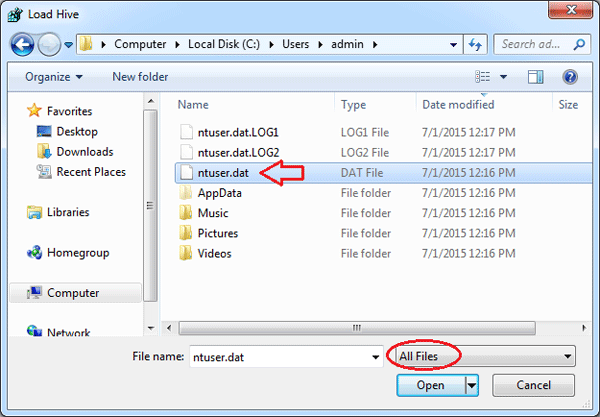
  3. When the Load Hive dialog appears, select All Files in the Files of type box. Navigate to your affected profile folder (for example, C:\Users\<user_name>) and select the NTUSER.DAT hive. Click Open.

    select-hive

    Note: if the NTUSER.DAT file doesn’t show up, you might need to configure Windows to display the hidden files.

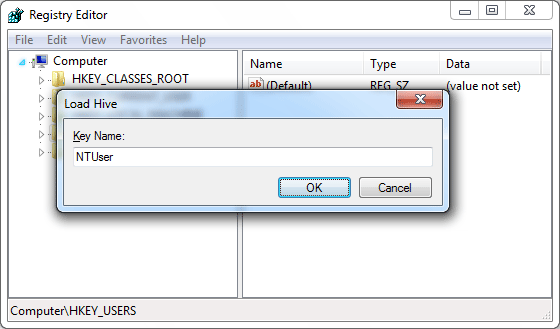
  4. It will ask you for a name. Give it any name, it doesn’t matter what it is.

    import-key-name

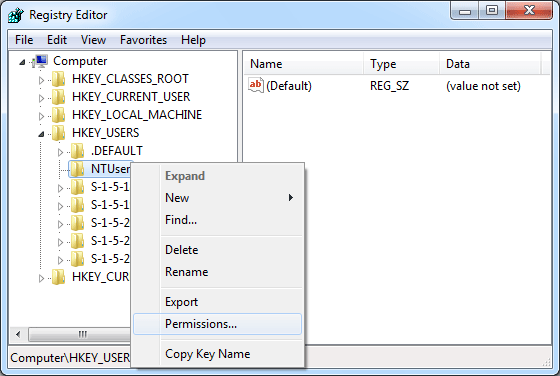
  5. You will now see the hive you just loaded with the name you gave it under the HKEY_USERS key. In my example, the entire NTUSER.DAT hive has been loaded into the Registry Editor under the registry location: HKEY_USERS\NTUSER.
  6. Right-click on HKEY_USERS\NTUSER and select Permissions.

    registry-permissions

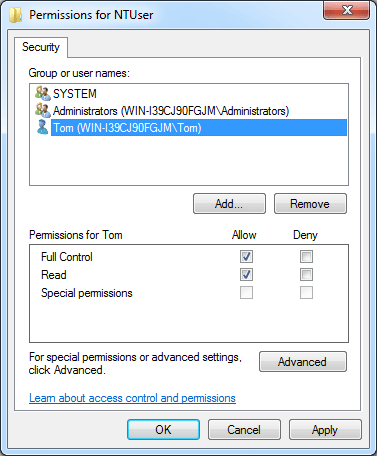
  7. Here you should see at least three accounts: System, Administrators and the name of your affected user account who’s profile you are fixing. If ANY of these are not shown it will not work. You need to add all three and then give them full control in the Permissions section.

    change-permissions

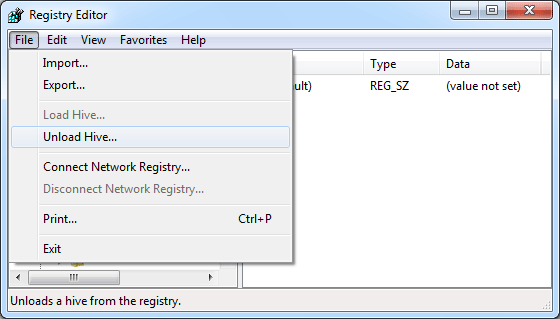
  8. Once you have added all three and given them the correct permissions, click the File menu and select Unload Hive. Close the Registry Editor.

    unload-hive

  9. Log off or restart your computer. You should be able to login successfully with your account that you were having trouble with.
Method 2: Deleting the Local Profile

This method works by deleting your affected local profile, so you can then log back on. After successfully logging on, Windows will automatically create a new profile for your account. Here’s how to delete the profile for your affected Windows account in Windows 10, 8, 7 and Vista:

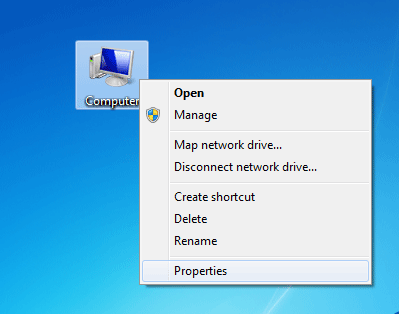
  1. Right-click on My Computer icon on your desktop, and then select Properties.

    computer-properties

  2. From there, click the Advanced System Settings link on the left-hand side.

    advanced-system-settings

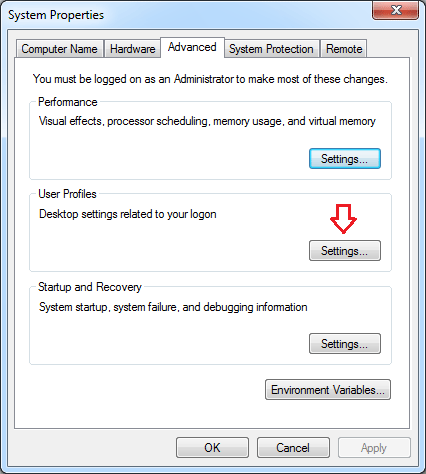
  3. When you see the System Properties dialog, click the Settings button in the User Profiles section.

    user-profiles

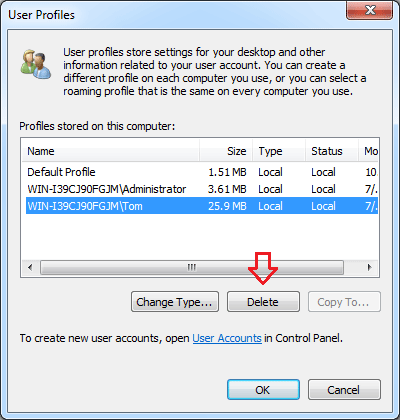
  4. In the User Profiles dialog box, select the profile of your affected user account and click on Delete.

    delete-user-profile

  5. Click OK to confirm. Now you’ve successfully deleted a user profile. Your problem should be fixed by now.

Reset Windows 8 or 7 Password with the Freeware NTPasswd

$
0
0

“My laptop was installed with Windows 7 with only one account, but no reset disk was created. Now I had forgotten my administrator password and don’t know how to reset it.

Had tried Ophcrack to burn its ISO into a flash drive, but failed to recover my password. Is there any way to reset my password without formatting my whole system disk?”

Fortunately, if you have lost your Windows password, there are several approaches you can take for either recovering or resetting the forgotten password. In this tutorial we’ll show you how to reset Windows 8 or 7 password with the freeware NTPasswd (Offline NT Password & Registry Eidtor). NTPasswd is a small Linux tool that allows you to reset Windows admin/user password on a computer where you forgot your password.

How to Reset Windows 8 or 7 Password with NTPasswd?

  1. First go to the official website of NTPasswd and grab a copy of the bootable CD image. To install NTPasswd onto a blank CD, Right-click on the ISO file and then click “Burn disc image” option. If your system doesn’t have built-in support for burning, you can take use of the free burning tool ISO2Disc.
  2. When the bootable NTPasswd CD is ready, it’s time to reset your lost Windows password. Insert the CD into the optical drive and restart the target computer. You might have to adjust the BIOS to allow booting from the CD.
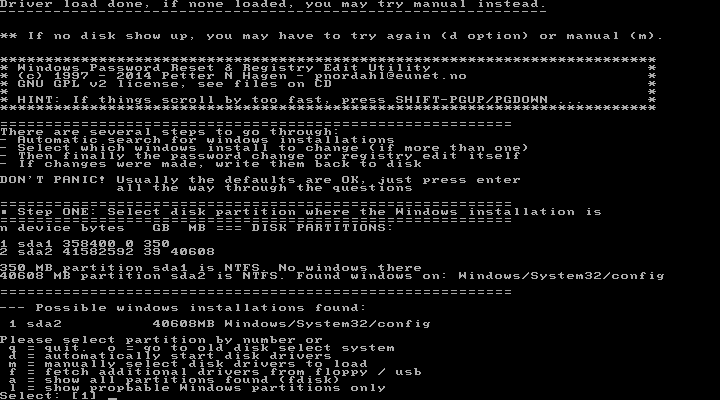
  3. After booting to the NTPasswd tool, you have to select which partition that has Windows installed. In most cases, there will be only one partition so you can just hit Enter to use the default value.

    select-partition

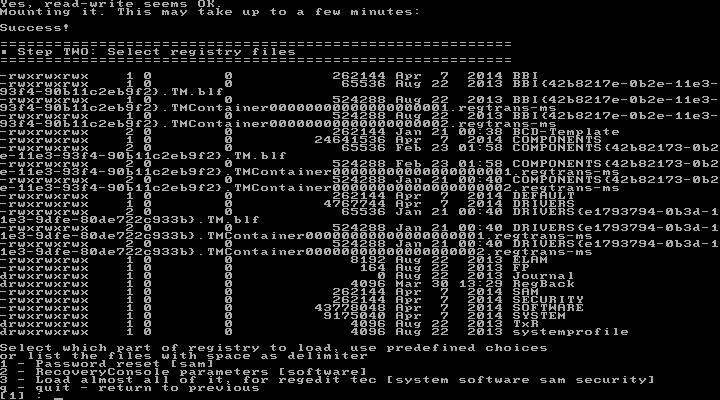
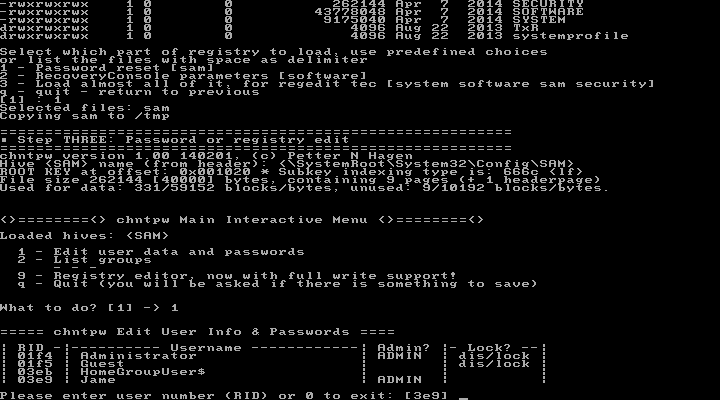
  4. Next, select which part of registry to load, press Enter to leave it as default option which is “Password reset [sam]“.

    load-sam

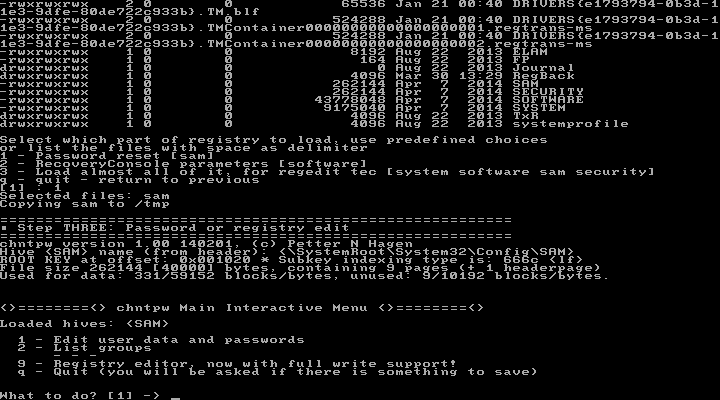
  5. When you see the chntpw Main Interactive Menu, press Enter to select “Edit user data and passwords” option.

    ntpasswd

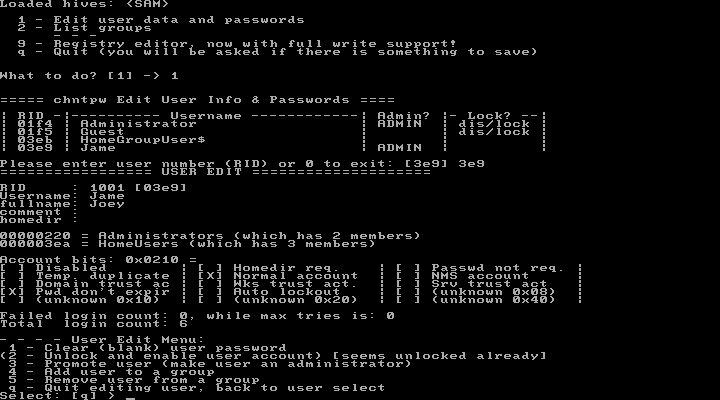
  6. Choose the user account where you want to reset the password. You can find the RID, which you have to enter now, to the left of the username.

    select-account

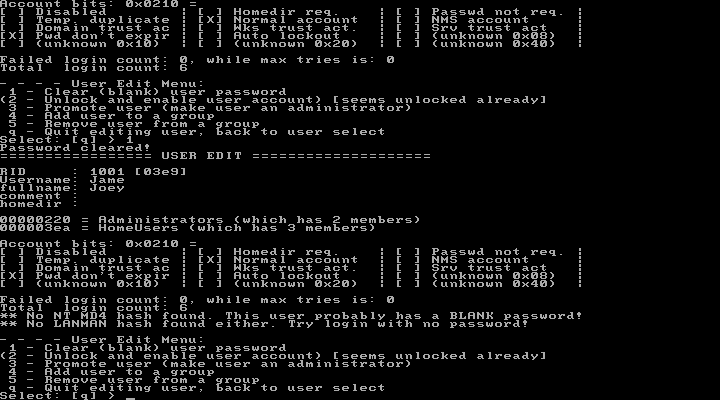
  7. On User Edit Menu, type 1 and press Enter to select “Clear (blank) user password”.

    clear-password

  8. If there is nothing wrong, you should see a message Password cleared!. Then, type q and press Enter to quit editing the user.

    quit-ntpasswd

  9. Next type q to quit the NTPasswd tool and type y to save your password reset changes. Press Ctrl + Alt + Del to restart your computer. You should be able to login to Windows without any problems — remember to change the password to something complex that you can still recall easily.

Note that NTPasswd could be used to reset password for local account only. If you need to bypass Windows 8 Microsoft account, or reset domain user password, you might need to take use of the commercial software PCUnlocker.

2 Options to Turn off Windows Defender in Windows 10 or 8

$
0
0

Windows Defender is a built-in antivirus software comes with Windows 10 and Windows 8. While Windows Defender provides very baseline protection, it slows down your PC considerably. Users who prefer using third-party security solution like Kaspersky, McAfee or Norton might want to completely disable Windows Defender. Here are 2 options to turn off Windows Defender in Windows 10 or 8.

Option 1: Turn off Windows Defender with Group Policy

  1. Press the Windows key + R to bring up the Run box. Type gpedit.msc and hit Enter.
  2. In the left pane of Local Group Policy Editor, navigate to the following location:
    Computer Configuration -> Administrative Templates -> Windows Components -> Windows Defender
  3. In the right pane you will see a policy labeled “Turn off Windows Defender“. Double-click on that policy and set it to Enabled.

    turn-off-windows-defender

  4. When finished, you can close the Local Group Policy Editor. Now if you try to launch Windows Defender, you’ll get a message that saying “This app is turned off by group policy“.

Option 2: Turn off Windows Defender from Settings

  1. Press the Windows key + X to bring up the Power User menu, and then select “Control Panel“.
  2. In Control Panel, choose either Large Icons or Small Icons from the View By drop-down list, and then click on Windows Defender.

    control-panel

  3. Once Windows Defender is launched, navigate to Settings tab and click on the Administrator section. Here uncheck the option Turn on this app and save your changes.

    windows-defender

  4. Windows Defender will be disabled instantly. If you want to enable Windows Defender protection in future you can check the “Turn on this app” option from within Windows Defender’s built-in settings.

How to Bypass the Password on Any Windows Version

$
0
0

There are lots of people that for some reason forget the login password on their Windows computers. Most of the answers they find all over the Internet is to reinstall or reset the password. This is not the answer you’ll get here. Today I’ll share with you how to bypass the password on any Windows version, not just reset it.

How to Bypass the Password on Any Windows Version?

  1. Download the required password bypassing tool – PCUnlocker. Once it’s finished, double-click the zip file to extract it. You will then need to burn the ISO file to a writable CD using a program like ISO2Disc.

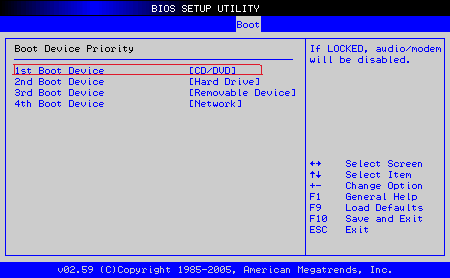
  2. Insert the CD into the computer that needs its password bypass and boot from it. You may have to change the computer’s boot order in the BIOS in order to boot from the CD.

  3. If you boot from the CD successfully, it will run the Windows PE environment from memory. When the PCUnlocker application opens, you’ll see a list of Windows user accounts that are discovered on your computer.
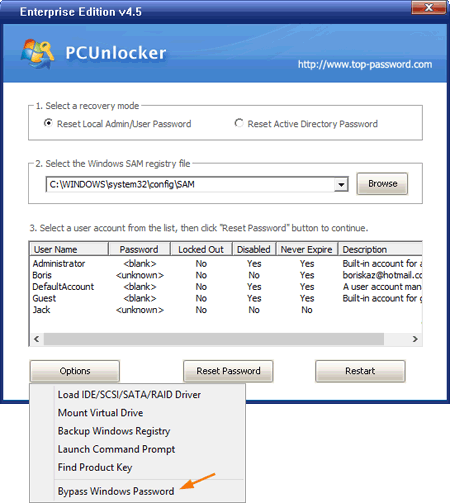
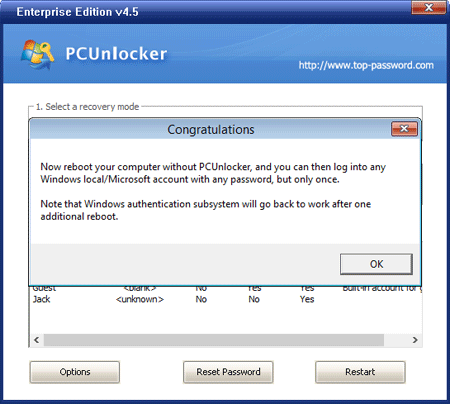
  4. Here we’re not going to reset the user password, so don’t click the “Reset Password” button. At the bottom-left side of your screen, there is an Options button. Click on Options and select “Bypass Windows Password”.

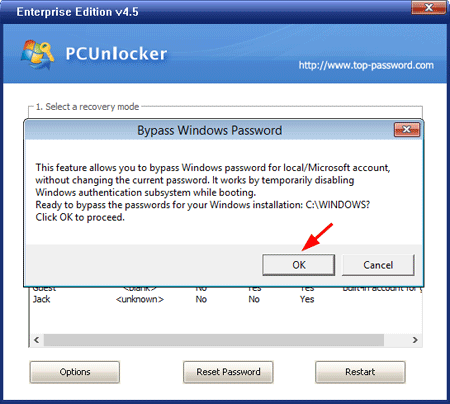
  5. Confirm your password bypass operation and click OK to proceed.

  6. When you see the Congratulations dialog box, you’re almost done!

    Restart your compute and take out the CD. When it boots to the Windows login screen, click the icon of any User account (supporting Windows 8 Microsoft account) and you can login with arbitrary password.

I have tested this procedure on Windows 10, 8.1, 8, 7, Vista, XP and it works fine, so if yours somehow does not work, go back through the steps again and make sure you have not missed any step. Or check out the boot up toubleshooting guide for PCUnlocker.


2 Options to Add a User to Local Administrators Group

$
0
0

Only an administrator can perform the administration tasks such as installing a driver or an application. If you have an existing standard or limited account, you can grant it administrator privileges by adding it to the built-in Administrators group. Here are two options to add a user to the local Administrators group in Windows 10, 8, 7, Vista or XP.

Option 1: Computer Management

The easier way to add a user to the local Administrators group is to use the Computer Management app. Here’s how:

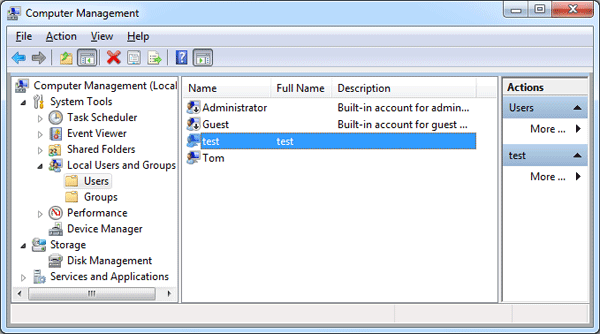
  1. To open the Computer Management, right-click on My Computer icon on your desktop and then select Manage. Another method is to press the Windows key + R to bring up the Run box, then type compmgmt.msc and hit Enter.
  2. When the Computer Management window opens, expand Local Users And Groups in the left pane, and click on Users (Please skip to the option 2 below if you don’t see Local Users and Groups.)

    local-users-and-groups

  3. Double-click your desired user account in the right hand side.
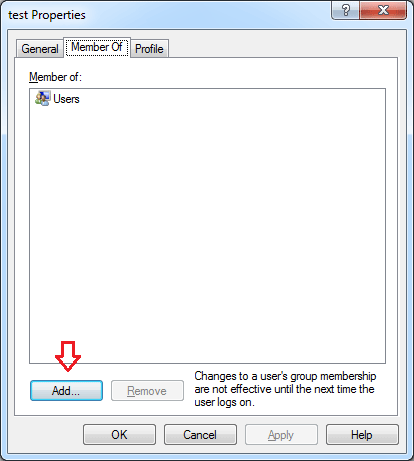
  4. In the User Properties window, click the Add button.

    account-properties

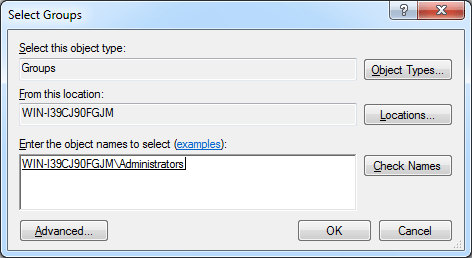
  5. In the Select Groups dialog, type the name of your administrators group. Click Check Names, and then click OK.

    select-groups

    If you don’t know the name of your administrator group, click Advanced and next click Find Now.

Option 2: Command Prompt

However, not every edition of Windows have the Local Users and Groups entry in the Computer Management (for example, Windows 8 Home and domain controller). This method will work on all editions of Windows.

  1. Open an elevated Command Prompt. In Windows 10 or 8, press the Windows key + X and then click “Command Prompt (Admin)“. In Windows 7 or Vista, go to Start > All Programs > Accessories, then right-click on Command Prompt shortcut and select “Run as Administrator“.
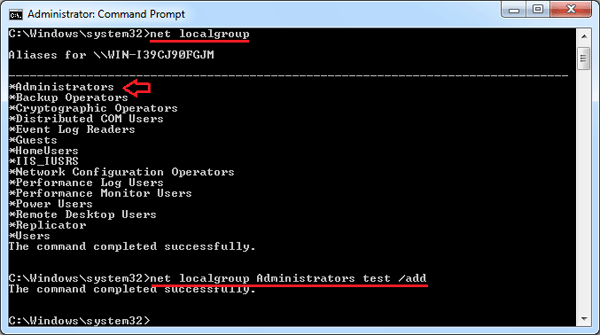
  2. To see a list of local groups available, just type:
    net localgroup
  3. You can add a user to the built-in Administrators group by running the following command:

    net localgroup Administrators [username] /add

    For example, add a user named test to the administrators group, we can run the below command.
    net localgroup Administrators test /add

    add-user-to-group

Set up Windows to Auto Login to Domain Account

$
0
0

In my previous post I’ve covered how to enable automatic login in Windows 8/7/Vista/XP, by using the command netplwiz or control userpasswords2. However, that option is disabled when your computer is joined to a domain. Fortunately, you can still set up Windows to auto login to your domain account using a registry trick.

How to Set up Windows to Auto Login to Domain Account?

  1. Press the Windows key + R to bring up the Run box. Type regedit and hit Enter.
  2. When the Registry Editor opens, navigate to the following registry location:
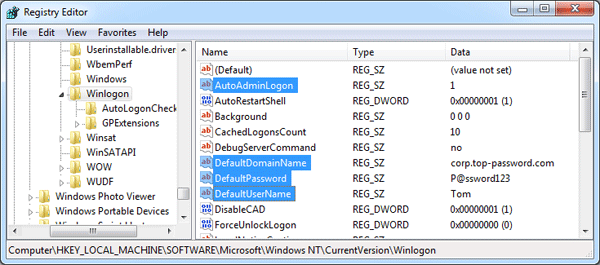
    HKEY_LOCAL_MACHINE\SOFTWARE\Microsoft\Windows NT\CurrentVersion\Winlogon
  3. In the right pane, you need to modify or create each of these registry entries: DefaultUserName, DefaultPassword, DefaultDomainName, AutoAdminLogon. If any of these keys are missing, create a new String Value (REG_SZ).
  4. Double-click the DefaultUserName entry, type the user name to log on with, and then click OK.
  5. Double-click the DefaultPassword entry, type the password for the user account under the value data box, and then click OK.
  6. Double-click on DefaultDomainName, and specify the domain name of the user account. If it’s local user, specify local host name.
  7. Double-click the AutoAdminLogon entry, set AutoAdminLogon to 1 to enable the auto logon. If AutoLogonCount or AutoLogonChecked exists, delete it.

    auto-login-to-domain-account

Once those four options are created and altered, you’re good to reboot and from now on every time you start Windows it will automatically login to your specified domain account! Again, if for some reason the auto-logon doesn’t work, go back into the registry and double-check the four entries in that folder to make sure nothing’s out of place.

How to Create A Windows To Go USB Drive in Windows 8 Enterprise

$
0
0

Windows to Go is a exclusive feature available in Windows 8 Enterprise only, which lets users create a portable version of the OS that can be used directly from a USB drive. Here’s how to create a Windows To Go USB drive in Windows 8 Enterprise, without using any third-party software.

How to Create A Windows To Go USB Drive in Windows 8 Enterprise?

  1. First of all we need to open the Windows To Go Creator. Press the Windows key + W, type “Windows To Go” and then press Enter. The Windows To Go Creator Wizard opens.
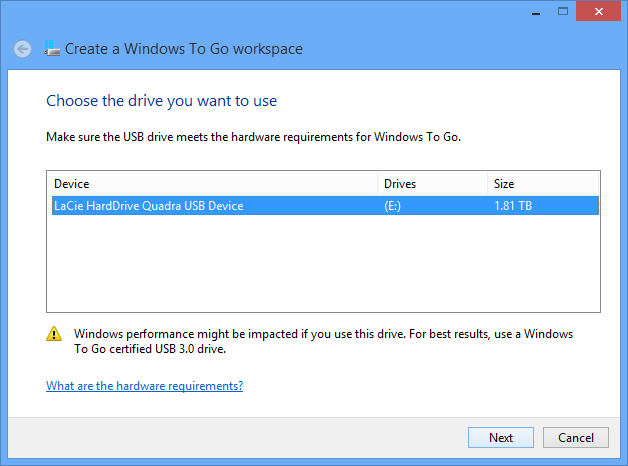
  2. Select your USB drive. Although it’s recommend to use USB 3.0 external storage device, USB 2.0 should also work.

    windows-to-go-1

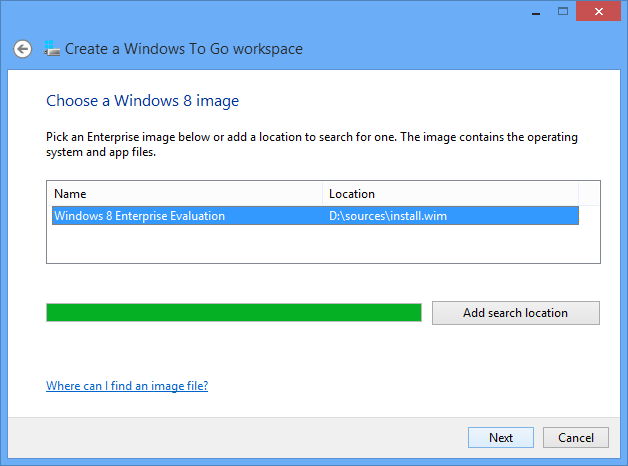
  3. Select Windows 8 image (.wim) file from Windows 8 installation DVD. If you’re using a Windows 8 installation ISO file, you can extract the install.wim file from it with the freeware 7-zip.

    windows-to-go-2

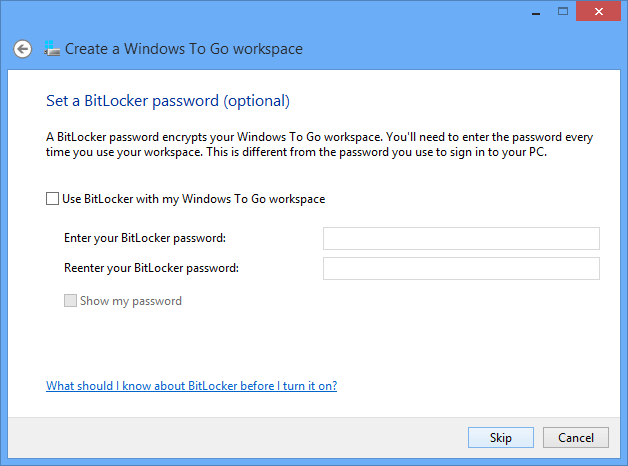
  4. Set up BitLocker password. By using Bitlocker, the USB drive and all data on it will be encrypted. This option is not mandatory, and you can skip it by clicking the Skip button.

    windows-to-go-3

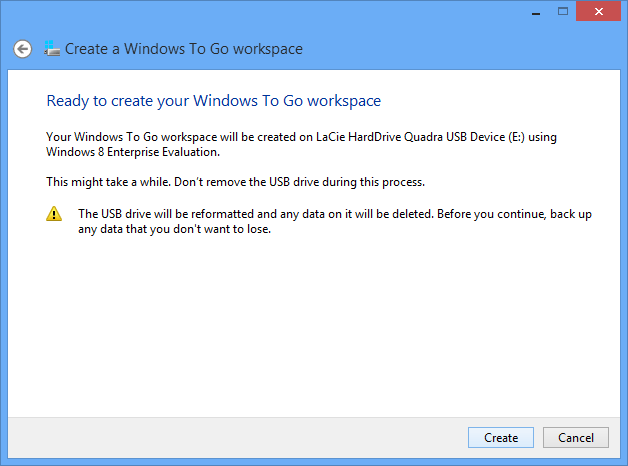
  5. Begin to create Windows To Go USB drive. This step displays the summary of settings and prepares your storage media for Windows To Go workspace. Clicking on Create at the bottom will start the process.

    windows-to-go-4

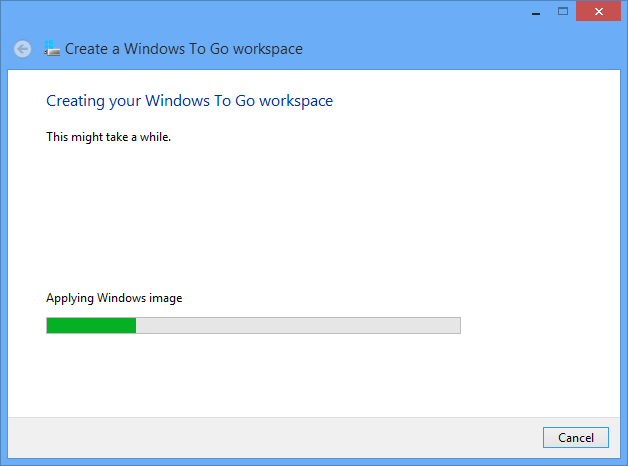
  6. After this step, it begins to install Windows 8 on your USB drive. The whole process should take about 30 minutes, depending on the hardware from which you are running this.

    Windows-to-go-5

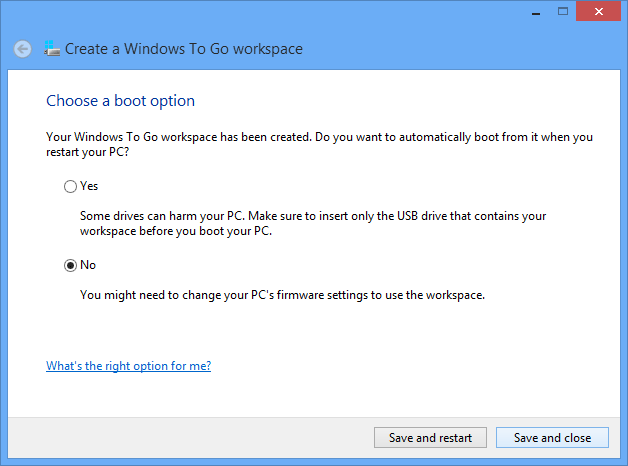
  7. Once a Windows To Go USB drive has been made you can choose whether to set up the host PC to boot from USB devices, or leave it as it is. You can close this wizard by selecting No, then choosing Save and Close.

    windows-to-go-boot-option

  8. Now your USB drive is ready for use.

Windows To Go Creator is only available in Enterprise edition of Windows 8. But with the freeware ISO2Disc you can create Windows To Go USB drive in any edition of Windows, so long as you have a Windows 8 ISO image.

Reset Forgotten Windows 8 Password on Lenovo Yoga Tablet 2

$
0
0

Lenovo Yoga Tablet 2 was loaded with a 32-bit version of Windows 8.1, and if you’ve forgotten the login password, you can reset it with PCUnlocker. But this tablet can boot in native UEFI mode only, so you need to use 32-bit version of PCUnlocker Enterprise which supports UEFI boot. Let’s see how to create a UEFI bootable USB drive with PCUnlocker and then reset lost Windows 8 password on Lenovo Yoga Tablet 2.

Part 1: Create A PCUnlocker Live USB

As this tablet doesn’t come with a CD drive, you have to use a USB thumb drive (with at least 1GB of space) instead. Follow the steps below to create a PCUnlocker Live USB from another computer:

  1. Download the 32-bit version of PCUnlocker Enterprise and save it to your desktop. Unzip it and you’ll get a CD image: pcunlocker.iso.
  2. Download and install the free USB creator software – ISO2Disc, which allows you to make a bootable USB drive from a ISO image.
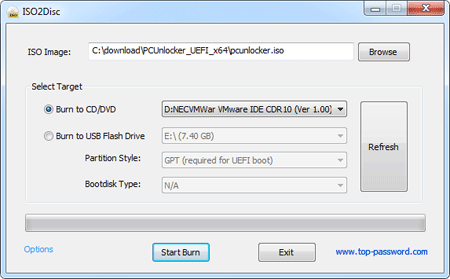
  3. Launch the ISO2Disc program. Click on Browse button and locate the pcunlocker.iso file. Next click on “Burn to USB Flash Drive” and select your attached USB thumb drive.
  4. Select “GPT (required for UEFI boot)” from the Partition Style list. Click on Start Burn to begin creating a PCUnlocker Live USB drive.

Part 2: Reset Lenovo Yoga Tablet 2 Password

As the tablet doesn’t have a full-size USB port, you have to use a micro USB on-the-go (USB OTG) adapter to connect your USB thumb drive to the micro USB port on the Lenovo Yoga Tablet 2. Once connected, you can proceed to reset your forgotten Windows 8 password:

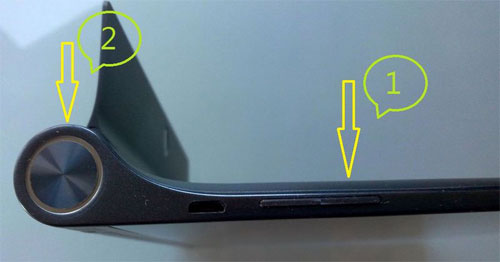
  1. When your tablet is turned off, press and hold the volume rocker up button, and press and hold the Power button at the same time.

    lenovo-yoga-tablet

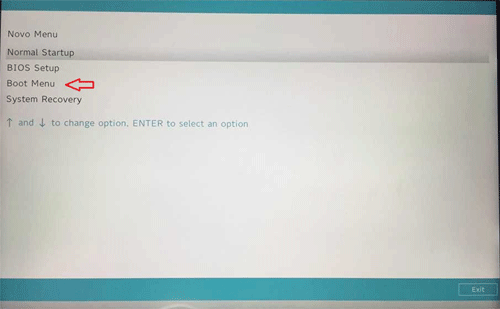
  2. This will turn on the tablet and take you to the Novo Menu. Now you can release both the volume rocker and the Power button.

    yoga-tablet-boot-menu

  3. Select the Boot Menu and hit Enter. From the next screen, choose the USB thumb drive as the boot media.
  4. Once booted to the PCUnlocker program, you’ll see a list of Windows accounts displayed on your screen. Choose a user account and click on “Reset Password” button, it will unlock & reset your forgotten Windows 8 password offline.

  5. Disconnect your USB drive and reboot the tablet. You can now login to Windows without typing a password!

Auto Shutdown Windows 10 / 8 As You Expect

$
0
0

Sometimes you might want to schedule Windows to shutdown automatically after a specified amount of time. For example, let’s say you’re downloading a big file at night. You know it will take about one hour for it to be complete, but it’s too late and you must sleep now. You don’t want to leave your laptop running overnight.

Here I’ll show you 2 methods to set up auto shutdown in Windows 10 and 8, and instruct your computer to automatically shutdown after a given amount of time, or at a specified time.

Method 1: Auto Shutdown Windows 10/8 After a Certain Amount of Time

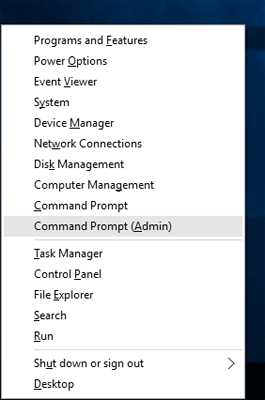
  1. Press the Windows key + X opens the Quick Access Menu. Click on Command Prompt (Admin).

    win+x-menu

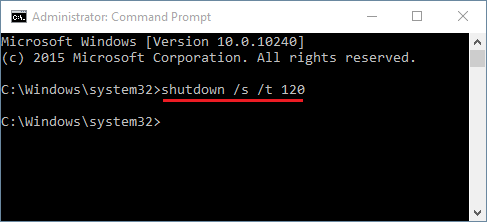
  2. Using the shutdown command you can set your computer to automatically shutdown after the amount of time you specified. For example, if you want to shutdown computer exactly after 120 seconds, type the command as follow:
    shutdown /s /t 120

    auto-shutdown

  3. Once you execute the command above, the system will force close all running applications and shutdown after 2 minutes.

Method 2: Auto Shutdown Windows 10/8 At a Specified Time

But sometimes you might want to schedule your Windows computer to shutdown at a specified time. For example, if you have a habit of listening music on your laptop before bed, you might have the tendency to fall asleep but forgot to turn off your computer. To avoid this, you can configure your PC to shutdown automatically at midnight. Here’s how:

  1. You’ll need to open up Task Scheduler to create a schedule task. Press the Windows key + R and type taskschd.msc in the Run box.
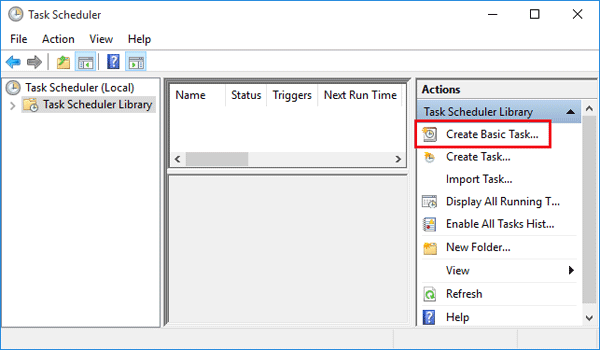
  2. The Task Scheduler window will come up. Select Create Basic Task from the Actions panel on the right.

    task-scheduler

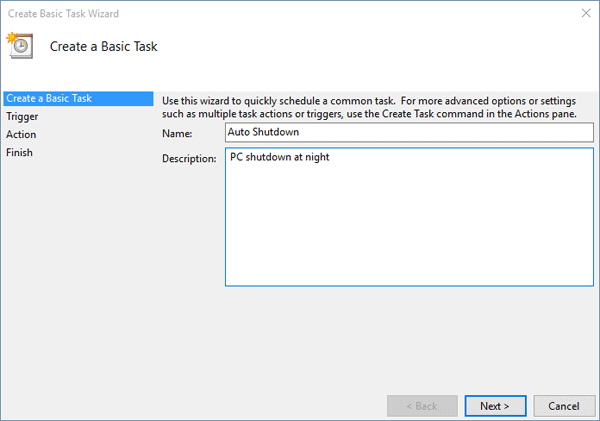
  3. Enter a meaningful name and description of the task you are going to create, and then click on Next.

    create-basic-task

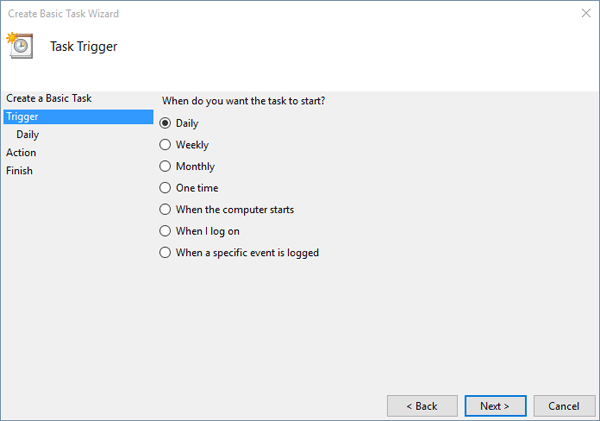
  4. Select the radio button “Daily” and click on Next to continue.

    task-trigger

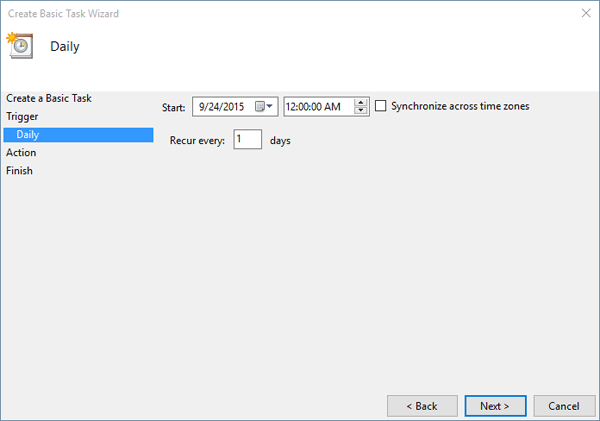
  5. Now enter the starting date and time. Also, make sure that you are choosing for the task to reoccur every day.

    when-to-start-task

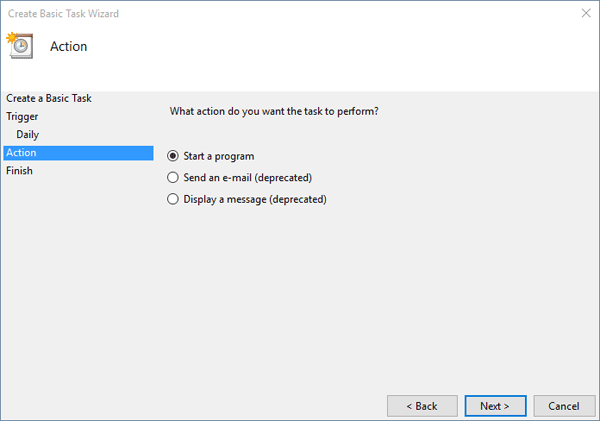
  6. Select the radio button “Start a program” and click on Next.

    task-action

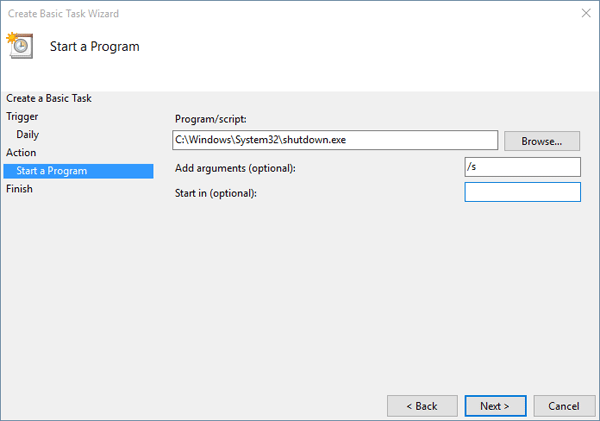
  7. Click on Browse button to locate shutdown.exe under the system folder c:\windows\system32. Enter /s as the application argument which forces your Windows computer to shut down.

    shutdown-task

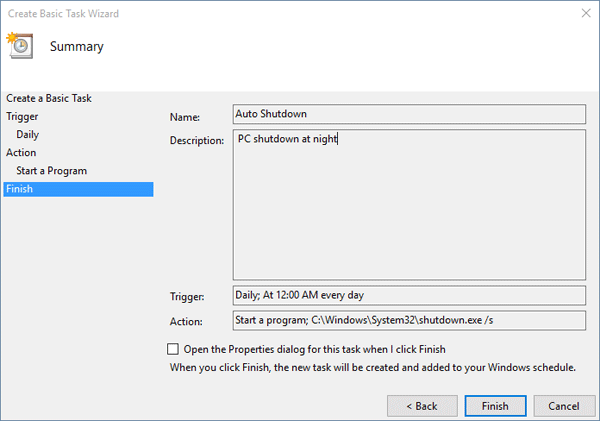
  8. Go through the summary, and if everything is fine, click on Finish.
    finish-task-creating

    Now you have successfully configured the automatic shutdown at night.
How to Change Keyboard Layout for Windows 10/8/7 Login Screen

$
0
0

“I’m stuck on logon screen of Windows 7 professional. My password has an ö (german umlaut) character and the keyboard layout changed somehow to English. And on logon screen I can’t seem to find anywhere to change the keyboard layout. Hence I cannot logon to my Windows, can’t use my PC. What should I do?”

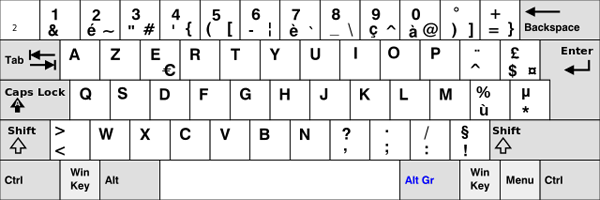
If for some reason a wrong keyboard layout is set for Windows welcome screen, the system might keep saying your login password is incorrect, even if you type in the password exactly the way they have been set. For example, if the keyboard layout is set to French, type QWERTY on a standard US keyboard and you’ll get AZERTY.

French Keyboard Layout:
French keyboard layout

In this tutorial we’ll show you how to change the default keyboard layout for the login / welcome screen in Windows 10, 8 and 7.

Tips: If you’re stuck at the login screen and see no chance to type in your password, you can boot off your computer from PCUnlocker Live CD to remove the login password. Afterwards you can log into Windows without typing password, then follow the steps below to fix the wrong the keyboard layout for Windows login screen.

How to Change Keyboard Layout for Windows 10/8/7 Login Screen?

  1. First of all, you need to open the Control Panel. In Windows 7, simply click on the Start button and then click Control Panel. With Windows 10 or 8, press the Windows key + X to bring up the Quick Access Menu and select “Control Panel“.
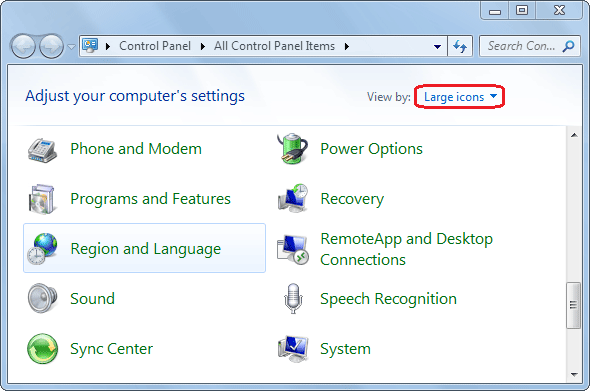
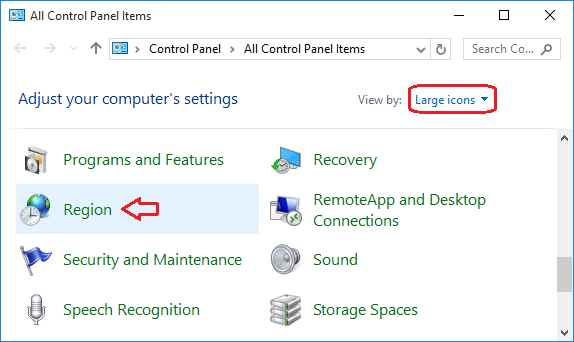
  2. By default, the Control Panel opens with the Category view. You need to change the view to Large icons or Small icons. In Windows 7, click “Region and Language“.

    win7-control-panel

    While in Windows 10 or 8, you have to click on “Region“.

    win10-control-panel

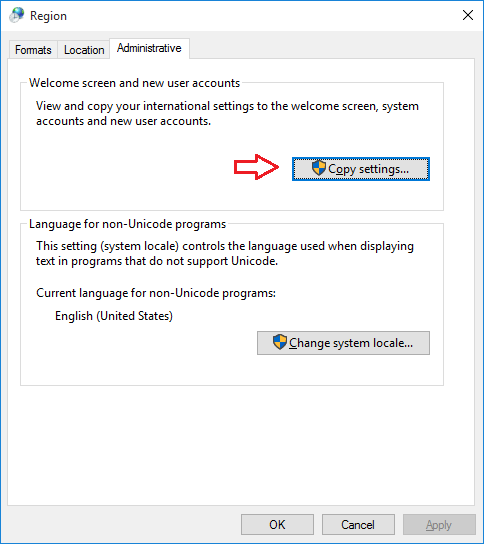
  3. Select the Administrative tab. Click on the Copy Settings button under Welcome Screen and New User Accounts. If prompted by UAC, click on Yes.

    win10-region

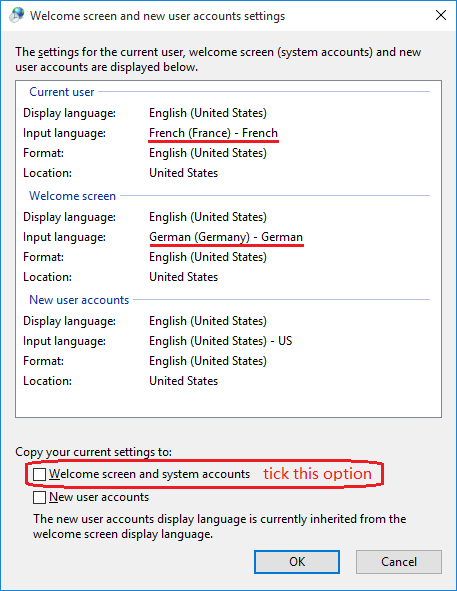
  4. In the dialog that appears, you can view the default keyboard layout and language for your current logged-on user, the Welcome/login screen, and new user accounts. To copy all “Current user” keyboard layout and language to the Windows welcome/login screen, tick “Welcome screen and system accounts“. Click OK.

    win10-keyboard-layout

    Note: The check boxes will not stay checked after clicking OK. The check boxes are only to copy the Current user settings to the checked option for this one time. If changes are made to the Current user settings, you can go back and check the boxes again to apply the changes.

  5. So this is how do I change the default keyboard layout for the login/Welcome screen in Windows 10/8/7.

Block Read / Write Access to USB or CD Drive in Windows 10 / 8 / 7

$
0
0

There are situations where you might want to disable USB/CD device access in your computer, if someone wants to copy your files to removable devices (USB stick or CD). In this tutorial we’ll show you 2 ways to block read/write access to USB/CD drive in Windows 10, 8 and 7.

Method 1: Using Group Policy

  1. Open up the Run box by press the Windows key + R. Type gpedit.msc and press Enter.

    gpedit

  2. When the Local Group Policy Editor opens, navigate to the following location:
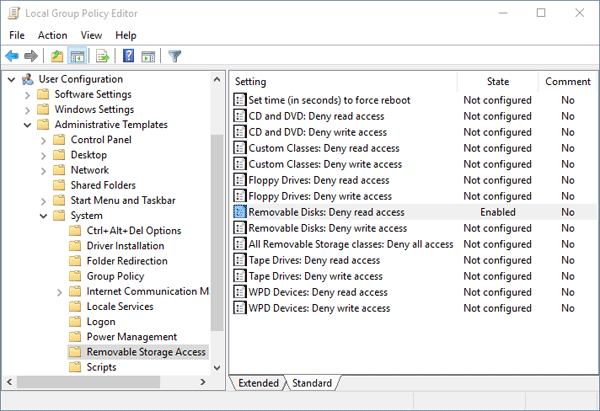
    User Configuration -> Administrative Templates -> System -> Removable Storage Access

    If you want to block access to removable devices for ALL Windows accounts, navigate to this location instead:
    Computer Configuration -> Administrative Templates -> System -> Removable Storage Access

  3. In the right pane, there are lots of settings for denying read/write access to removable disk, CD and DVD. If you want to deny read access to all external removable hard drive or USB flash drive, just double-click on the policy “Removable Disks: Deny read access“, and set it to Enabled.

    usb-storage-access

  4. In order to make your changes take effect immediately, open an administrative Command Prompt and run the following command:
    gpupdate /force
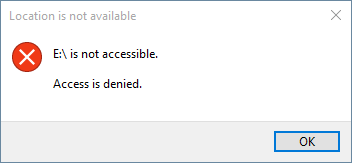
  5. Once your group policy takes effect, a user will see the following message box whenever they attempt to open a removable storage device.

    usb-access-is-denied

Method 2: Using Registry Trick

However, not all editions of Windows has a Group Policy Editor (gpedit.msc). If you’re using a Home edition of Windows, you have to use this registry trick to disable the USB/CD drive access. Here’s how:

  1. Press the Windows key + R to open the Run box. Type regedit and hit Enter.
  2. In the Registry Editor, navigate to the following key:
    HKEY_CURRENT_USER\SOFTWARE\Policies\Microsoft\Windows\RemovableStorageDevices

    If you want to block access to removable devices for ALL Windows accounts, navigate to this key instead:
    HKEY_LOCAL_MACHINE\SOFTWARE\Policies\Microsoft\Windows\RemovableStorageDevices

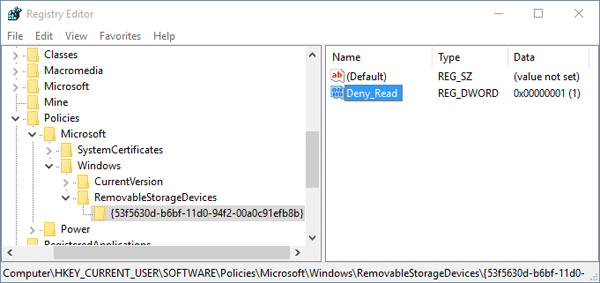
  3. In the left pane, right-click on RemovableStorageDevices, select New -> Key and type in {53f5630d-b6bf-11d0-94f2-00a0c91efb8b}.

    {53f5630d-b6bf-11d0-94f2-00a0c91efb8b} is GUID of the generic USB storage device. If you want to block CD/DVD access, type the GUID {53f56308-b6bf-11d0-94f2-00a0c91efb8b} instead.

  4. In the right pane, right-click on an empty area and select New -> DWORD (32-bit) Value and type Deny_Read and press Enter, modify its value to 1.

    usb-deny-read

    If you want to deny write access, create a new value Deny_Write and set its value to 1.

  5. Close the Registry Editor. Restart your computer to apply changes.

Reset Dell Laptop to Factory Settings without Knowing Admin Password

$
0
0

How to reset your Dell computer to original factory settings if you forgot the administrator password? A forgotten password should not become an obstacle on the way! This guide explains how to perform a factory reset on Windows 10/8/7/Vista Dell laptop, without knowing the admin password.

Note: a factory reset is used to wipe and take your computer back to where it was on the day you opened the box. It will delete everything on your hard drive. Be sure to backup anything you don’t want to lose.

Part 1: Reset Windows 10/8 Dell Laptop to Factory Settings without Admin Password

Locked out of your Dell laptop after forgot the admin password? Don’t worry! Follow these steps and you can factory reset Windows 10 or 8 from the login screen:

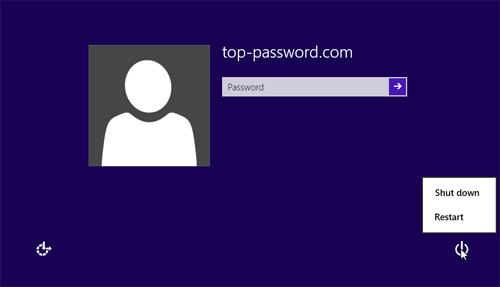
  1. From the login screen, click the Power icon in the lower right corner of the screen. While holding the Shift key, click Restart.

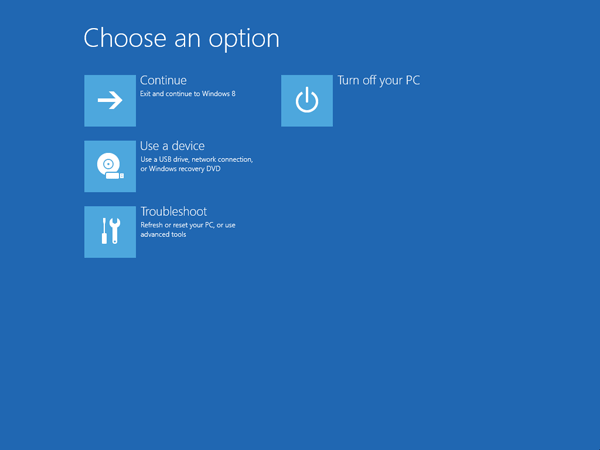
  2. The computer will restart and take you to the troubleshooting option screen. Click on Troubleshoot.

  3. Now you’ll see the options to reset or refresh your computer. Click on Reset your PC.

  4. Click Next. The system will reboot and begin preparing to reset the PC.
  5. At the Reset your PC screen, click Just remove my files and then Click Reset.

Part 2: Reset Windows 7/Vista Dell Laptop to Factory Settings without Admin Password

Unlike Windows 10/8, Windows 7 and Vista will require you to enter admin password when resetting it to factory state. If you’ve forgotten your password, you can remove the password by booting your Dell lapltop from PCUnlocker Live CD. If you don’t have such as a Live CD, you can create one from another computer you have access to.

Once you’ve successfully removed the admin password (or you could remember your password), let’s proceed with a factory reset on your Windows 7/Vista Dell laptop:

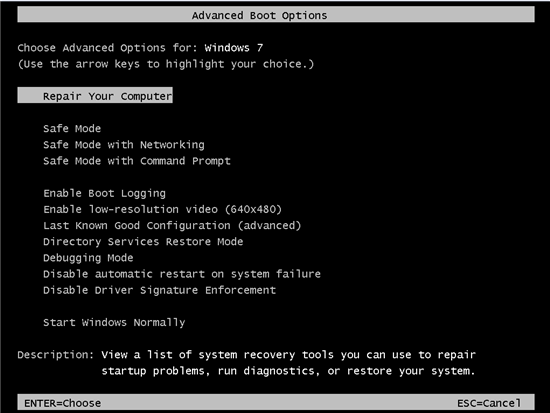
  1. Turn on the laptop. As soon as the Dell logo appears on the screen, repeatedly press the F8 key until you see the “Advanced Boot Options” menu.

    repair-your-computer

  2. Select “Repair your computer” and press Enter. The System Recovery Options screen opens.
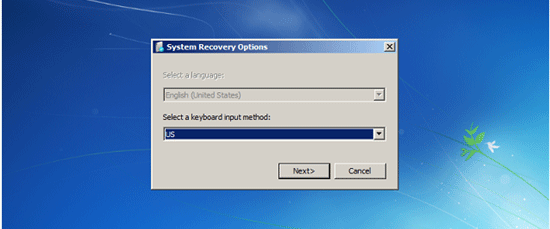
  3. Select your keyboard layout, and then click on Next.

    select-keyboard-layout

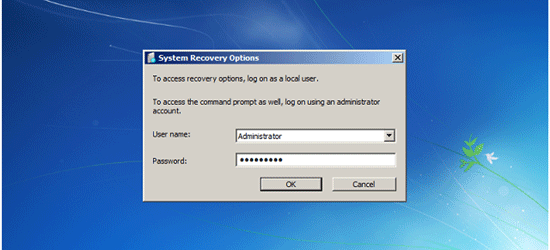
  4. At the next screen it will ask you for the user name and password. Type your Administrator username and password, and then click OK. If you’ve removed the admin password, leave the password field blank.

    enter-admin-password

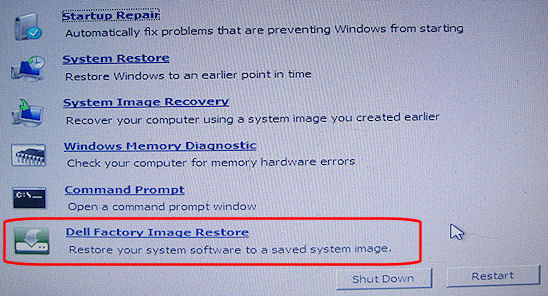
  5. When you’re presented with a list of system recovery options, look for an option named “Dell Datasafe Restore and Emergency Backup“, “Dell Factory Image Restore“, or “Dell Backup and Recovery Managers“. Click on it and follow the on-screen instructions to reset your Dell laptop to factory settings.

    dell-factory-reset

Fix Automatic Startup Repair Loop in Windows 10, 8 and 7

$
0
0

A customer recently mentioned that his Windows 8 laptop was stuck in an Automatic Repair loop. When he turned on the computer, it came up with the ‘Preparing Automatic Repair’ screen, and then rebooted automatically and ran Automatic Repair again, becoming caught in the loop again and again.

There could be many reasons for a failed automatic repair. However, the most common problem is corrupted registry or missing files on the hard disk. Here I will give the complete solutions on how to fix this issue in Windows 10, 8 and 7.

All the solutions below require you to run certain commands at the Command Prompt. Here is a way to access the Command Prompt at boot:

  1. Insert your Windows installation DVD, turn on the computer, and wait until you see the message “Press any key to boot from CD or DVD“. Just press any key to continue. (Note: If you don’t see this message, you probably have to change the boot order in the BIOS)
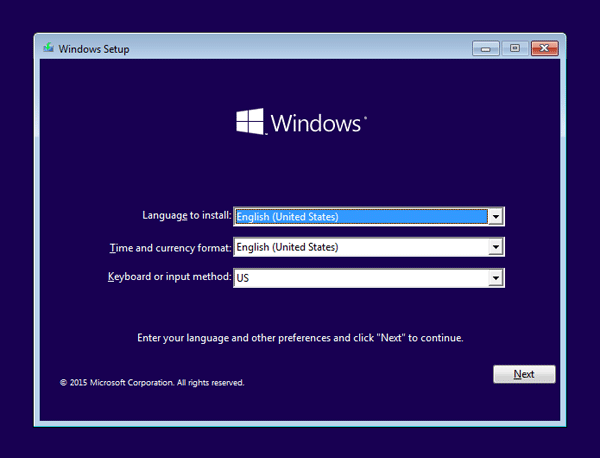
  2. After a while, you’ll get to the Windows Setup screen. Press Shift + F10 to open a Command Prompt.

    windows-setup

Solution 1: Running check disk to see if your hard drive is the problem

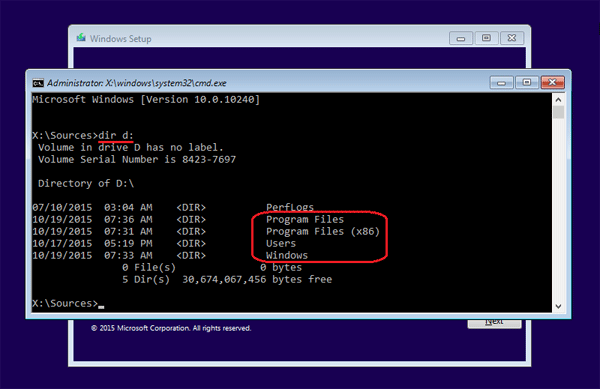
Chkdsk could be used to check and repair your hard drive for filesystem corruption. Before running the chkdsk command, you have to find out the drive letter of your system drive. Depending on how your system is setup, this could be either C: or D:.

  1. Type dir C:\ and press Enter.
  2. If you see the common folders: Program Files, Users and Windows, then you have found your system drive.

    find-system-partition

    If the drive is not your system drive, repeat the step above, changing the drive letter to D, E or some other letter until the system drive is located.

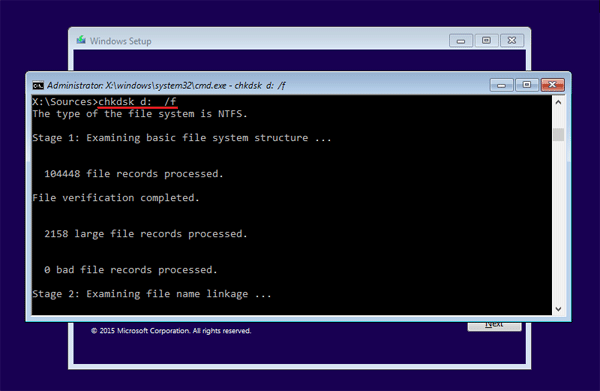
When you have located your Windows system drive, type the following command and press Enter. Replace d: with the actual drive letter of your system drive.

chkdsk d: /f

chkdsk

The scan should start. This could take several hours depending on the size of your hard drive. Once the scan is done, exit the Command Prompt and reboot your computer to check if the problem has been solved.

Solution 2: Manually attempt to rebuild the BCD and repair MBR

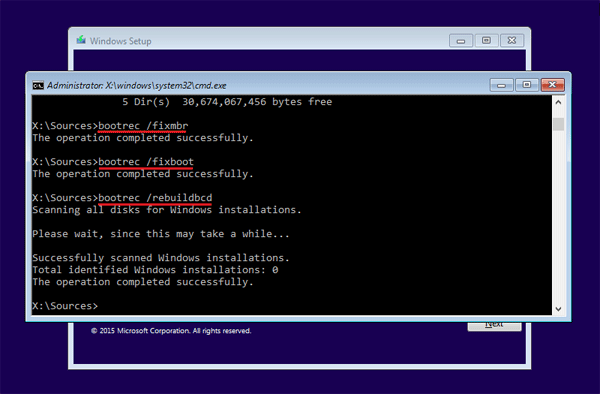
Running the bootrec utility to rebuild the BCD / MBR might fix the automatic repair loop problem. Type the following set of commands at the Command Prompt, one by one.

bootrec /fixmbr
bootrec /fixboot
bootrec /rebuildbcd

fix-mbr

The /fixmbr switch writes a new MBR (Master Boot Record) to the system partition, the /fixboot switch writes a new boot sector onto the system partition, and the /rebuildbcd switch scans all disks for Windows installations and provides a choice of which entries to add to the BCD store.

Solution 3: Disable Automatic Startup Repair

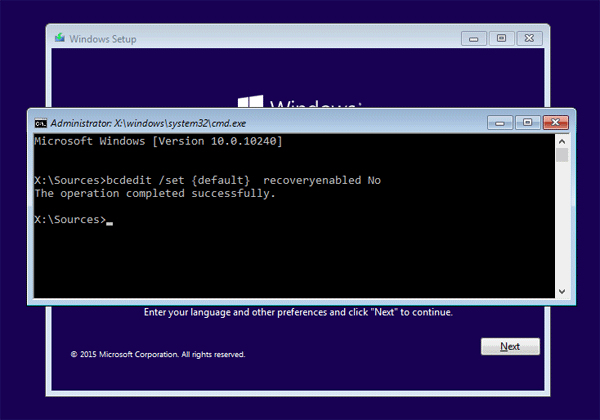
If the automatic repair couldn’t really repair your PC and just get you stuck in a repair loop, it’s better to disable the automatic startup repair. Type the following command and press Enter:

bcdedit /set {default} recoveryenabled No

disable-automatic-repair

Now you’ve successfully disabled the automatic startup repair feature in Windows.

Solution 4: Restore your Windows registry

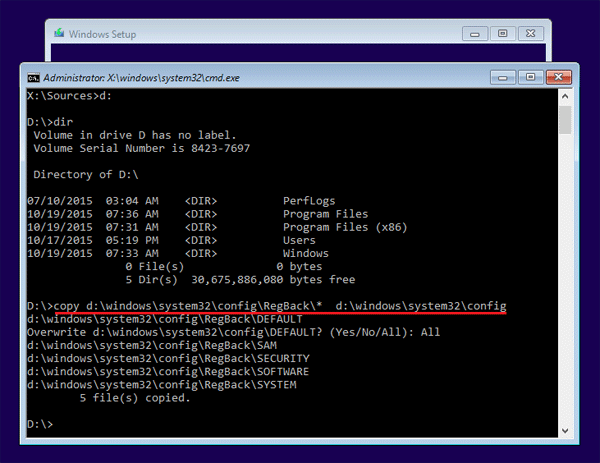
A corrupted registry settings can also cause a auto-repair loop. Here is how to restore your registry from the RegBack directory. The RegBack folder is located in :/windows/system32/config, which is used by Windows to hold a recent backup copy of the registry hives.

Assuming your system drive is d:, run the following command to restore Windows registry:

copy d:\windows\system32\config\RegBack\* d:\windows\system32\config

restore-windows-registry

if prompted to overwrite existing files, type All and hit Enter. Type exit and hit Enter to close the Command Prompt window. Restart your computer and most probably, you may able to access your Windows system as before.

2 Ways to Set Password Hint for Windows User Account

$
0
0

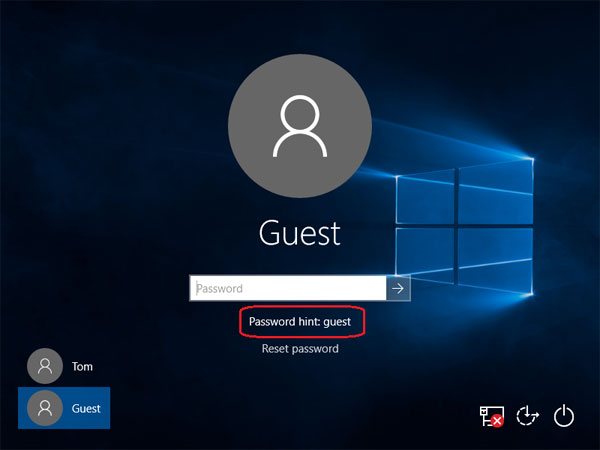
“I have activated the built-in guest account on my system so guests can use to work on my computer. To log on they must enter a password. How can I set a password hint to inform users of the correct password when entering wrong password? Please help!”

windows-password-hint

The password hint is used to remind you of your password in case you forget it. In this article we’ll show you 2 ways to set up a password hint for any user account in Windows 10, 8, 7, Vista and XP. The first method is the most common way of setting a password hint, but it doesn’t work for Windows guest account. While the second method is a bit complicated but it works with any situation.

Method 1: Set A Password Hint Through Control Panel

It’s super easy to set up a password hint when you change or reset your Windows user password. Follow these steps:

  1. Open the Control Panel. Set the View by option to Large icons. Click on User Accounts.

    control-panel

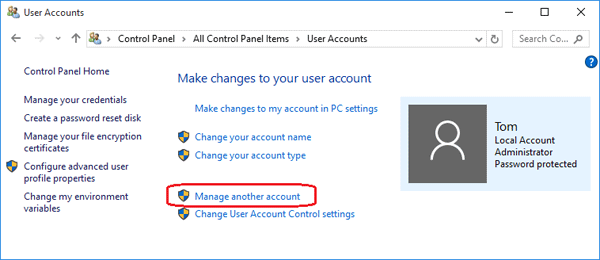
  2. Once on your user account page, click on the Manage another account link at the bottom.

    user-accounts

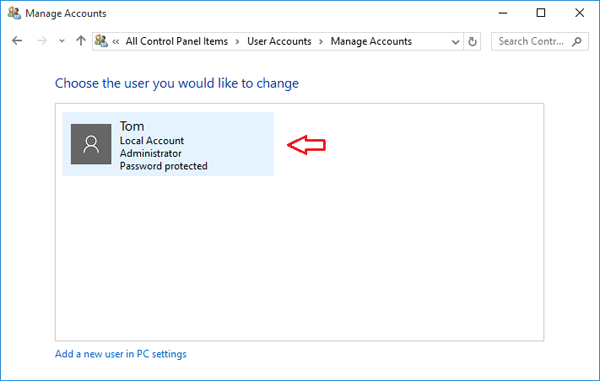
  3. Click on the user account whose password hint you want to create or change.

    manage-accounts

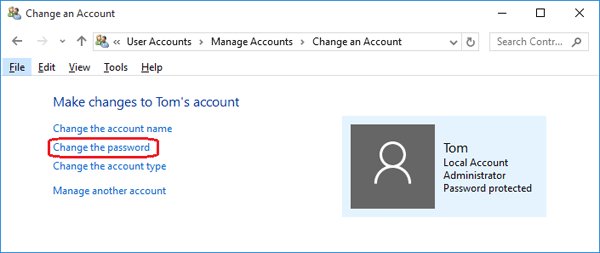
  4. In the next window, click on Change the password.

    change-windows-password

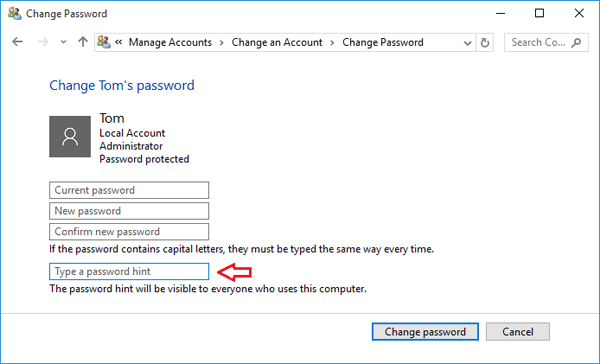
  5. Type your current password and set a new password. Next enter a word or sentence for your password hint that will help you (and you only!) remember your password. Click Change password when you are done.

    set-up-password-hint

Method 2: Set A Password Hint Through Windows Registry

It turns out that the password hint is stored in Windows registry as a readable format after you set up it through the Control Panel. Here we’ll walk you through the steps of set a password hint directly from the registry.

  1. Press the Windows key + R to open the Run box. Type regedit and hit Enter.
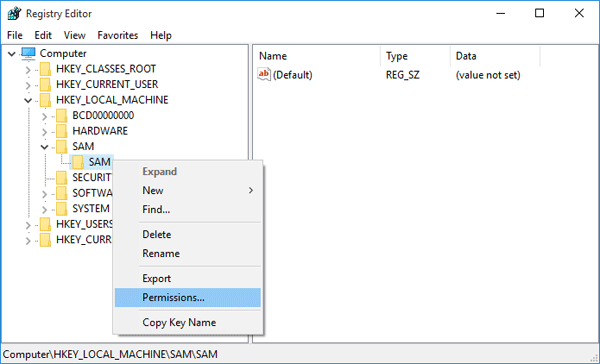
  2. When the Registry Editor opens, navigate to HKEY_LOCAL_MACHINE\SAM\SAM. To go beyond SAM you have to give yourself permission by right-clicking the second SAM Key and selecting Permissions….

    sam-permissions

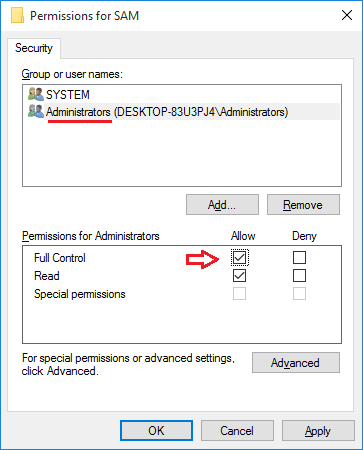
  3. In the Permissions for SAM dialog box, highlight the “Administrators” and click the “Full Control” box, click Apply and OK.

    permissions-for-sam

  4. Press F5 to refresh the registry and you’ll be able to navigate to: HKEY_LOCAL_MACHINE\SAM\SAM\Domains\Account\Users.
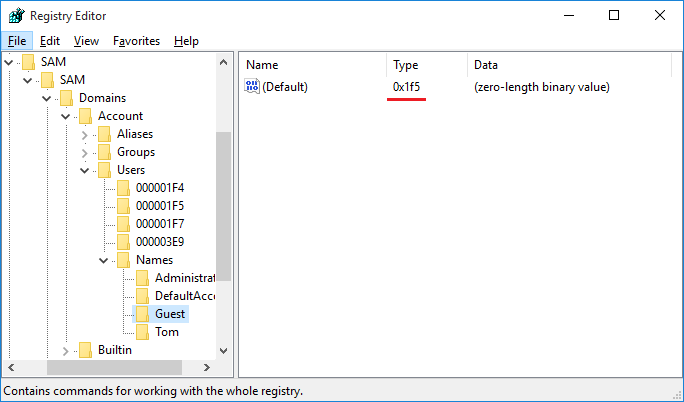
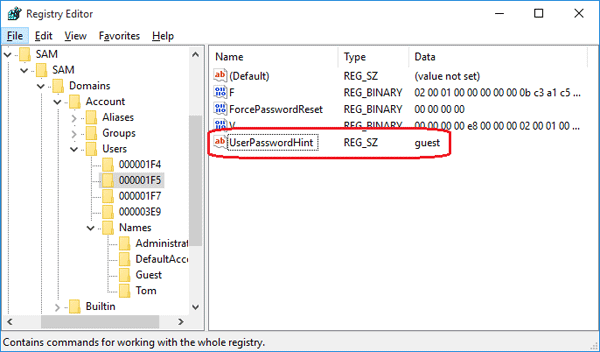
  5. You’ll notice a Names subkey with a registry key for each user account. Click on your desired account and you’ll see the RID of your account in the right pane. In my example, 0x1F5 is the RID of the built-in Guest account.

    account-rid

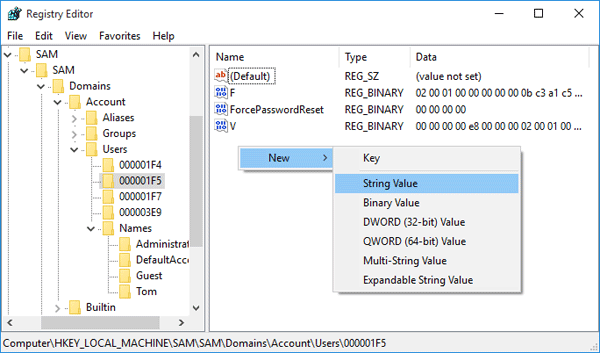
  6. Navigate to HKEY_LOCAL_MACHINE\SAM\SAM\Domains\Account\Users\{User_RID}. Right-click on an empty area in the right pane. From the pop up menu, select New > String Value.

    new-string-value

  7. Rename New Value #1 to UserPasswordHint. Next double-click on UserPasswordHint, type your password hint and click OK. Close the Registry Editor and it’s done.

    UserPasswordHint

After setting the password hint, log off or restart your computer. Type in a wrong password at the Windows login screen and it will show you the password hint as a reminder of the password. Make sure you choose a good and secure password hint. If you’re locked out and the password hint couldn’t remind you of the forgotten password, you have to use PCUnlocker to reset the login.

How to Upgrade to Windows 10 without Using Windows Update

$
0
0

Windows 10 is available to public as a free upgrade to every qualified computers running a genuine copy of Windows 8.1, 8 or 7. (Enterprise editions do not qualify.) Just download the official Media Creation Tool from Microsoft and it allows you to upgrade to Windows 10 as well as create installation media such as bootable USB or DVD drive. This tutorial will show you how to upgrade your current or another computer to Windows 10 directly without using Windows Update.

How to Upgrade Your Computer to Windows 10?

Head over to Microsoft’s website to download the 32-bit or 64-bit version of Media Creation Tool. Pick the 64-bit version if you want to run Media Creation Tool on Windows 8 or 7 64-bit OS. Otherwise opt for the 32-bit version.

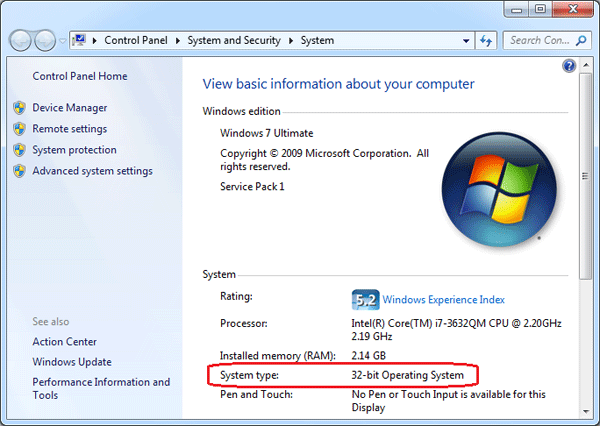
If you don’t know whether you’re running Windows 32-bit or 64-bit, right-click on “My Computer” or “This PC” icon on your desktop and select Properties, the field labeled System Type will indicate if you are using a 32-bit or 64-bit OS.

system-type

Run the Media Creation Tool and follow the steps below to upgrade your current computer or another PC to Windows 10.

Option 1: Upgrade Current Computer to Windows 10

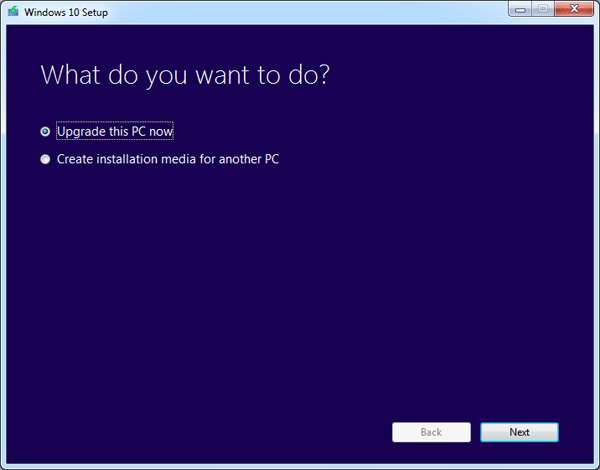
  1. Run the Media Creation Tool and then select the Upgrade this PC now option.

    upgrade-this-pc

  2. The Media Creation Tool will download Windows 10. When it’s done, accept the EULA, you’ll be presented with three options:
    • Keep personal files and apps
    • Keep personal files only
    • Nothing
  3. Select the first option to ensure your PC upgrades and you keep your files and applications. Windows 10 will start installing and after a few reboots and customization you’ll be upgraded.

Option 2: Upgrade Another Computer to Windows 10

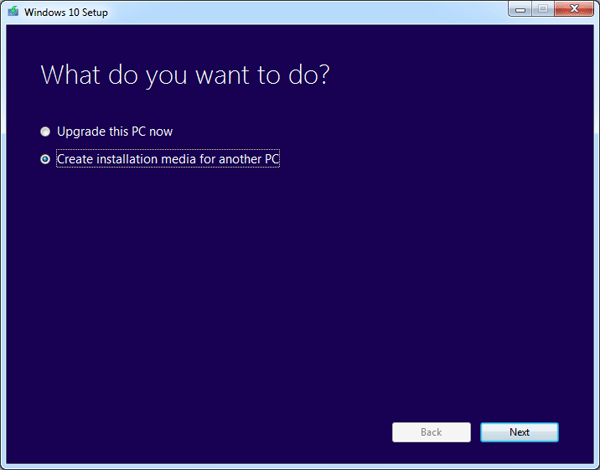
  1. Run the Media Creation Tool and then select the Create installation media for another PC option.

    create-installation-media

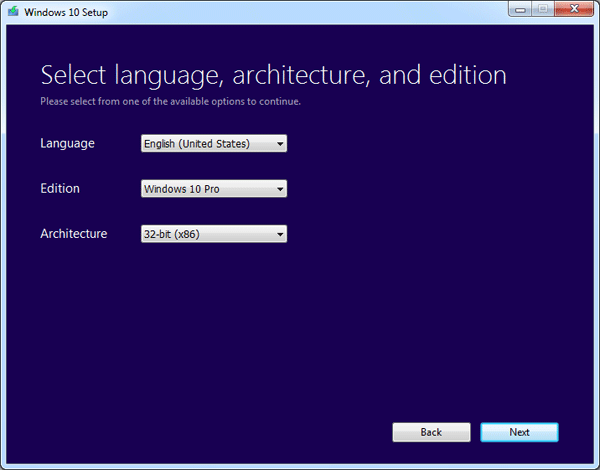
  2. Select the language, edition and architecture (32 or 64 bits) of Windows. Make sure your selections match those of the computer(s) you wish to upgrade. So, if you currently have Windows 8 Pro (32-bit), choose Windows 10 Pro 32-bit.

    select-os-edition

  3. Select USB flash drive. If you plan to burn this to DVD instead, select ISO file and, after the process is over, you’ll have to use a DVD burning program to write the ISO to disc.
  4. Click Finish when the process is complete. If you don’t plan to upgrade to Windows 10 right away, you can remove the drive and stop here.
  5. Insert the created CD or USB flash drive into the computer you want to upgrade, and then run setup.exe. Follow the on-screen instruction to complete the upgrade process. If the software asks you for a product key, you are using the wrong edition of Windows 10 to upgrade.

2 Options to Get out of Safe Mode in Windows 10 / 8 / 7 / Vista

$
0
0

Are you stuck in Windows Safe Mode? Every time you turn on or restart your computer and you still keep ending back in Safe Mode? In this article we’ll show you 2 ways to get out of Safe Mode in Windows 10, 8, 7 and Vista, so your system will go back to normal mode.

Note: The following methods require you to log on your computer as administrator. If you’ve forgotten your password, try to reset lost Windows password with PCUnlocker.

Option 1: Get out of Windows Safe Mode Using MSConfig Utility

MSConfig is a built-in tool available in all versions of Windows, which is designed to help identify problems that might prevent Windows from starting correctly. From within the MSConfig utility, you can set Windows to start in normal node instead of Safe Mode.

  1. Press the Windows key + R to bring up the Run box. Type msconfig and press Enter.

    msconfig

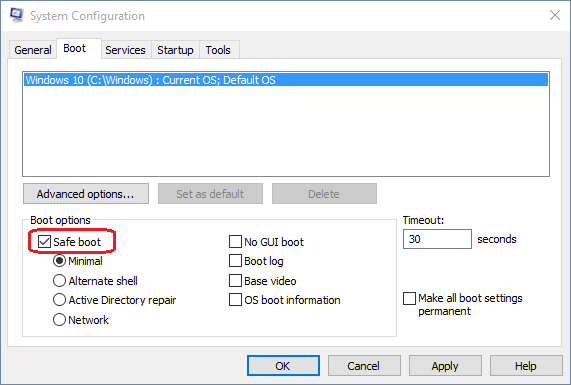
  2. When the System Configuration window opens, you’ll see the Safe boot option under the Boot options section.

    safe-boot-settings

  3. If Safe boot is checked, your computer will keep booting in Safe Mode. To get out of Safe Mode, you have to uncheck Safe boot and click Apply.
  4. Restart your computer and it will start in normal mode.

Option 2: Get out of Windows Safe Mode Using Command Prompt

  1. Before get started, you need to open a Command Prompt with administrator privileges. If your computer is current running in Safe Mode – Alternate Shell, you should be now at an administrator Command Prompt.
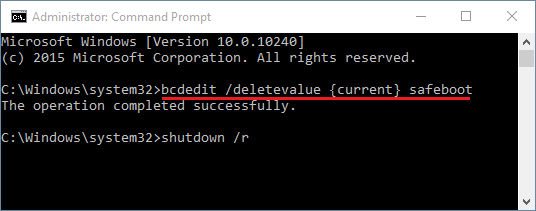
  2. Type the following command directly at the Command Prompt. Press Enter and it will turn off Safe Mode.
    bcdedit /deletevalue {current} safeboot

    get-out-of-safe-mode

  3. Reboot your computer with the command:
    shutdown /r
  4. Now your computer will boot back into normal mode. That’s it!
Viewing all 396 articles
Browse latest View live