Quantcast
Channel: Windows 8 – Password Recovery
Viewing all 396 articles
Browse latest View live

Fix: Windows 8.1 Update (KB2919355) is not applicable to your computer

$
0
0

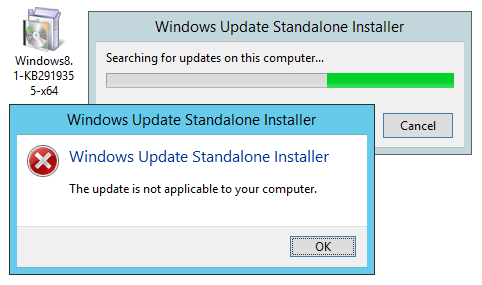
Unable to install Windows 8.1 Update (KB2919355) on your computer? Even if you’ve enabled automatic update in Windows, you might find out that KB2919355 doesn’t appear in the list of available updates. If you download KB2919355 directly from Microsoft’s online website and then install it manually, Windows Update Standalone Installer will fail with the error message “The update is not applicable to your computer“.

update-not-applicable

KB2919355 is essentially a service pack released for Windows 8.1 and Windows Server 2012 R2, but Microsoft has decided not to call it “service pack”. It is officially known as “Windows 8.1 Update”. In this article we’ll show you an effective way to install Windows 8.1 Update on Windows 8.1 and Windows Server 2012 without such a problem.

How to Install Windows 8.1 Update (KB2919355) Successfully?

  1. Press the Windows key + X to open up the Quick Access Menu. Next click Control Panel.
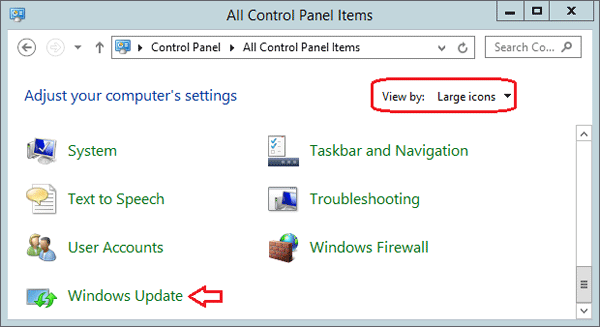
  2. Click the View by option at the top right of the Control Panel. Set it to Large icons. Click on Windows Update.

    control-panel

  3. Click the Change settings link on the left side of the Windows Update window.

    windows-update

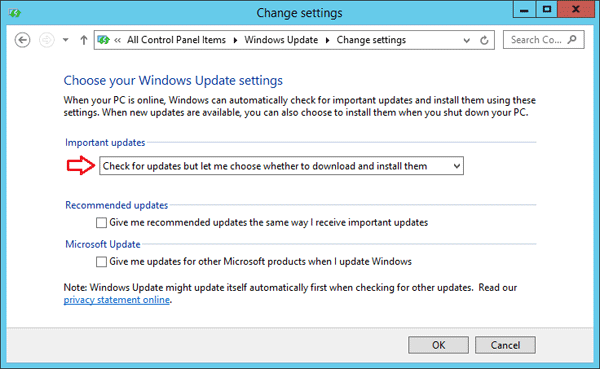
  4. Under Important updates, check the “Check for updates but let me choose whether to download and install them” option from the drop-down menu. Click OK.

    windows-update-settings

  5. When come back to the Windows Update window, click on the Check for updates link in the left pane. The search may take some time, depending on how many updates are waiting.

    check-for-updates

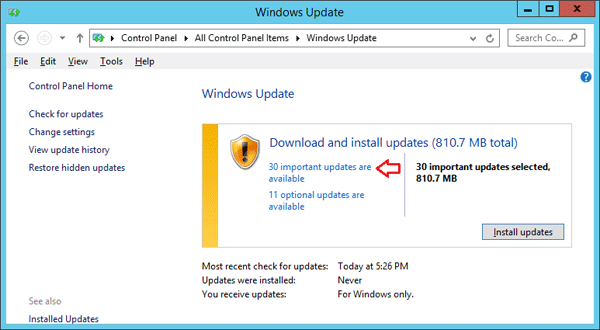
  6. When the search is finished, click the link that says how many important updates are available.

    available-updates

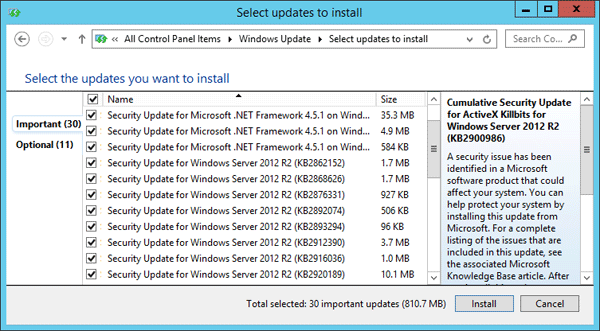
  7. In the list of available updates, select the update KB2919355, then click Install and you’re done! However, if the update KB2919355 doesn’t appear in the list of available updates, check ALL important updates and click Install.

    install-windows-updates

  8. After installing all available important updates, open your Web browse to download the Windows 8.1 Update from Microsoft’s website:

    At the download page, select your language and then click the Download button.

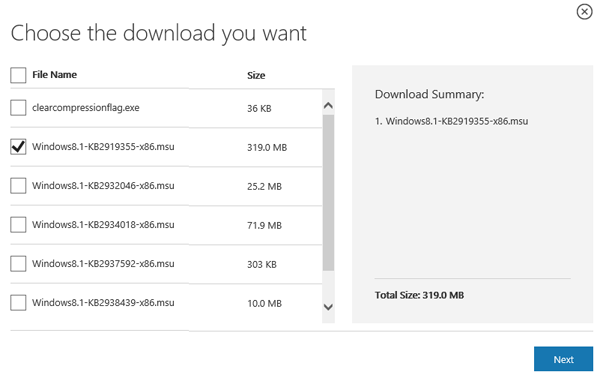
  9. Windows 8.1 Update contains six separate files: clearcompressionflag.exe, KB2919355, KB2932046, KB2934018, KB2937592 and KB2938439. You just need to select the file contains KB2919355 and click Next to begin downloading.

    KB2919355

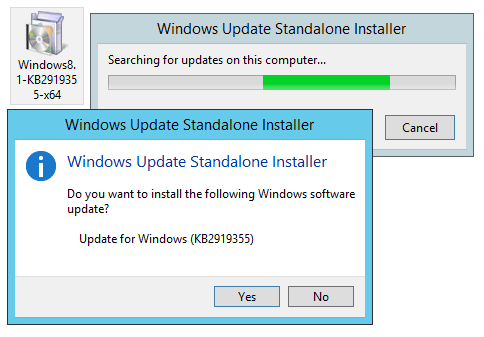
  10. Now double-click on the update KB2919355 you’ve downloaded and it should be able to be installed successfully.

    install-kb2919355


How to Turn on / off Adaptive Brightness in Windows 10 / 8

$
0
0

Adaptive brightness is a new feature in Windows 8 / 10 that uses an ambient light sensor to automatically adjust your screen’s brightness to your surroundings. When you have mostly dark stuff on screen (like a text editor with dark background), the screen will dim automatically. While on a white background it will brighten. These changes happen automatically after a few seconds, and they can also sometimes manifest as noticeable flickering.

If the brightness switching is driving you crazy, you can disable this feature so your screen will stay at the brightness level you want. In this post we’ll show you how to turn on / off adaptive brightness in Windows 10 and 8.

How to Turn on / off Adaptive Brightness in Windows 10 / 8?

  1. Press the Windows logo key + X to open the Quick Access menu. Click Control Panel.
  2. When Control Panel is open, set the View by option to Large icons. Click Power Options.

    control-panel

  3. Find your currently selected power plan and click on the associated “Change plan settings” link.

    power-options

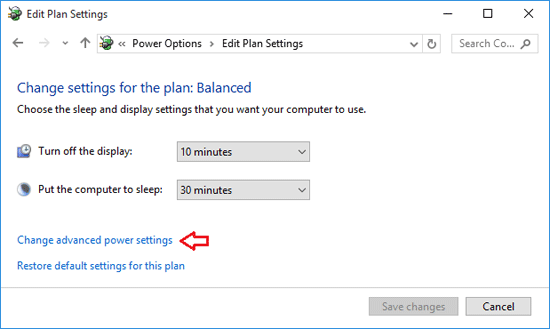
  4. Now click on “Change advanced power settings“.

    edit-power-plan

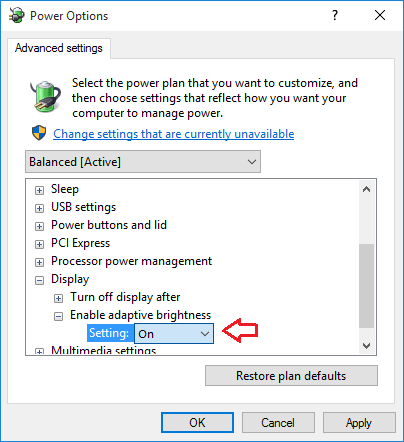
  5. Scroll down to Display –> Enable adaptive brightness, and change the settings there to Off or On.

    adaptive-brightness

    If you set it to off, your screen will maintain a constant brightness level. If you don’t see this setting, it means that your computer doesn’t come with light sensors.

Change Account Lockout & Password Complexity Policy in Windows 10, 8, 7, Vista and XP

$
0
0

Unable to change Windows password and keep getting the error “The password you typed does not meet the password policy requirements“? How to make the system lock your account when a hacker tries to guess your password continuously? In this guide we’ll show you how to change the account lockout and password complexity requirement policy from Command Prompt, Local Security Policy Editor, or by exporting / importing your policy. These methods work on Windows 10, 8, 7, Vista and XP.

Local Security Policy

Local Security Policy allows enforcing many system-wide, user and security-related settings, such as password policy, account lockout policy, audit policy and user rights.

When you want change a security setting this is how you launch the Local Security Policy Editor:

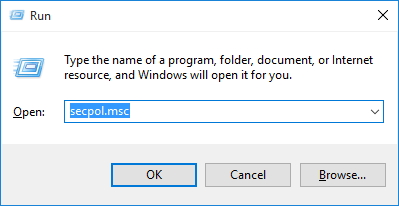
  1. Press the Windows key + R to bring up the Run box.
  2. Type secpol.msc and hit Enter.

    secpol

    When the Local Security Policy Editor opens, you can navigate to the security policy you’re interested.

Note that the Local Security Policy Editor is not available on the Home edition of Windows. So if you’re running Windows 10/8/7/Vista/XP Home, you have to change the local security policy from Command Prompt.

Change Password Complexity Requirement Policy

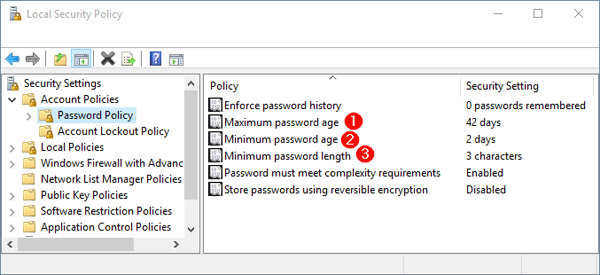
In the left pane of Local Security Policy Editor, expand Account Policies and then click Password Policy. In the right pane you see a list of password policy settings. Double-click on the policy you want to modify, it will open the Properties box and you can change the setting to desired value.

password-policy

  • Maximum password age
    Set the maximum number of days that a password is valid. After this number of days, the password is expired and Windows will force you to change the password at the next logon. You can set the Maximum password age between 1 and 999, or set it to 0 so your password will never expire.
  • Minimum password age
    This security setting determines the period of time (in days) that a password must be used before the user can change it. You can set a value between 1 and 998 days, or set it to 0 for allowing to change password anytime. This policy allows you to limit how frequently a user may change the password.
    Note: The Minimum password age must be less than the Maximum password age, unless the Maximum password age is set to 0.
  • Minimum password length
    Specify the least number of characters a password can have. You can set a value of between 1 and 14 characters, or set to 0 if you allow blank password. This policy can reject a user to set a short password that does not meet a minimum password length. For security reasons you’ll generally want passwords of at least six characters because long passwords are usually harder to crack than short ones.
  • Password must meet complexity requirements
    If this policy is enabled, passwords must meet the following minimum requirements:
    1. Be at least six characters long
    2. Contain a combination of at least three of the following characters: uppercase letters, lowercase letters, numbers, symbols (punctuation marks)
    3. Don’t contain the user’s user name or screen name

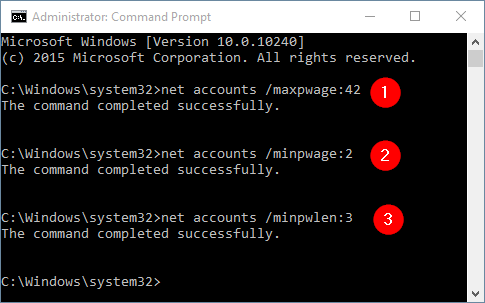
You can also change the password policy from an elevated Command Prompt. This is especially useful if you’re running Windows Home edition.
For example, if you want to change Maximum password age to 42 days, type the command:
net accounts /maxpwage:42

Set Minimum password age to 2 days, type:
net accounts /minpwage:2

Set Minimum password length to 3 characters, type:
net accounts /minpwlen:3

change-password-policy

Change Account Lockout Policy

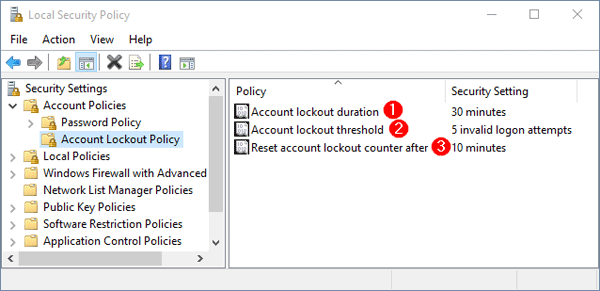
In the left pane of Local Security Policy Editor, expand Account Policies and then click Account Lockout Policy. In the right pane you see three policy settings. Double-click on the policy and you can change the setting to desired value.

account-lockout-policy

  • Account lockout duration
    Specify the number of minutes that a locked account remains inaccessible before it automatically becomes unlocked. You can set the account lockout duration between 1 and 99,999 minutes. If you set it to 0, then a locked out account will remain locked until an administrator manually unlocks that account. This policy has to set along with Account lockout threshold policy.
  • Account lockout threshold
    Set the number of invalid logon attempts that are allowed before an account becomes locked out. The lockout threshold can be set to any value from 0 to 999. If the lockout threshold is set to zero, accounts will never be locked out due to invalid logon attempts.
  • Reset account lockout counter after
    Specify the time (in minutes) that must elapse after a failed logon attempt before logon attempt counter is reset to 0. The available range is 1 minute to 99,999 minutes.

    Note: The Account lockout duration must be greater than or equal to the Reset account lockout counter after time.

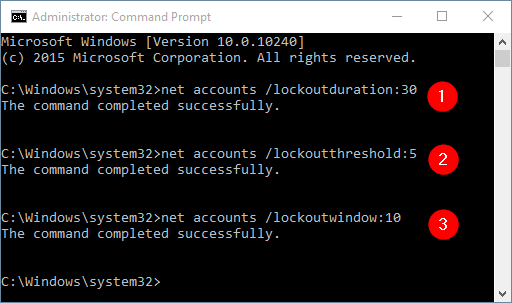
Here is how you can change the account lockout policy from an elevated Command Prompt.
For example, if you want to set Account lockout duration to 30 minutes, type:
net accounts /lockoutduration:30

Set Account lockout threshold to 5 bad logon attempts, type:
net accounts /lockoutthreshold:5

Set Reset account lockout counter after to 10 minutes, type:
net accounts /lockoutwindow:10

change-account-lockout-policy

Change Local Security Policy by Exporting and Importing

How to copy local group policy objects from one machine to another? Is it possible to disable the “Password must meet complexity requirements” policy using Command Prompt? All these can be achieved by exporting & importing the local security policy. Here’s how:

  1. Open an elevated Command Prompt.
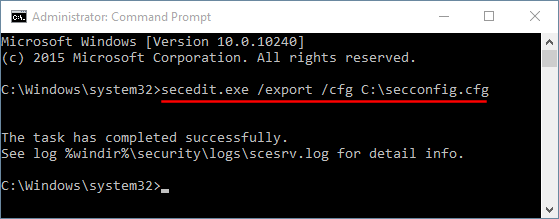
  2. Type the following command and press Enter. This will export all the settings of local security policy to a text file.
    secedit.exe /export /cfg C:\secconfig.cfg

    export-account-policies

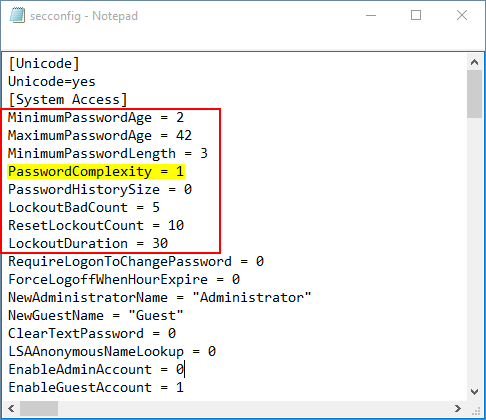
  3. Open the C:\secconfig.cfg file with NotePad and you can view and modify the policy for your own purpose. For example, if you want to disable the password complexity requirements policy, just set the value PasswordComplexity to 0 and save your changes.

    secconfig

  4. Type the following command to import the local security policy from the file C:\secconfig.cfg. Of course, you can move the secconfig.cfg file to another computer and then import the policy.
    secedit.exe /configure /db %windir%\securitynew.sdb /cfg C:\secconfig.cfg /areas SECURITYPOLICY
  5. Restart your computer and the imported security policy will take effect.
How to Restore Local Security Policy to Default in Windows 10, 8, 7, Vista and XP

$
0
0

Did you mess with the local security policy? Or a certain program changed the security policy that caused some strange issues? Luckily there is a simple way to reset / restore your local security policy settings to default in Windows 10, 8, 7, Vista and XP, if you mess up.

How to Restore Local Security Policy to Default in Windows 10, 8, 7, Vista and XP?

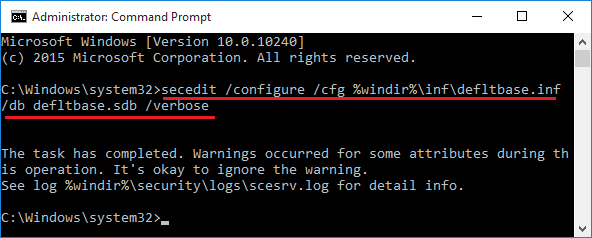
This method uses the default security configuration templates to reset the local policies (including account lockout and password complexity requirements policy). Here’s how to reset local security policy settings to their default values:

  1. Open an elevated Command Prompt. In Windows 10 and 8, press the Windows + X key combinations to open the Quick Access menu and choose Command Prompt (Admin). In Windows 7 or Vista, click the Start menu, then select All Programs -> Accessories, right-click on Command Prompt and select “Run as administrator”.
  2. Now copy and paste the following command into the Command Prompt. Hit Enter.
    secedit /configure /cfg %windir%\inf\defltbase.inf /db defltbase.sdb /verbose

    If you are running Windows XP and need to reset the security settings to their default values, use this command instead:
    secedit /configure /cfg %windir%\repair\secsetup.inf /db secsetup.sdb /verbose

    reset-local-security-policy

  3. This will take a few minutes to reset all the policies back to the Windows defaults. you’ll have to restart the computer to see the changes.

4 Ways to Enable Built-in Administrator Account on Windows 10 / 8

$
0
0

The built-in Administrator account is hidden & disabled by default in Windows. There is always a built-in Administrator account associated for every Windows installations. It’s a super administrator account that gives you some extra privileges over the normal administrator account. In this tutorial we’ll show you 4 ways to enable the built-in Administrator on Windows 10 / 8.

Method 1: Enable Built-in Administrator from Command Prompt

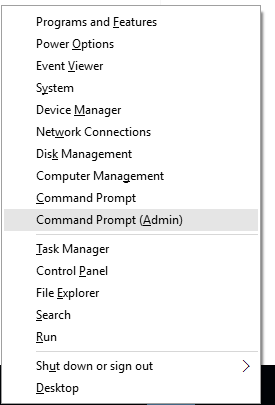
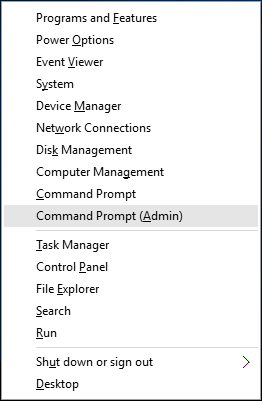
  1. Press the Windows key + X to open the Quick Access menu, and then select Command Prompt (Admin).

    quick-access-menu

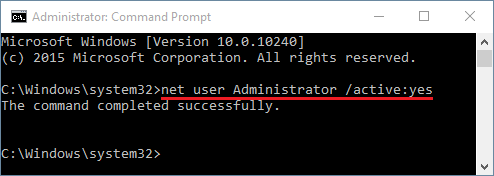
  2. In the Command Prompt, type the following command and press Enter.
    net user Administrator /active:yes

    enable-admin-account

  3. As soon as you execute the command, the super built-in Administrator account is enabled, and you can access it by switching the accounts.

Method 2: Enable Built-in Administrator from Computer Management

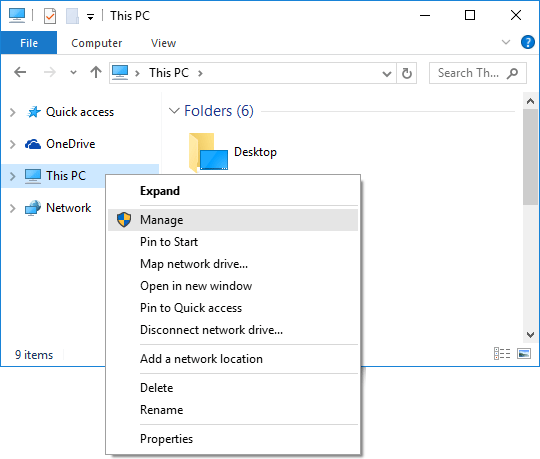
  1. After opening the File Explorer, right-click on “This PC” (or “This Computer”) on the left navigation pane, and then select Manage.
    manage-pc

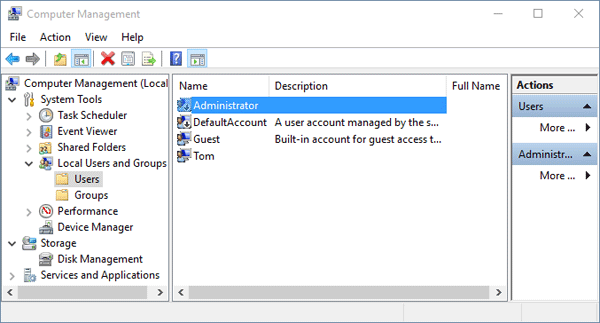
  2. When the Computer Management window opens, expand System Tools > Local Users and Groups > Users.

    local-users

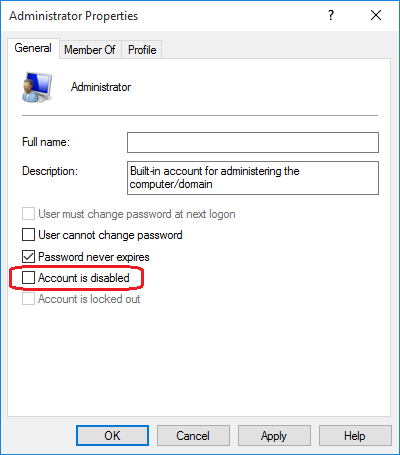
  3. In right-side pane double-click on Administrator account. It’ll open its Properties window. Uncheck the “Account is disabled” option.

    account-is-disabled

    Click Apply and then OK.

Method 3: Enable Built-in Administrator Through Local Security Policy

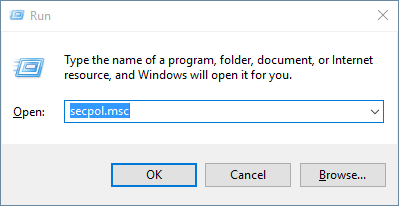
  1. Press Windows key + R to open the Run box. Type secpol.msc and hit Enter.

    secpol

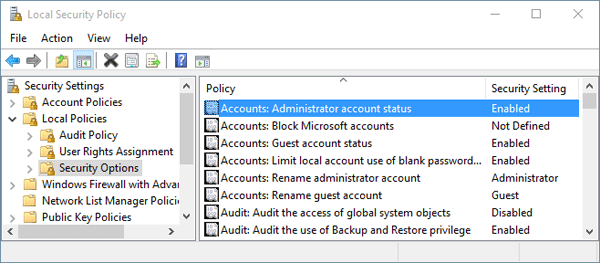
  2. When the Local Security Policy window opens, expand Local Policies > Security Options.
  3. In right-side pane, double-click on the policy “Accounts: Administrator account status” and set it to Enabled.

    administrator-status

    Click Apply and then OK.

Note: Local Security Policy Editor is not available on home editions of Windows.

Method 4: Enable Built-in Administrator without Logging In

All the above methods are fairly simple, but they work assuming you can still log on to Windows 10/8 with admin rights. What to do if you’re locked out of your computer? Follow the procedure described below and it allows you to activate the built-in Administrator account without logging in:

  1. Boot your problematic computer from Windows 10 or 8 installation DVD. Make sure that your PC’s BIOS (UEFI) Setup is configured to boot from a DVD and that UEFI and Secure Boot are disabled.
    press-a-key-to-boot-cd

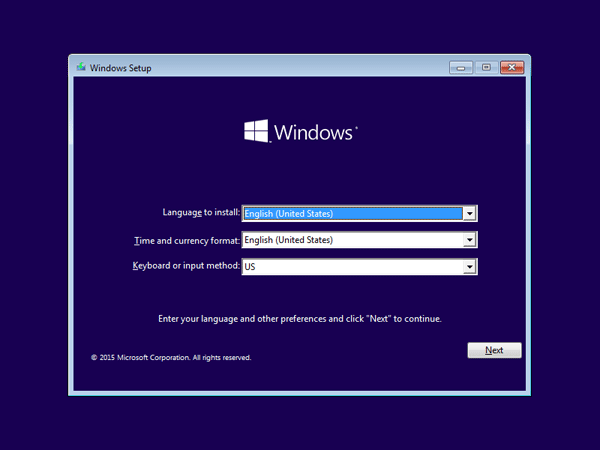
  2. After booting into the DVD media, you’ll see the Windows Setup screen.

    windows-setup

    Just press SHIFT + F10 to open a Command Prompt.

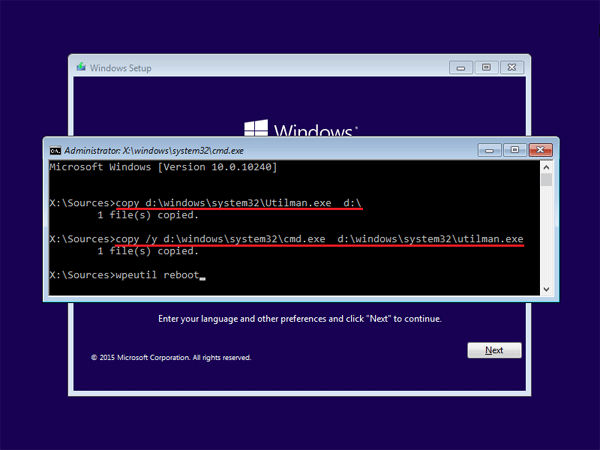
  3. In the Command Prompt, type the following commands one by one, press Enter after each. That will make a copy of the utilman.exe file, and then replace utilman.exe with cmd.exe. In most cases, Windows 10 or 8 is located on drive d:\. If that’s not your case, make sure you replace d:\ with the drive letter of the partition where Windows 10/8 is installed.

    copy d:\windows\system32\utilman.exe d:\
    copy /y d:\windows\system32\cmd.exe d:\windows\system32\utilman.exe

    replace-utilman

  4. Now type wpeutil reboot and hit Enter to reboot your computer. Eject the DVD media and let your computer boot from local hard drive.
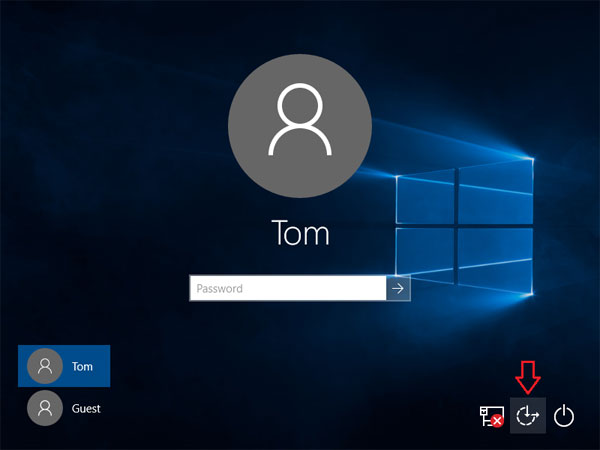
  5. Wait until Windows boots to the login screen. Click the Ease of Access button in the lower-left corner of your screen.

    ease-of-access

    Since we replaced the utilman.exe with cmd.exe, a Command Prompt should open now.

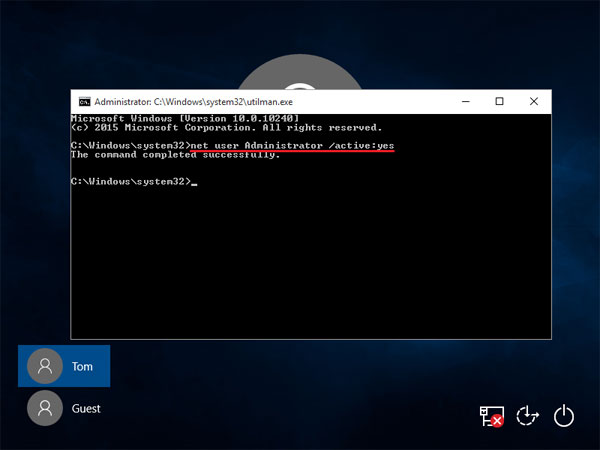
  6. At the Command Prompt, type the following command to activate the built-in Administrator account:
    net user Administrator /active:yes

    activate-administrator

  7. Close the Command Prompt and reboot your computer. You can sign in to Windows 10/8 with the newly activated Administrator account.

4 Ways to Rename Windows Local Administrator or Guest Account

$
0
0

How to change Windows administrator account name? The built-in administrator account is one of the most Windows accounts targeted by attackers. To improve security on your computer, you should rename the administrator account to less common name because this lowers the risk of brute force attacks.

In this tutorial we’ll show you 4 ways to rename Windows 10/8/7 user account, including the local administrator and guest accounts.

Method 1: Change Windows Account Name from Command Prompt

How to rename a Windows account from Command Prompt? Well, you can use the net user command to either reset a user password or activate a disabled/locked account, but it doesn’t support renaming user account. To rename a Windows account, we need to use the WIMC command. Here’s how:

  1. Open an elevated Command Prompt. In Windows 10 or 8, press the Windows key + X and select “Command Prompt (Admin)” from the power user menu.

    command-prompt-with-admin

    If you’re using Windows 7 or Vista, click Start, then All Programs -> Accessories, right-click Command Prompt and select Run as administrator.

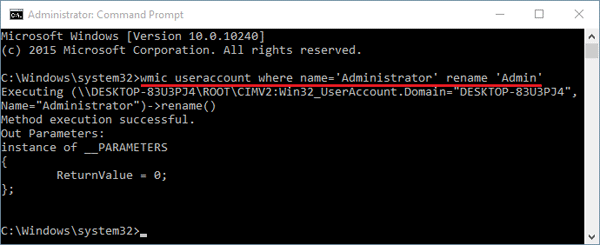
  2. At the Command Prompt, run the following command for renaming the administrator account, replacing Admin with your desired name.

    wmic useraccount where name='Administrator' rename 'Admin'

    rename-windows-account

  3. You’ve successfully changed the built-in administrator account name.

Method 2: Change Windows Account Name in Computer Management

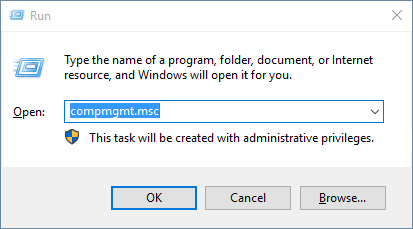
  1. Press the Windows key + R to bring up the Run box. Type compmgmt.msc and hit Enter.

    compmgmt

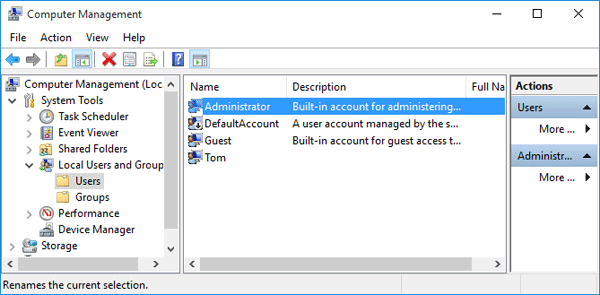
  2. The Computer Management console should open. Expand System Tools -> Local Users and Groups -> Users and you’ll see a list of local user accounts in the right pane.

    local-users

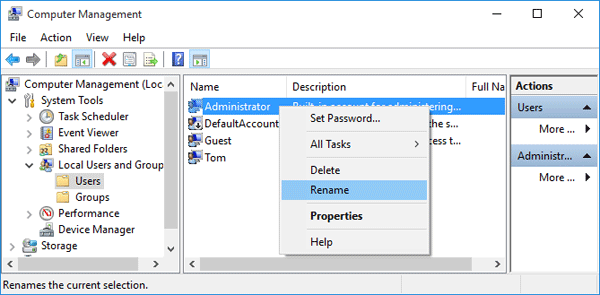
  3. Right-click on the local account you wish to rename, and then select Rename from the drop-down context menu.

    rename-local-account

  4. Once you click on the Rename option, you will be able to edit the account name. Type in the new name you want to give the account and press Enter.

Method 3: Change Windows Account Name from Control Panel

  1. First of all, you need to open the Control Panel applet. Set the View by option to Large icons and then click User Accounts.

    control-panel

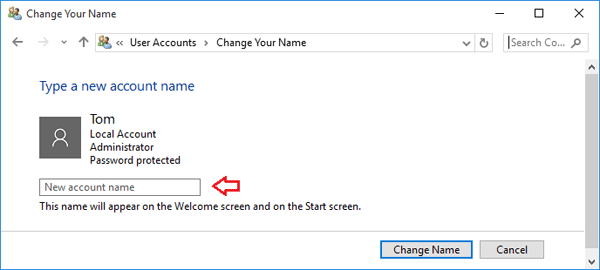
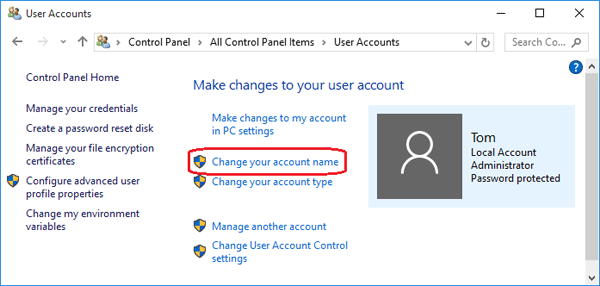
  2. On the User Accounts window, click the “Change your account name” link.

    user-accounts

  3. Now you can change the account name to something of your choice. When done, click on the Change Name button.

    change-windows-account-name

Method 4: Rename Windows Administrator/Guest Using Local Security Policy

This method only allows you to rename the built-in local administrator and guest accounts in Windows.

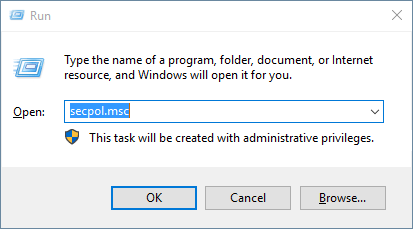
  1. Press the Windows key + R to open the Run box. Type secpol.msc and press Enter.

    secpol

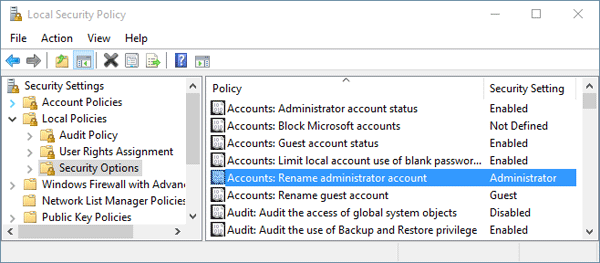
  2. The Local Security Policy Editor should open. Navigate to Security Settings -> Local Policies -> Security Options.
  3. In the right pane, find the policy “Accounts: Rename administrator account“, and double-click on it to open the respective policy setting.

    rename-administrator-account

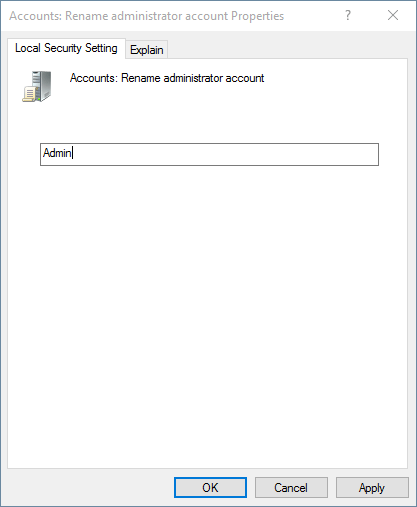
  4. Simply enter the new administrator account name and click OK. Your Administrator account has now been renamed to the one you entered.

    new-admin-account-name

Note that you can also change the name of the built-in Guest account because there is also a local policy “Accounts: Rename guest account” for guest account.

How to Change or Remove User Account Picture in Windows 10 / 8

$
0
0

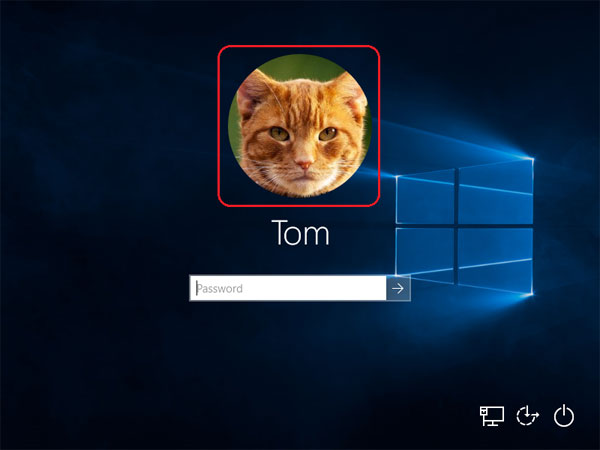
At Windows login screen you can see a list of user accounts with a small picture next to each one. Actually, the same account picture is also shown at the top of the Start menu (or Start screen), and you can click it to log off and switch user accounts.

windows-10-account-picture

In this article we’ll show you how to change the user account picture in Windows 10/8, restore the default user picture (avatar) or delete your old or current account picture.

Part 1: Change Account Picture for Windows 10/8 Account

Unlike previous versions of Windows, Windows 10 and Windows 8 don’t include an option to change the account picture from the User Accounts applet in Control Panel. Now, you have to change it from PC Settings. Here’s how:

  1. Click the Start button or press the Windows logo key on your keyboard. This will open the Start Menu (or Start Screen).
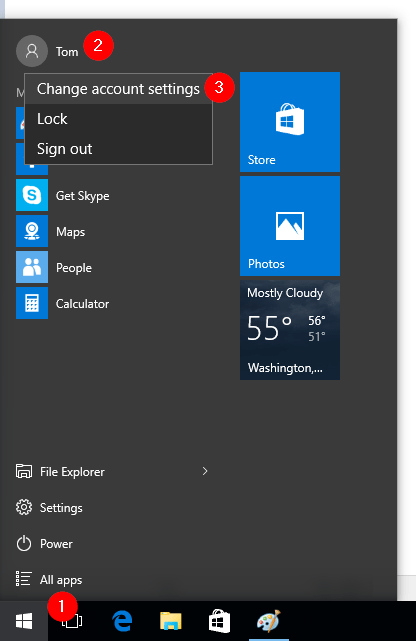
  2. Right-click on the account picture at the top-left corner of the Start menu, and then select “Change account settings“. If a Start screen is shown, right-click on the account picture at the top-right corner of the Start screen and select the “Change account picture” option.

    windows-10-start-menu

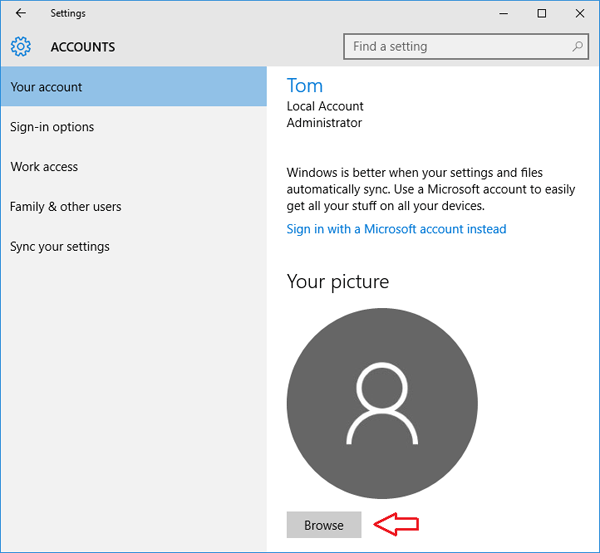
  3. Windows presents the PC Settings screen shown below. From there you can see your current account picture. Click on Browse button and select your favorite picture to set as new account picture.

    change-windows-10-account-p

Part 2: Reset/Restore Account Picture to Default

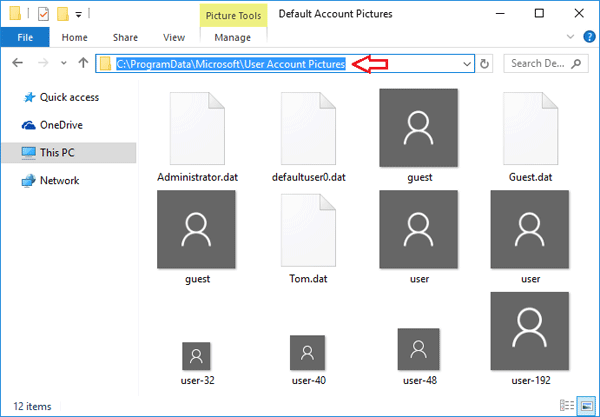
After changing the account picture, you might later find that there is no option to restore the profile picture to default. In Windows 10/8/7, the default account picture images are stored in the hidden system folder: C:\ProgramData\Microsoft\User Account Pictures. Here’s how to reset account picture to default in Windows 10/8:

  1. Click the Start button or press the Windows logo key on your keyboard. This will open the Start Menu (or Start Screen).
  2. Right-click on the account picture at the top-left corner of the Start menu, and then select “Change account settings“. If a Start screen is shown, right-click on the account picture at the top-right corner of the Start screen and select the “Change account picture” option.
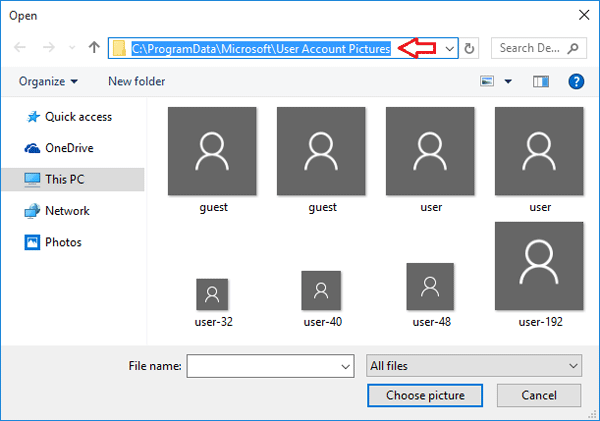
  3. Click on Browse button under your current user avatar. When the Open dialog appears, type the following path in the address bar and hit Enter.

    C:\ProgramData\Microsoft\User Account Pictures

    windows-default-account-pictures

  4. There, you will be able to pick the default user image.

Part 3: Delete Your Old Account Picture

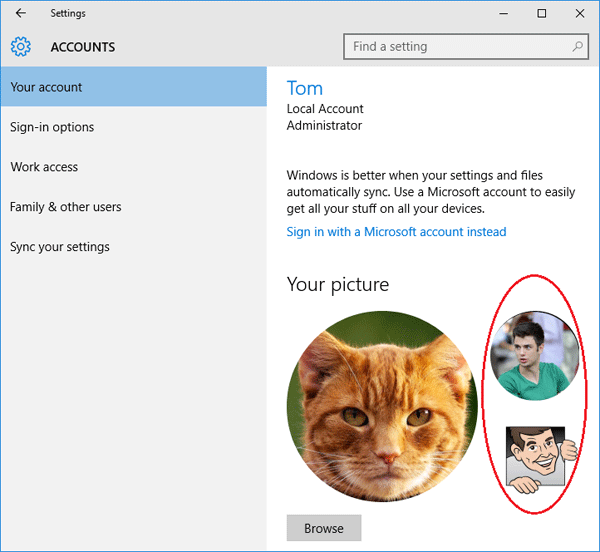
If you changed your Windows user account picture several times, the previous account pictures will also be shown on the right side of your current account picture.

show-old-account-pictures

If you don’t plan to use them again, there is no reason to keep them there. But Windows 10/8 provide no way to remove old user pictures. Here is very simple way to delete the old user account pictures:

  1. Open the File Explorer.
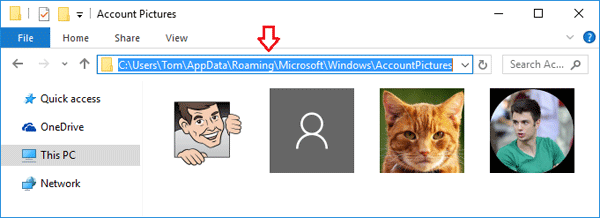
  2. Type the following path at the address bar, replacing username with the name of your Windows account.
    C:\Users\username\AppData\Roaming\Microsoft\Windows\AccountPictures

    windows-account-pictures

  3. Here you will get all those images what was ever used as your profile picture. Delete all the old images that you do not want to keep. That’s it! Your user picture cache is clean now.

Part 4: Hide or Remove Current Account Picture

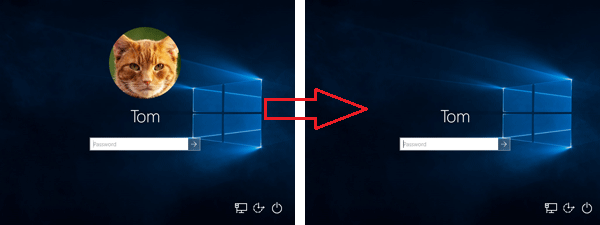
Is there a way to hide or remove the user picture at the login screen? How to disable the user account picture from the Start menu? Follow these steps and you can hide/remove current account picture completely in Windows 10/8:

  1. Open the File Explorer.
  2. Copy and paste the following path in the address bar of File Explorer. Press Enter and you can see all built-in default account pictures. Delete all images.
    C:\ProgramData\Microsoft\User Account Pictures

    user-account-pictures

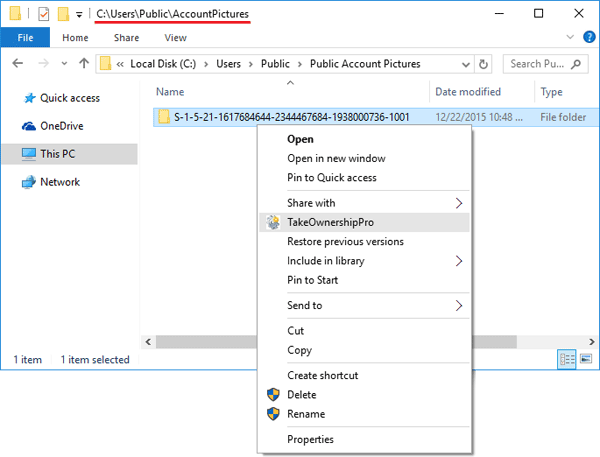
  3. Now you have to clean the cached account images. Copy and paste the following path in the address bar of File Explorer. Press Enter and you’ll see a folder with the name of your account’s SID.
    C:\Users\Public\AccountPictures

    public-account-pictures

    Just rename the folder or delete it. If you want to delete that folder, you need to firstly take ownership of the folder using the freeware TakeOwnershipPro.

  4. Log off or restart your computer. You’ll see the account picture disappeared from Windows login screen.

    remove-account-picture

How to Rename User Profile Directory in Windows 10, 8 and 7

$
0
0

In previous post we’ve explained how to rename Windows administrator or guest account. However, just rename a user account and Windows won’t automatically rename the associated user profile folder. In this tutorial we’ll show you how to manually rename user profile directory in Windows 10, 8 and 7, if the name of your user account folder is not what you want.

How to Rename User Profile Directory in Windows 10, 8 and 7?

To make sure your renaming of user profile folder is consistent across the entire installation of your Windows and does not break anything, follow these steps:

  1. Log on to another Administrator account that is not the account being renamed.
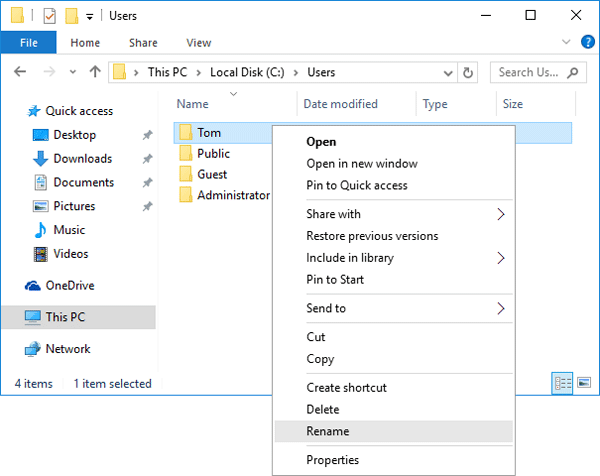
  2. Open the Windows Explorer and browse to the C:\Users folder. Right-click on your user account folder and rename it to whatever you like.

    rename-user-profile

  3. Press the Windows key + R to open the Run box. Type regedit and hit Enter.
  4. When the Registry Editor opens, navigate to the following registry location:
    HKEY_LOCAL_MACHINE\SOFTWARE\Microsoft\Windows NT\CurrentVersion\ProfileList\
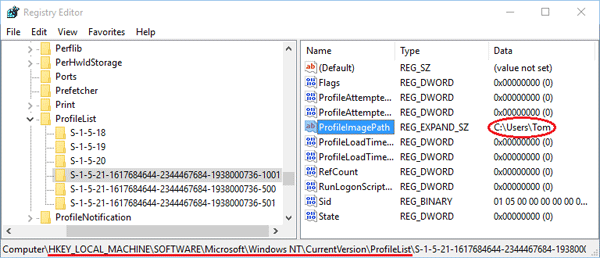
  5. Under the ProfileList subkey you will find a few subfolders (starting with ‘S-1-5-‘) that are named with the SID of Windows user accounts. Find the SID for your user account whose profile folder you just renamed. You can simply open each subfolder and check the ProfileImagePath path for the correct one.

    profile-image-path

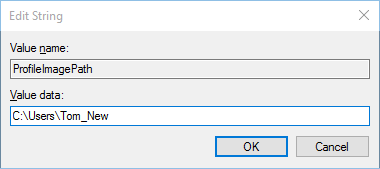
  6. In the right-pane, double-click the ProfileImagePath value and change the user profile path to your desired name. In my example, I renamed the account folder from C:\Users\Tom to C:\Users\Tom_New.

    change-profile-path

  7. Close the Registry Editor window. Logout of the Administrator account and log in with your user account. Everything should work fine – all your apps and files should be intact and your user folder should have been renamed.

Move the Entire User Profiles to Another Drive in Windows 10, 8 and 7

$
0
0

There are times when moving Windows user profiles off the default location is necessary, especially if there is no enough space on the system partition. In this tutorial we’ll walk you through the steps of moving the entire Users profile directory (for example, C:\Users) to another drive in Windows 10, 8 and 7. This method will also change the default profile location so any new users that’re created later will have their profiles located under your new location.

How to Move the Windows User Profiles to Another Drive?

  1. Before getting started, you need to create a temporary administrator account, which can be deleted after moving the user profiles.
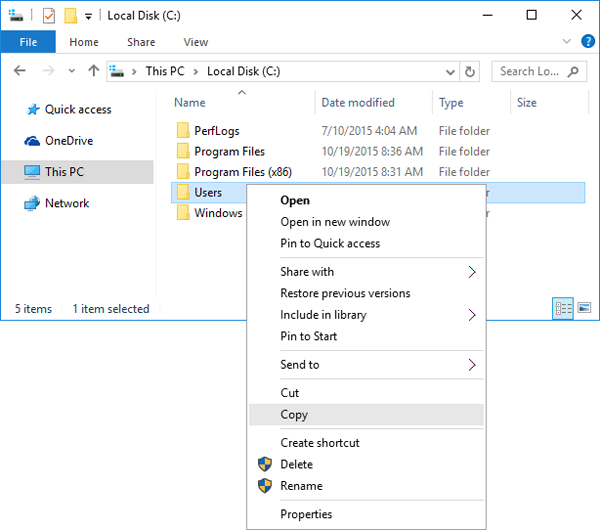
  2. Log in to Windows with the temporary administrator account. Open Windows Explorer and browse to the root path of your system drive. Right-click on the Users folder and copy the entire folder to the new location (e.g. from C:\Users to E:\Users).

    copy-windows-profiles

    During the copying process, there are some temporary files that are locked and would not copy. Just skip those files.

  3. Press the Windows key + R to open the Run box. Type regedit and hit Enter to launch the Registry Editor.
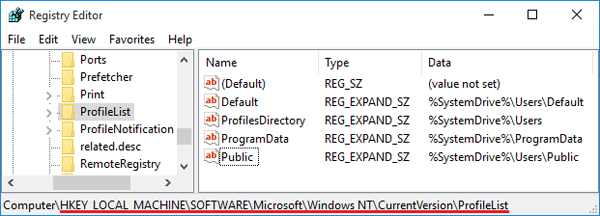
  4. In the left side of Registry Editor, locate and then click the following registry subkey:
    HKEY_LOCAL_MACHINE\SOFTWARE\Microsoft\Windows NT\CurrentVersion\ProfileList

    profilelist

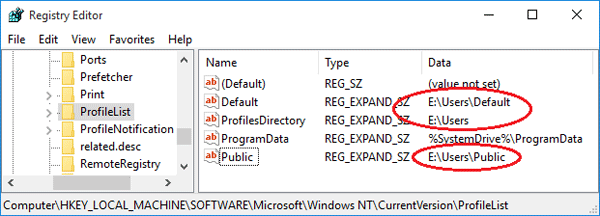
  5. In the right pane, we need to modify the value for these entries: Default, ProfilesDirectory and Public. Replace %SystemDrive%\Users with your new profile directory, such as E:\Users. After modifying the values, it should look like as the following screenshot.

    change-profile-directory

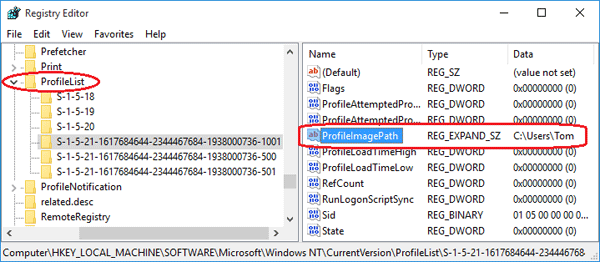
  6. Expand the ProfileList node at the left side, you’ll see several subkeys (starting with ‘S-1-5-‘) that are named with the SID of your user accounts. Open each subkey and check the ProfileImagePath entry. If it’s pointed to your old profile folder, change the value to the new user profile location (e.g. C:\Users\Tom to E:\Users\Tom).

    profileimagepath

  7. Now close the Registry Editor. Restart your computer and log in as your usual user. Everything should be working correctly except for programs that use a hardcoded user profile location.
  8. Now you can then rename or delete the original user profile and remove the temporary administrator account. From now on, any new user that logs to this computer will also have his/her profile stored in the newly specified location.

Make Windows 10/8 Show All User Accounts on Login Screen

$
0
0

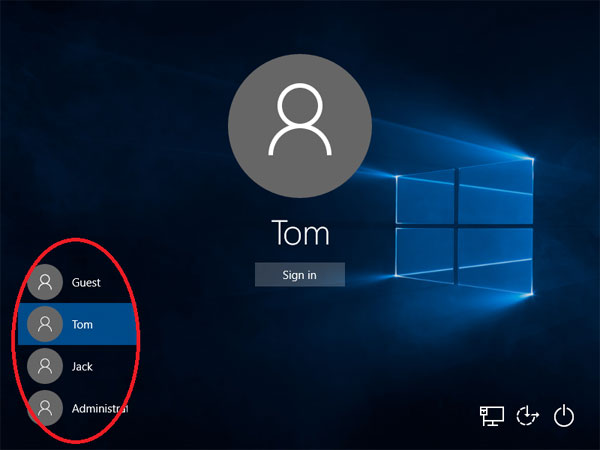
How do I make Windows 10 always display all user accounts on the login screen when I turn on or restart the computer? By default, Windows 10 or 8 will display only the last logged-on user on the sign-in screen. If your user doesn’t have a password, the system will automatically log in to that user account even if you haven’t enabled the automatic logon feature.

show-windows-user-list

In this tutorial we’ll show you how to make Windows 10 / 8 show a list of all user accounts on the login screen, rather than just the last logged in user. The procedure requires you to use Task Scheduler to run a batch file.

How to Make Windows 10/8 Show All User Accounts on Login Screen?

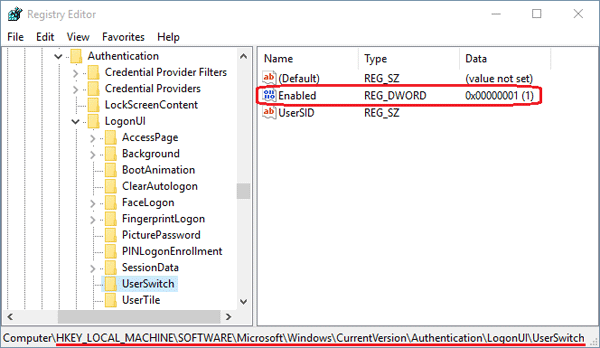
To have Windows 10/8 display all user accounts on the sign-in screen, all you need to do is access the following registry key and set the value of Enabled to 1.

HKEY_LOCAL_MACHINE\SOFTWARE\Microsoft\Windows\CurrentVersion\Authentication\LogonUI\UserSwitch

UserSwitch

However, the system will automatically restore the Enabled value back to 0 when a user logs on. To force Windows to always show all user accounts, we have to create a scheduled task that changes the Enabled value to 1 at logon. Here’s how:

  1. Before getting started, we need to create a batch file. Just open Notepad, copy the following command line and paste it into the file, next save the file as UserSwitch.bat.
    REG ADD HKLM\SOFTWARE\Microsoft\Windows\CurrentVersion\Authentication\LogonUI\UserSwitch /v Enabled /t REG_DWORD /d 1 /f

    userswitch-batch

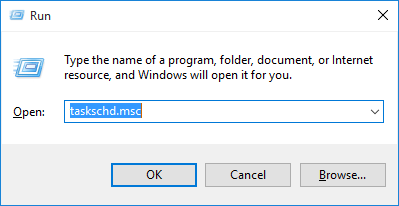
  2. Press the Windows key + R to bring up the Run box. Type taskschd.msc and hit Enter to launch Task Scheduler.

    taskschd

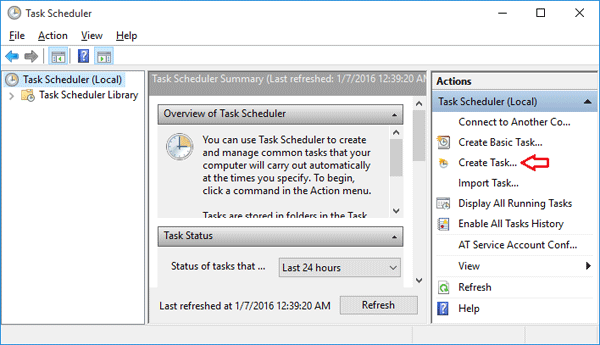
  3. When the Task Scheduler window opens, click the Create Task link in the Actions panel.

    task-scheduler

  4. On the next dialog, go to General tab. Give your task a Name so that you can identify it among other if when you decide to make some changes later. Select the “Run whether user is logged on or not” option and tick the “Do not store password” box, and check the “Run with highest privileges” check box.

    create-task-general

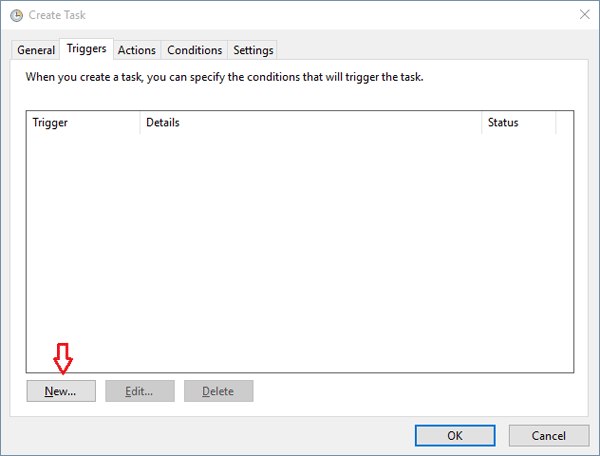
  5. Next, switch to the Triggers tab. Click on the New button on the bottom left of the window to define trigger details.

    create-task-triggers

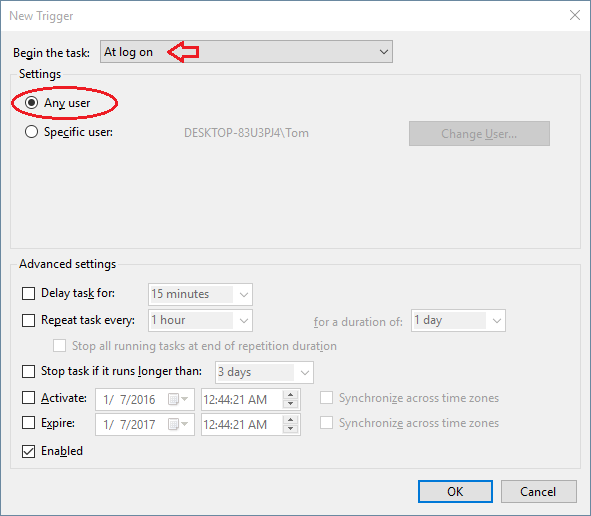
  6. The New Trigger dialog box should open. Select At log on from the Begin the task drop-down menu and select the Any user option. Leave all the other settings as they are and click OK.

    new-trigger

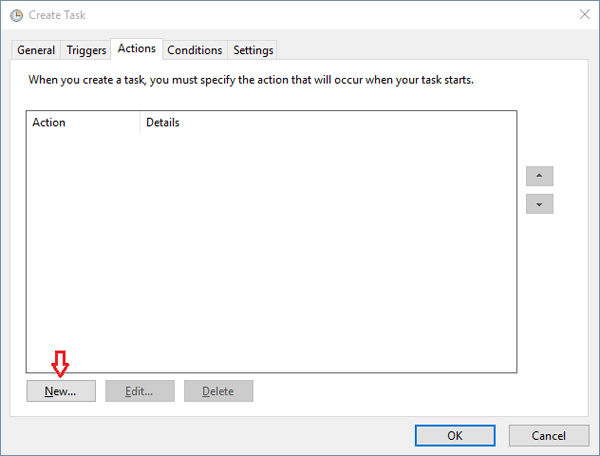
  7. Back on the Create Task window, switch to the Actions tab and click the New button.

    create-task-actions

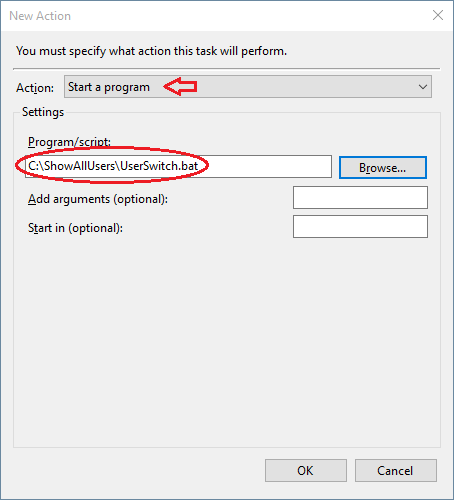
  8. When you see the New Action dialog box, select Start a program from the Action drop-down menu. Click the Browse button and locate the ShowAllUsers.bat file we have created previously. Click OK.

    new-action

  9. You don’t need to change anything on the Conditions or Settings tabs, so just click OK to close the Create Task dialog box and your task is ready to run.
  10. Log off and then log back into your user account, this task will automatically run and change the Enabled registry value. The next time you reboot or start your computer, you will always see that all user accounts are displayed on Windows 10/8 login screen.

Note: If your task is created correctly but the login screen only displays “Other user” that requires you to type username and password, it’s likely that you’ve enabled the group policy “Interactive Logon: Do not display last username“, and you have to disable it.

How to Reset Linx 7 / 8 / 10 Tablet Password with A Bootable USB Drive

$
0
0

Forgot Windows user password for your Linx 1010 tablet? Linx is one of the cheapest Windows tablet we’ve seen yet, and it can boot in UEFI mode only. You might have no luck getting the tablet to load some traditional password resetting Live CDs, because it doesn’t support legacy BIOS boot. In this article we’ll explain how to reset Linx 7 /8 / 10 tablet password by booting from a UEFI compatible USB drive.

Part 1: Create A UEFI Compatible USB Drive

Before resetting Linx password, you need to create a UEFI compatible bootdisk (a USB flash drive or USB memory stick) from another computer you have access to. Here’s how to make such a disk:

  1. Download the 32-bit version of PCUnlocker Enterprise (trial version) and save it to your local hard drive. Extract the downloaded .zip file and you’ll see two files: pcunlocker.iso and ReadMe.txt.
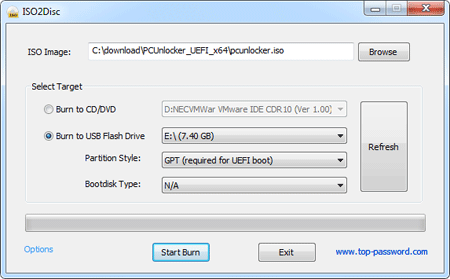
  2. Download and install the free LiveUSB creating tool ISO2Disc, which allows you to create a bootable USB drive directly from a CD image.
  3. Launch ISO2Disc, and click on Browse to select the pcunlocker.iso you just extracted. Click “Burn to USB Flash Drive” and select the drive letter for your attached USB stick.

  4. Set the partition scheme to “GPT (required for UEFI boot)” and click on Start Burn. The program will format / erase your USB drive with FAT32, create a GPT partition table and copy the contents of the ISO file to your USB drive.
  5. When the burning process is complete, you can take the USB drive to reset your Linx tablet password.

Part 2: Boot Linx Tablet from USB

As the Linx tablet doesn’t come with a full-size USB port, you need to connect your created USB drive with a USB OTG adapter. You will have to access the BIOS (UEFI) Setup and modify the boot sequence. Here are 3 ways to access the BIOS Setup:

  • Press and hold the F7, DEL or ESC key while powering on the Linx tablet, if you have a physical keyboard.
  • Hold down the Power button and Volume+ at the same time. This will load up a screen with various options.
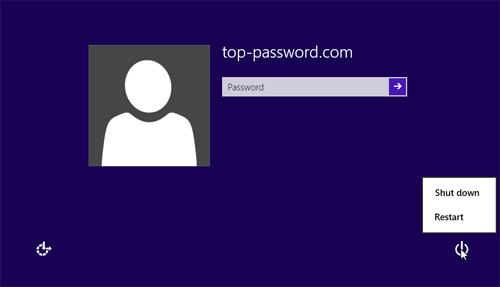
  • Access the BIOS from Windows 10/8 login screen: Hold down the SHIFT key and click on the Power icon on the screen, then choose Restart option. Next click Troubleshoot -> Advanced Options -> UEFI Firmware Settings -> Restart.

After getting into BIOS Configuration Utility, use the arrow keys on your keyboard to select the Boot tab. Under Boot options priority, set your USB drive as the first boot media. Save your changes and the next time your tablet will boot from USB drive instead of hard drive.

Part 3: Reset Windows User Password

After booting from USB, the touch screen might not work and you have to operate with a USB keyboard or mouse. Here’s how to reset your lost user password:

  1. Once booted to the PCUnlocker program, you’ll see a list of local accounts for your Windows installation. If you use a Microsoft account login, there should be a local account that is linked to your Microsoft account, with your email address displayed under the “Description” column.

  2. Select a local account and click on “Reset Password” button, it will remove your password in no time. If your selected account is associated with your Windows Live email, the program will also switch your Microsoft account to local account.
  3. When it’s done, reboot your tablet and disconnect the USB drive. You can then log back into your Linx tablet without a password!

Windows 10 Downgrade: Revert Back to Previous Windows 8 or 7

$
0
0

Microsoft offers Windows 10 as a free upgrade for Windows 8 and Windows 7 users. You only have one month to decide if you want to keep Windows 10 or not after upgrading from Windows 8 or 7. If you find out some things don’t work properly or the new OS is not suitable for your taste, you can downgrade or revert back to your previous Windows 8 or 7 system.

How to Revert Windows 10 Back to Previous Operating System?

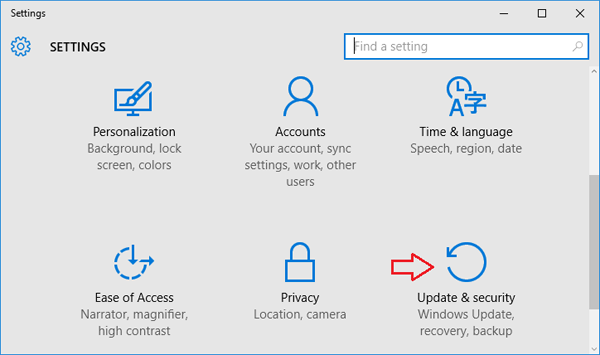
  1. Press the Windows key + I to launch PC Settings app. You can also open it by clicking the Start button at the bottom left of the screen and then select Settings.
  2. Click Update & security.

    pc-settings

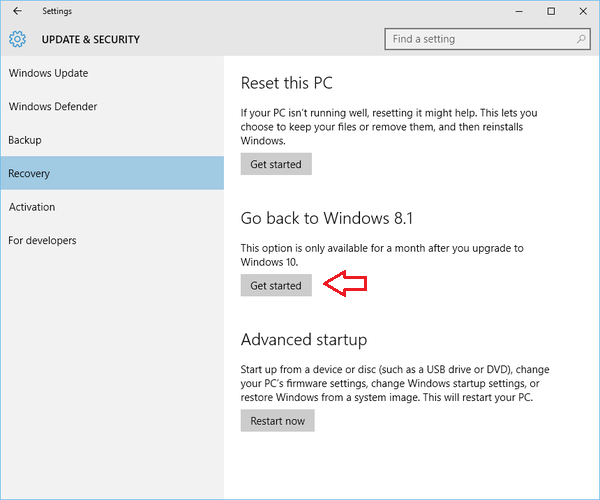
  3. Select the Recovery tab from the left side. If you’re eligible to downgrade you should see an option that says Go back to Windows 8.1 or Go back to Windows 7. If you see it, click Get started to go through the downgrade process.

    windows-10-downgrade

  4. The whole process should not take longer than 10 minutes or so, and your system will be just as it was before Windows 10.

If you don’t see this downgrade option, that’s possible because it’s been too long since you upgraded to Windows 10. Windows 10 will automatically remove these installation files after 30 days.

How to Know Your Windows is 32-bit or 64-bit

$
0
0

All versions of Windows are available in two different flavors: 32-bit and 64-bit. For most people, whether they use a 32-bit or 64-bit version of Windows doesn’t make a difference. But it’s necessary to find out your running Windows is 32-bit or 64-bit when performing certain tasks, such as install drivers for your new device. Here are 3 simple ways to know your Windows is 32-bit or 64-bit.

Method 1: Right-click on My Computer

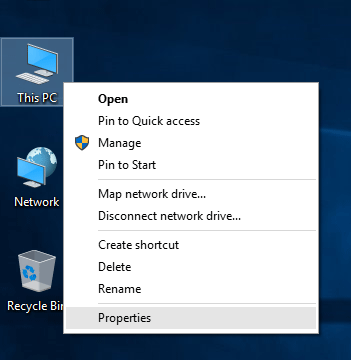
Simply right-click on “My Computer” (or “This PC” if you’re running Windows 10) icon on your desktop, and then select Properties from the drop-down context menu.

my-computer-properties

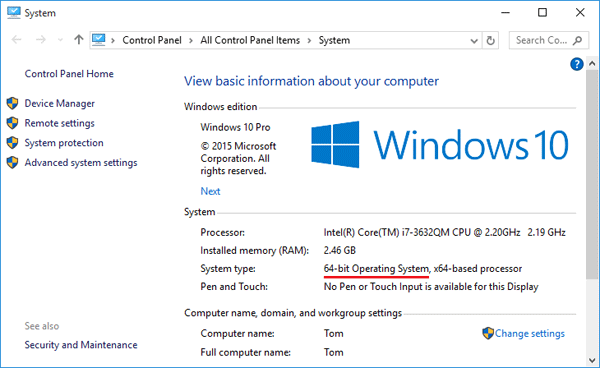
The System Control Panel will now open. In this screen you will see various information about your computer and Windows. The System type field indicates whether your computer are running a 32-bit or 64-bit version of Windows.

system-info

Method 2: Use the MSINFO32 Command

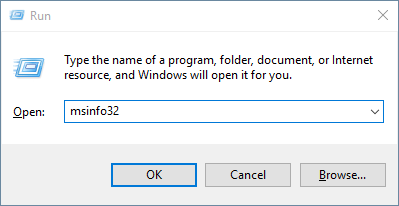
Press the Windows key + R on your keyboard to open the Run dialog. Type msinfo32 and hit Enter.

msinfo32

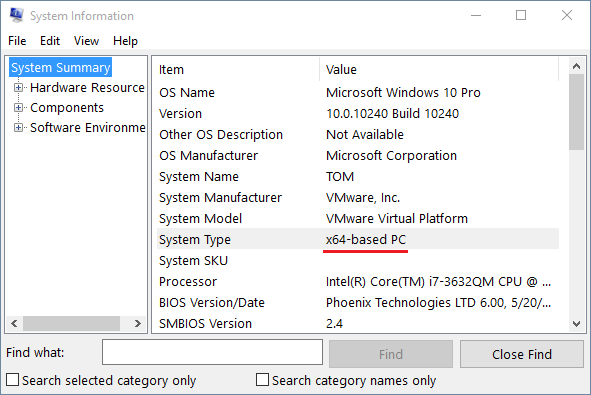
This opens the System Information window which shows details of almost everything in the system. Click the System Summary node on the left, then locate the System Type entry. If it’s x64-based PC, you’re running 64-bit Windows. If it’s x86-based PC, your Windows is 32-bit.

system-information

Method 3: Check the Program Files (x86) Folder

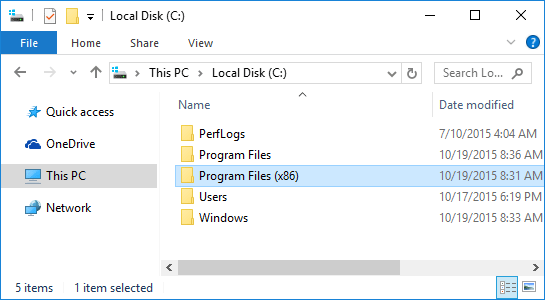
For purposes of backward compatibility, 64-bit version of Windows needs to run both 64-bit and 32-bit programs. 32-bit application are installed in the “Program Files (x86)” folder but native 64-bit application run in the normal “Program Files” folder.

program-files-x86

So if you can see the “Program Files (x86)” folder under the root path of your system partition, your Windows is 64-bit. Otherwise it’s 32-bit OS.

Enable / Disable Fast User Switching in Windows 10, 8, 7 and Vista

$
0
0

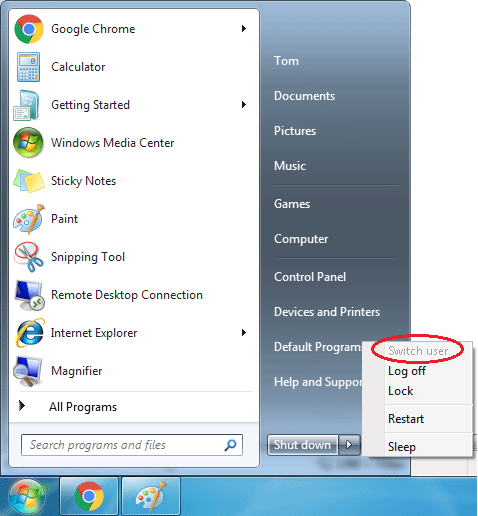
Fast user switching is disabled or missing on your Windows 10 system? Unable to switch to a different account as the “Switch user” option is greyed out?

win7-switch-user

In this tutorial we’ll show you 2 ways to enable or disable Fast User Switching in Windows 10, 8, 7 and Vista.

Method 1: Using Local Group Policy Editor

  1. Press the Windows key + R to open the Run dialog box. Type gpedit.msc and press Enter.
  2. The Local Group Policy Editor console should open. In the left pane, expand the following nodes:
    Local Computer Policy\Computer Configuration\Administrative Templates\System\Logon
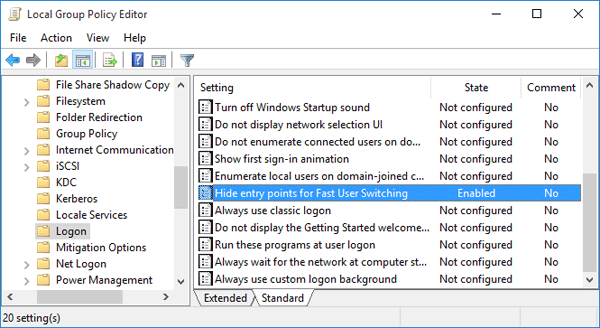
  3. In right-side pane, double-click on the “Hide entry points for Fast User Switching” policy and its properties screen will open.

    hide-fast-user-switch

  4. If you want to turn off / disable the Fast User Switching feature, set it to Enabled. Or click Disabled or “Not configured” to re-enable Fast User Switching.

By disabling the Fast User Switching feature, the “Switch user” option will be greyed out or removed from Windows logon screen,Start menu and the Task Manager.

Method 2: Using Registry Trick

Since Group Policy Editor doesn’t come with the Home and Starter editions of Windows, here is another method to enable / disable Fast User Switching using Registry Editor:

  1. Press the Windows key + R to open the Run dialog box. Type regedit and press Enter.
  2. In the Registry Editor window, navigate to the following key:
    HKEY_LOCAL_MACHINE\SOFTWARE\Microsoft\Windows\CurrentVersion\Policies\System
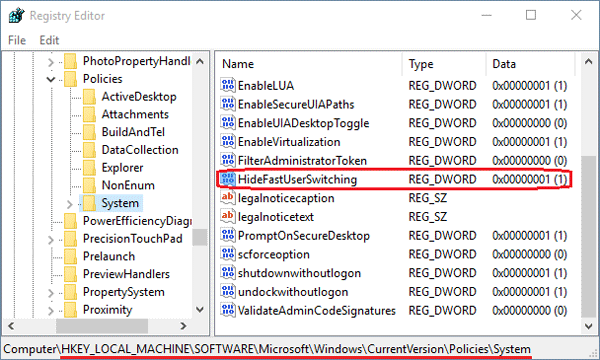
  3. In the right-side pane, search for the value named HideFastUserSwitching. If it doesn’t exist, you can create one by right-clicking in the empty space on the right pane and choose New –> DWORD (32-bit) Value.

    hide-fast-user-switching

  4. Set the Value data for HideFastUserSwitching to 1 if you want to disable the Fast User Switching feature. To re-enable it, change that value to 0.
  5. Close the Registry Editor. You will have to log off and then log back on for the changes to take effect.

5 Quick Ways to Open Task Manager in Windows 10 / 8

$
0
0

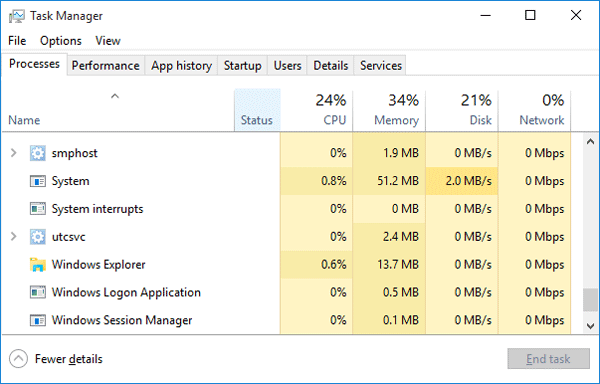
Task Manager is one of the most-used system utilities in Windows. We usually use it to check the overall performance of our computers or close a program that stops responding (hangs). There are multiple ways you can launch Task Manager. In this tutorial we’ll show you 5 quickest ways to open the Task Manager in Windows 10 and Windows 8.

task-manager

Option 1: Press Ctrl + Shift + Esc

Just press Ctrl + Shift + Esc key combination on your keyboard and it can open the Task Manager directly. This keyboard shortcut is a global hotkey, means it is available from any app you running and even when your Explorer shell is not running! This should be the simplest way to launch Task Manager.

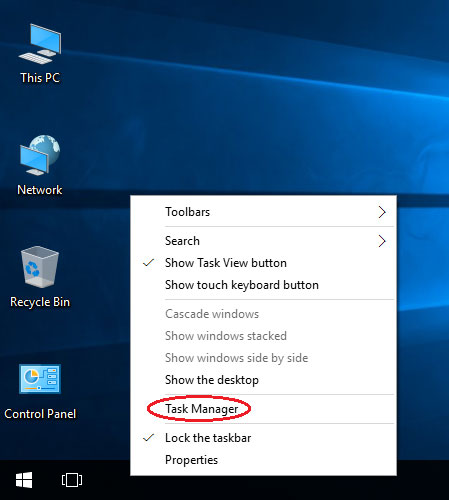
Option 2: Right-click Taskbar

Right-click the empty space on the taskbar, and then select “Task Manager” from the context menu. The Task Manager will launch immediately.

taskbar

This method allows you to use the mouse only and simply ignore the keyboard, making it the likely preferred method of those who like using the mouse instead of the keyboard.

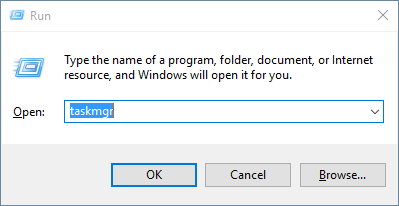
Option 3: Run taskmgr Command

Press the Windows key + R to open the Run box. Type taskmgr and hit Enter. It will also start the Task Manager.

run-box

If you’re at the Command Prompt, run the taskmgr command and you can also bring up the Task Manager.

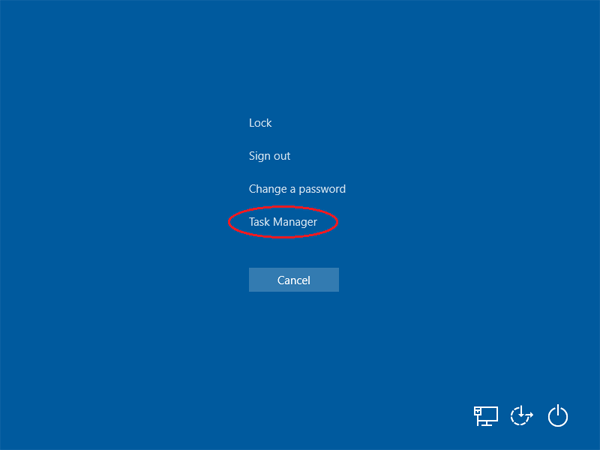
Option 4: Ctrl+Alt+Del

Press the Ctrl + Alt + Del keys together on the keyboard, the security screen should open. Click on the “Task Manager” option.

ctrl-alt-del

This action will open the Task Manager. This method is pretty helpful if your system is unresponsive for whatever reason.

Option 5: Win+X Menu

While all previous options are available in previous versions of Windows like Windows 7, Vista, XP etc, this method is exclusive for Windows 10 and Windows 8.

quick-access-menu

Press the Windows key + X keys together on the keyboard, pick the “Task Manager” item from the power user menu and it will open Task Manager.


How to Modify / Edit Hosts File in Windows 10 / 8

$
0
0

The hosts file is basically a plain text file that is used to map host names to IP addresses. It is located deep down in the Windows folder: C:\Windows\System32\Drivers\etc. In this tutorial we’ll show you how to modify / edit the hosts file in Windows 10 or 8, and use it to block opening of one or more particular websites.

Part 1: Edit Hosts File

You can use any text editor to open the hosts file. But you’ll get the “Access is denied” error when you try to save your changes back to the hosts file. By default, the hosts file is protected from user changes. Before editing, you need to take ownership of the hosts file so you have full permissions to it. Here’s how:

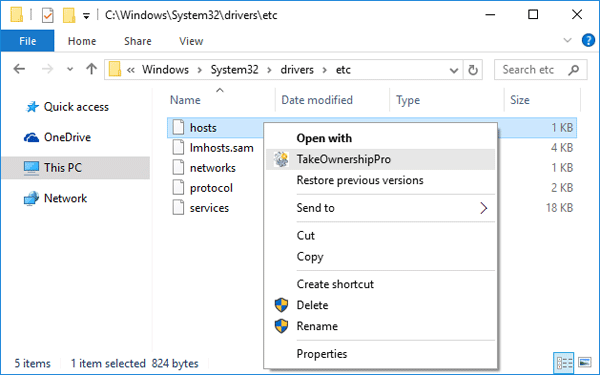
  1. Download and install the freeware TakeOwnershipPro on your local computer. After installing, it will add a TakeOwnershipPro shortcut to the right-click context menu.
  2. Browse to the folder C:\Windows\System32\Drivers\etc. Right-click on the hosts file and select “TakeOwnershipPro” from context menu.

    take-ownership

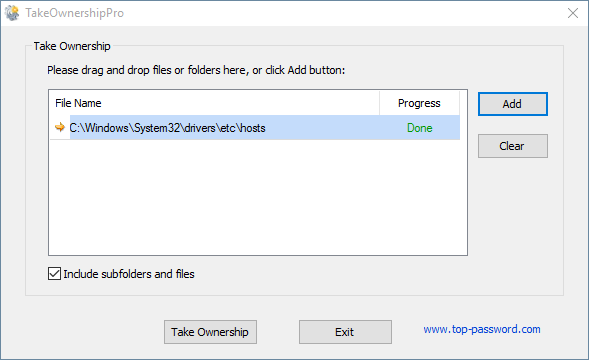
  3. When the popup window says the process of taking ownership is done. Click Exit to close it.

    TakeOwnershipPro

  4. Now the hosts file is ready to be modified.

Part 2: Block A Particular Website

The hosts file could be used to block access to any websites that you don’t want to visit. For example, lets say you want to prevent your computer from accessing the youtube.com website, simply add the following line to the end of the hosts file:

127.0.0.1 youtube.com

hosts

Once you’ve made the necessary changes, save it back to the hosts file and restart your computer for the changes to take effect.

Part 3: Prevent hijacking

Beware, the hosts file can also be used by viruses or malware to redirect you to phishing and other dangerous sites. To help prevent hijacking or unauthorized changes to the hosts file, consider making it read-only. Simply navigate to the hosts file with Windows Explorer: C:\Windows\System32\drivers\etc. Then right-click the hosts file, select Properties, check the Read-only attribute, and click OK.

Hide / Clear Most Used Programs in Windows 10, 8 and 7 Start Menu

$
0
0

My frequently used programs are missing from the Start menu. Can this be corrected and if so how? Thanks in advance.

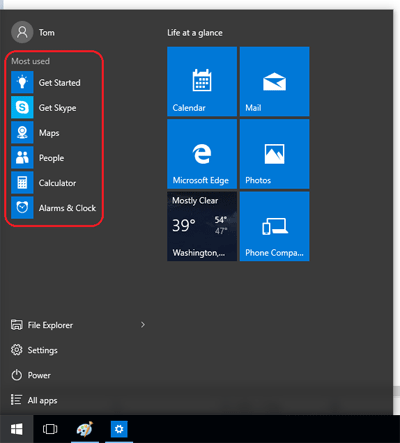
By default, Windows keeps track of programs you use frequently and puts them on the Start menu (or Start screen) for convenience. For privacy purposes, some of you may want to clear the most used programs from the list. In this tutorial we’ll show you how to hide / clear the most frequently / recently used programs in Windows 10, 8 and 7.

most-used-apps

The first part is for Windows 10 users and the second is for Windows 8 / 8.1 users, so you will have to scroll down if you use Windows 7 – the last part is for this operating system.

Part 1: Clear Most Used Programs from Windows 10 Start Menu

  1. Press the Windows key + I to bring up the Settings app. If you’re using a tablet without a keyboard, click the Start button and then select Settings.
  2. Click on Personalization.

    settings

  3. At the Personalization window, click on the Start tab on the left-hand side. On the right pane, you’ll see a few options for configuring what is shown on the Start Menu and how the Start Menu is displayed.
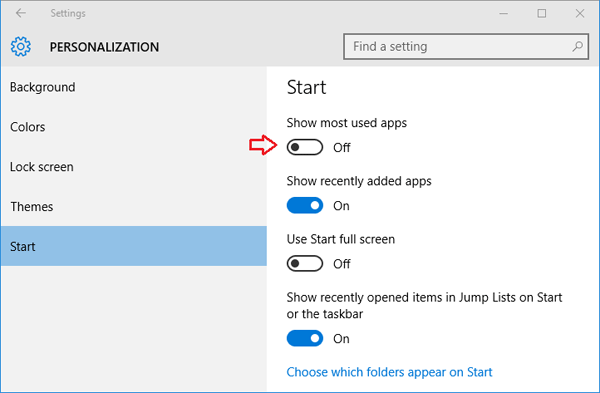
  4. From there, set toggle button under “Show most used apps” to Off in order to make Start menu hide the apps you use often.

    hide-show-most-used-apps

Part 2: Clear Most Used Programs from Windows 8 Start Screen

  1. Right-click on an empty space on the Taskbar and select Properties.
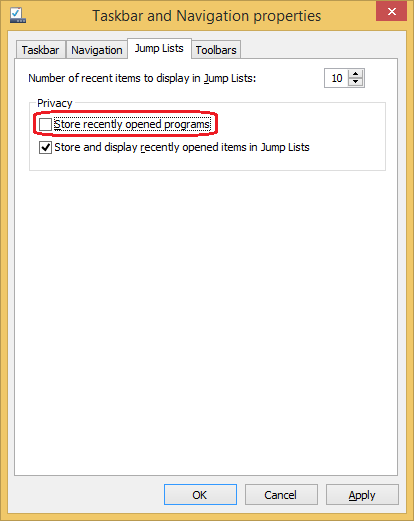
  2. Click on the Jump Lists tab, uncheck the “Store recently opened programs” box.

    jump-lists

  3. Click Apply and then click OK.

Part 3: Clear Most Used Programs from Windows 7 Start Menu

  1. Right-click on an empty space on the Taskbar and select Properties.
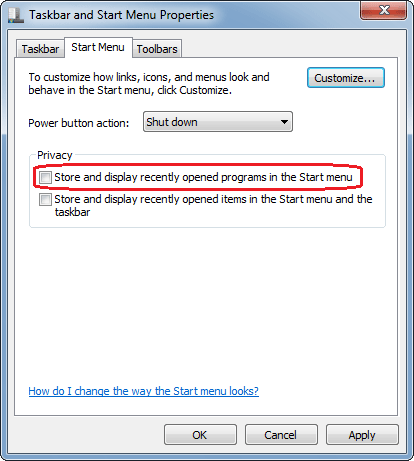
  2. Click on the Start Menu tab, uncheck the “Store and display recently opened programs in the Start menu” box.

    hide-recently-opened-apps

    If you also want to hide your recently opened documents/files from the Start menu, uncheck the “Store and display recently opened items in the Start menu and the taskbar” box as well.

  3. Click Apply and then click OK.

2 Options to Remove the Lock Option from Windows Start Menu

$
0
0

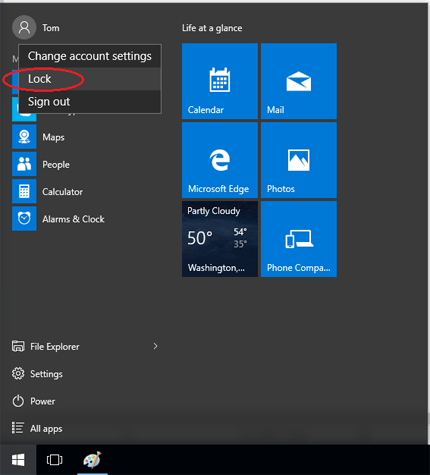
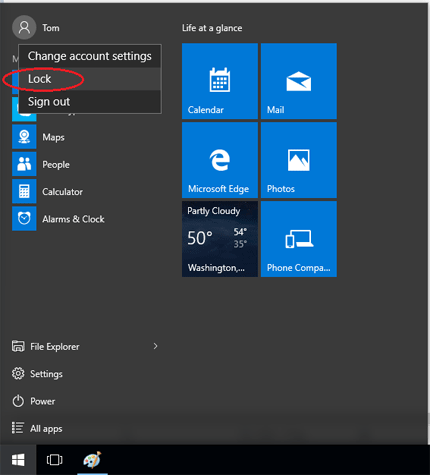
No matter what version of Windows you are running, you can find the lock option in the Start Menu (or Start Screen) that allows you to lock your computer. In this tutorial we’ll show you 2 ways to disable / remove the lock option from Windows 10, 8 and 7 Start menu.

account-lock-option

Method 1: Remove the Lock Option with Group Policy

Follow this method and you can remove the lock option from the user tile menu on the Start menu (or Start screen) in Windows 10, 8.1 or 8.

  1. Press the Windows key + R to open the Run box. Type gpedit.msc and press Enter.
  2. When the Local Group Policy Editor opens, expand the tree to the following path:
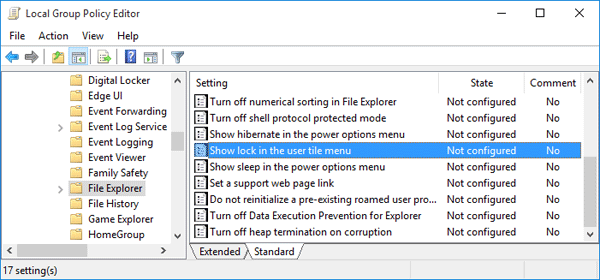
    Local Computer Policy\Computer Configuration\Administrative Templates\Windows Components\File Explorer
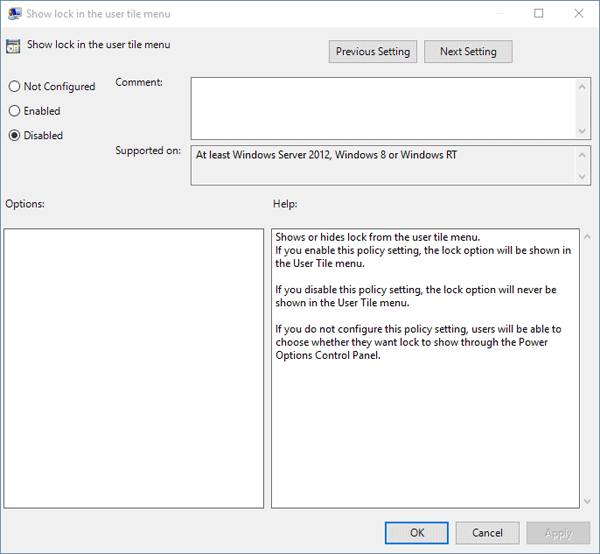
  3. In the right-hand pane you should now see a variety of settings. Double-click on the “Show lock in the user tile menu” setting and its properties screen will open.

    show-lock-in-user-menu

  4. Set it to Disabled and click OK.

    disable-lock-in-user-menu

    Now close the Local Group Policy Editor window. You’ll see the lock option is disabled or removed from the Start menu.

Method 2: Remove the Lock Option with Registry Hack

If the Group Policy Editor is not available in your computer or you’re running Windows 7, then use this registry hack to disable the lock option from your Windows Start menu.

  1. Press the Windows key + R to open the Run box. Type regedit and press Enter.
  2. When the Registry Editor opens, browse down to the following key:
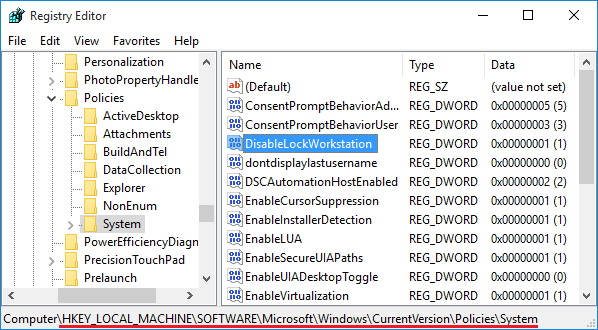
    HKEY_LOCAL_MACHINE\SOFTWARE\Microsoft\Windows\CurrentVersion\Policies\System
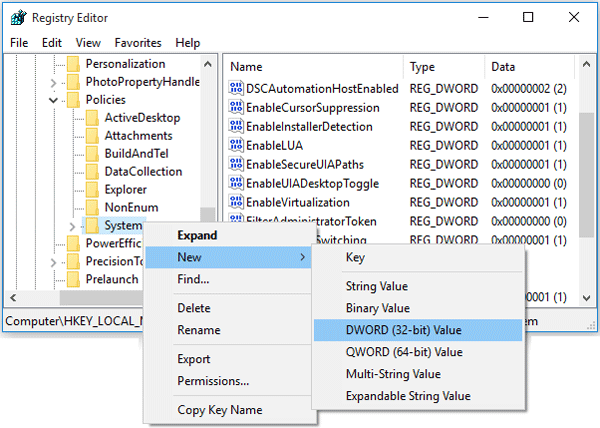
  3. Right-click on the System key on the left pane and select New -> DWORD (32 bit) Value.

    new-dword-value

  4. Name it DisableLockWorkstation and set the value to 1 in order to disable the lock option in the Start menu.

    disable-lock-workstation

    If you want to show / enable the lock option later on, just change the value to 0.

  5. Close the Registry Editor and you will see the lock option turns gray or disappeared from the Start menu.

Enable / Disable Lock Workstation Feature in Windows 10 / 8 / 7 and Vista

$
0
0

In previous post we’ve covered 3 ways to lock a Windows computer. If you are unable to lock your Windows system or want to disable the computer lock option completely, here’s how you can enable / disable lock workstation feature in Windows 10, 8, 7 and Vista. When the lock feature is disabled, you will be unable to lock your computer by either pressing Windows + L, Ctrl + Alt + Del, or clicking the Lock option from the Start menu.

account-lock-option

How to Enable / Disable Lock Workstation Feature?

  1. Press the Windows + R key combination to bring up a run box, type gpedit.msc and hit Enter.
  2. When the Local Group Policy Editor opens navigate to:
    User Configuration\System\Ctrl+Alt+Del Options
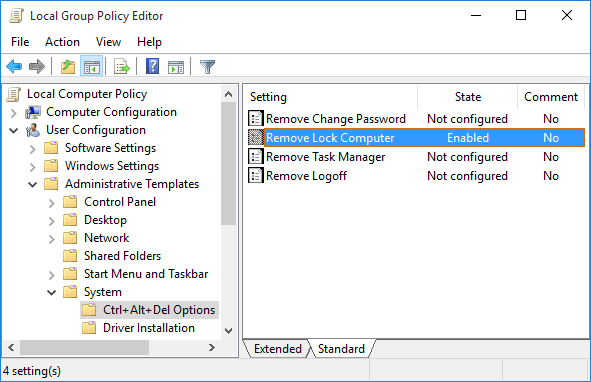
  3. On the right hand side you should see a setting called “Remove Lock Computer“. Double-click on it.
  4. Then change the radio button over to Enabled if you want to disable the lock workstation feature.

    ctrl-alt-del-options

    To enable this feature later, just change it to Disabled or Not Configured. Click OK to save your changes.

  5. Now you will need to enforce the updated policy to take effect on your PC, to do this press the Windows + R key combination, when the Run box open run:
    gpupdate /force
  6. Once you press enter you Local Group Policy will be automatically updated. Windows will no longer show the lock option when that you press the Windows key + L or Ctrl+Alt+Delete keyboard combination.

2 Ways to Repair Corrupt or Missing System Files in Windows 10 / 8

$
0
0

Did you accidentally deleted a vital system file? Windows failed to load because of missing or corrupt system files? In this tutorial we’ll show you how to repair corrupt or missing system files using the Windows built-in command line utility – SFC (System File Checker). SFC is built into Windows 10/8/7/Vista that can scan your system files for corruption or modification. If a file is missing or modified, it will automatically replace that file with the correct version.

When your Windows system won’t load normally, start it in Safe Mode or boot off Windows Setup DVD, and you can also use the SFC command to repair corrupt or missing system files, without having to reinstall the whole OS.

Note: Though these guides are written for Windows 10 and Windows 8, a very similar process will work for Windows 7, Vista or XP.

Method 1: Repair System Files After Logging into Windows

  1. Open an elevated Command Prompt. To do this, press the Windows key + X to open the Quick Access menu and then select “Command Prompt (Admin)“.
  2. In the Command Prompt, run the following command:
    sfc /scannow

    sfc

  3. Just keep waiting & be patient because running this command will take quite a bit of time. The scan results will be shown after this process is finished. If you see a “Windows Resource Protection found corrupt files but was unable to fix some of them” message, try reboot into Safe Mode and run the SFC command again, or try the method below.

Method 2: Repair System Files Offline When Windows Won’t Boot

If Windows cannot start because some of system files are corrupted or missing, just boot your computer from Windows Installation DVD and you can repair the system files offline. If you don’t have a Windows Installation DVD, you can borrow one from a friend or use a Recovery Drive created in any computer running Windows 10/8.

  1. Insert the Windows Installation DVD and set up your computer to boot from optical drive (You might need to change the boot priority in the UEFI / BIOS). Press a key when prompted to boot from DVD.
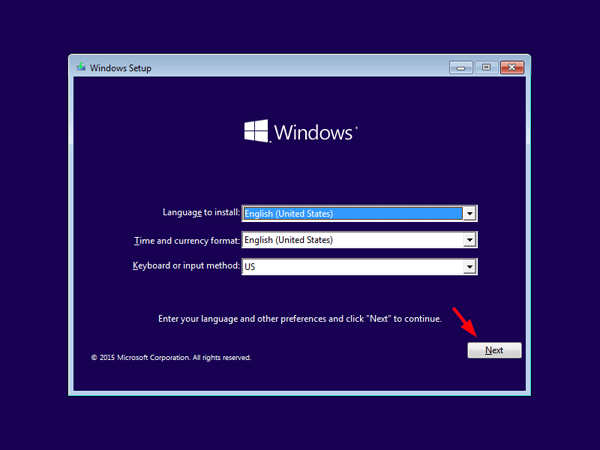
  2. Once booted to the DVD, you’ll see the familiar Windows installation language-selection screen. Click Next.

    windows-10-setup

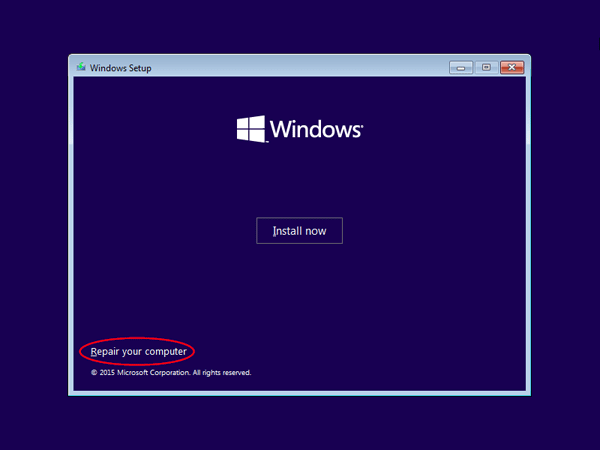
  3. Click on “Repair your computer“.

    repair-your-computer

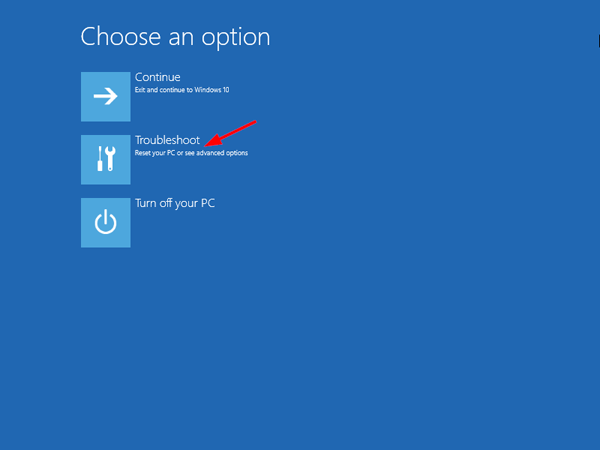
  4. When you are asked to choose an option for how you want to continue. Click Troubleshoot.

    toubleshoot

  5. Next click “Advanced options“.

    advanced-options

  6. On the next screen, click “Command Prompt“.

    command-prompt

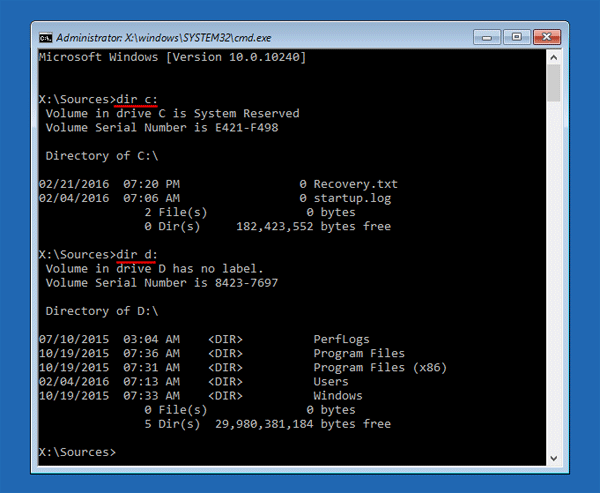
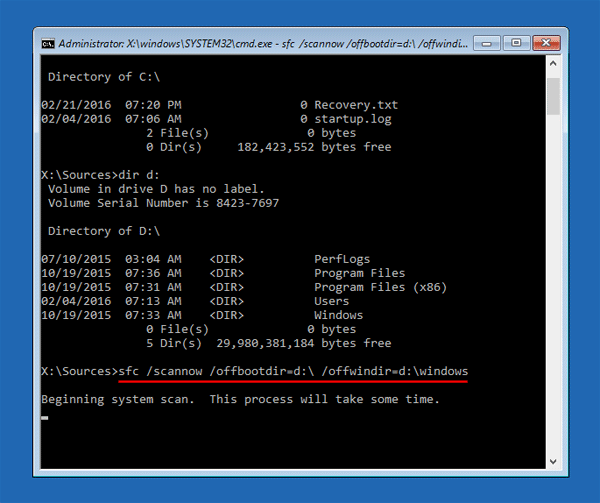
  7. In the Command Prompt, use the dir command to find the drive letter of your Windows partition. In my example, C:\ is the System Reserved partition and D:\ is my actual Windows partition.

    find-os-partition

  8. Now run the SFC command to repair your Windows installation. It will scan all your system files, identify those that are corrupt or missing and try to fix the problems it find.
    sfc /scannow /offbootdir=D:\ /offwindir=D:\windows

    repair-damaged-files

    Remember to replace D:\ with the actual drive letter of your Windows partition.

When the scan is complete, remove the installation DVD and restart your computer to check if your problem is fixed. To perform the recovery experiment, I intentionally deleted a system file c:\windows\system32\sechc.exe, and the file can be restored successfully by running the SFC command.

Viewing all 396 articles
Browse latest View live